
Manage the charging network
Management of a charging network
Managing a charging network enables administrators to organise the network, ensure that members have access to the correct charging points, guarantee accurate pricing and keep network information up to date. As your network grows, regular management helps to provide a better charging experience whilst ensuring security and operational efficiency.
This page explains all aspects of managing an existing charging network, including editing network information, managing charging points, configuring price profiles, inviting members and deleting the network.
Setting up a charging system
To manage an existing network:
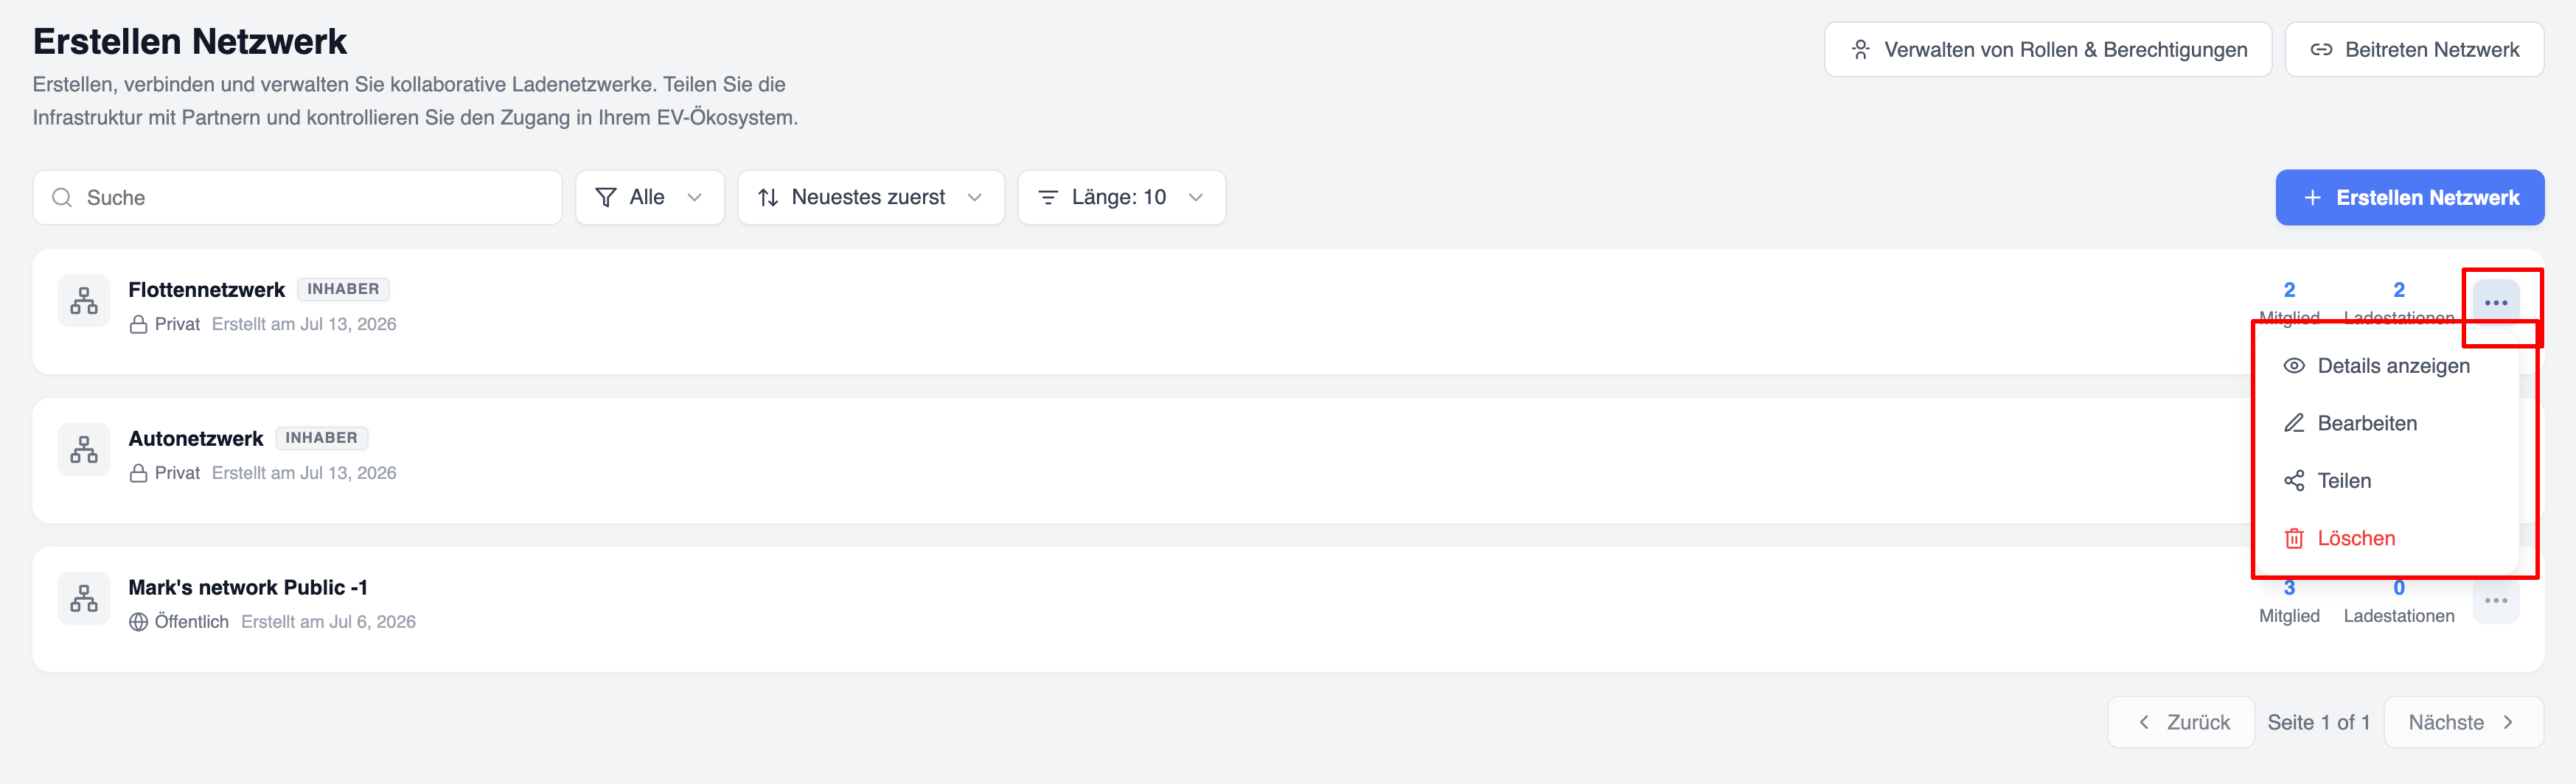
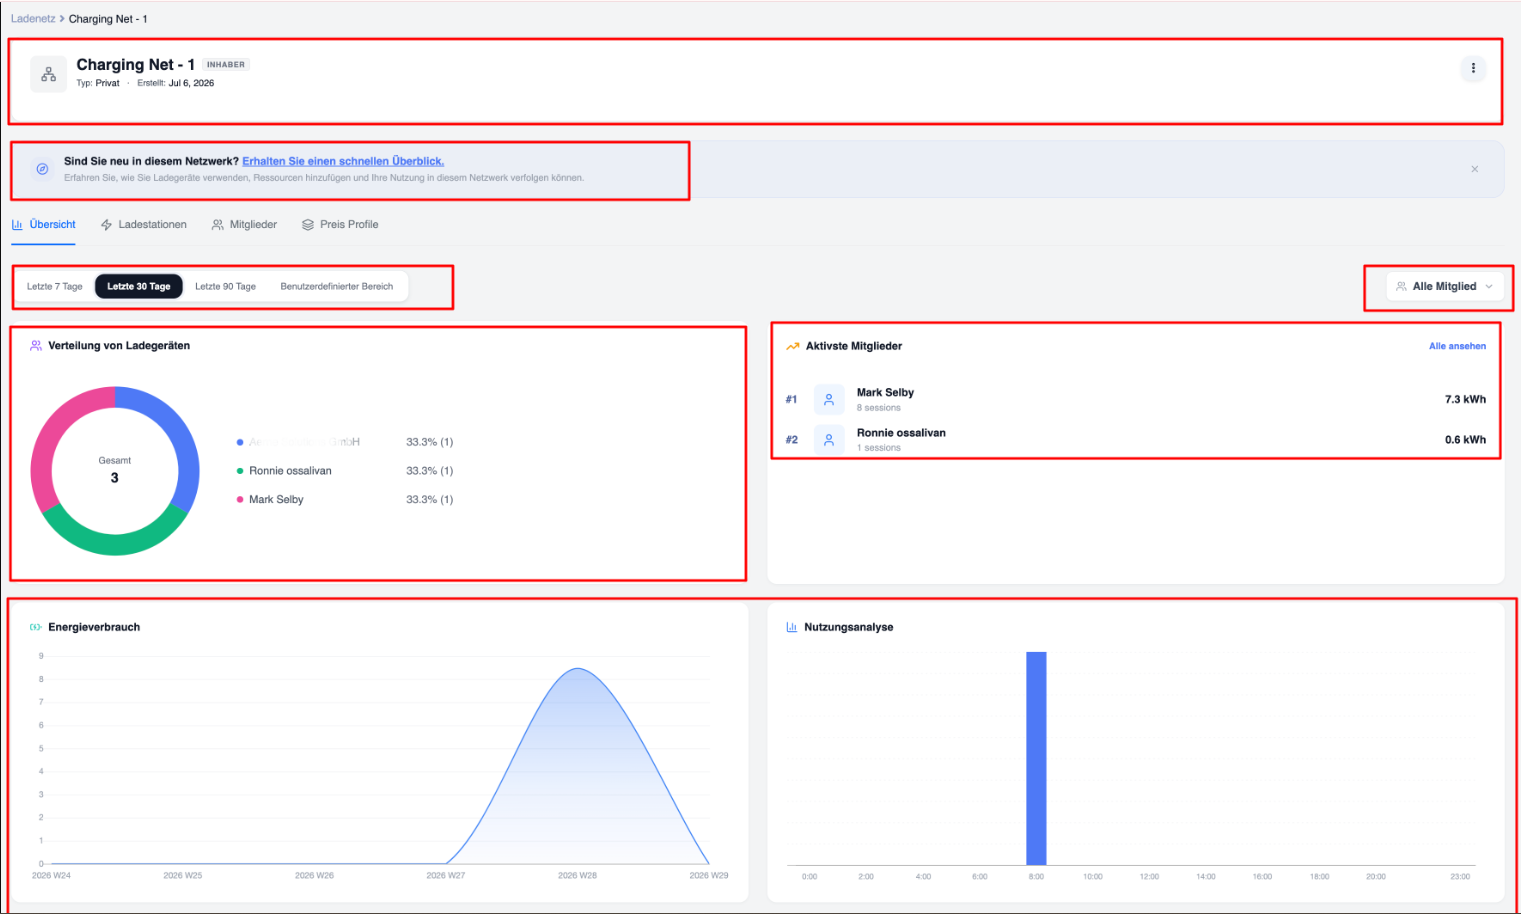
The network management page contains several tabs, each dedicated to a specific management area.
Typical tabs include:
-
Overview
-
Charging points
-
Members
-
Pricing profiles
Edit network information
Network information can be updated at any time to reflect organisational changes or to improve clarity for members.
To edit network information:
-
Open the required charging network.
-
Click the ‘Edit network’ button.
-
Update the relevant fields.
-
Save your changes.
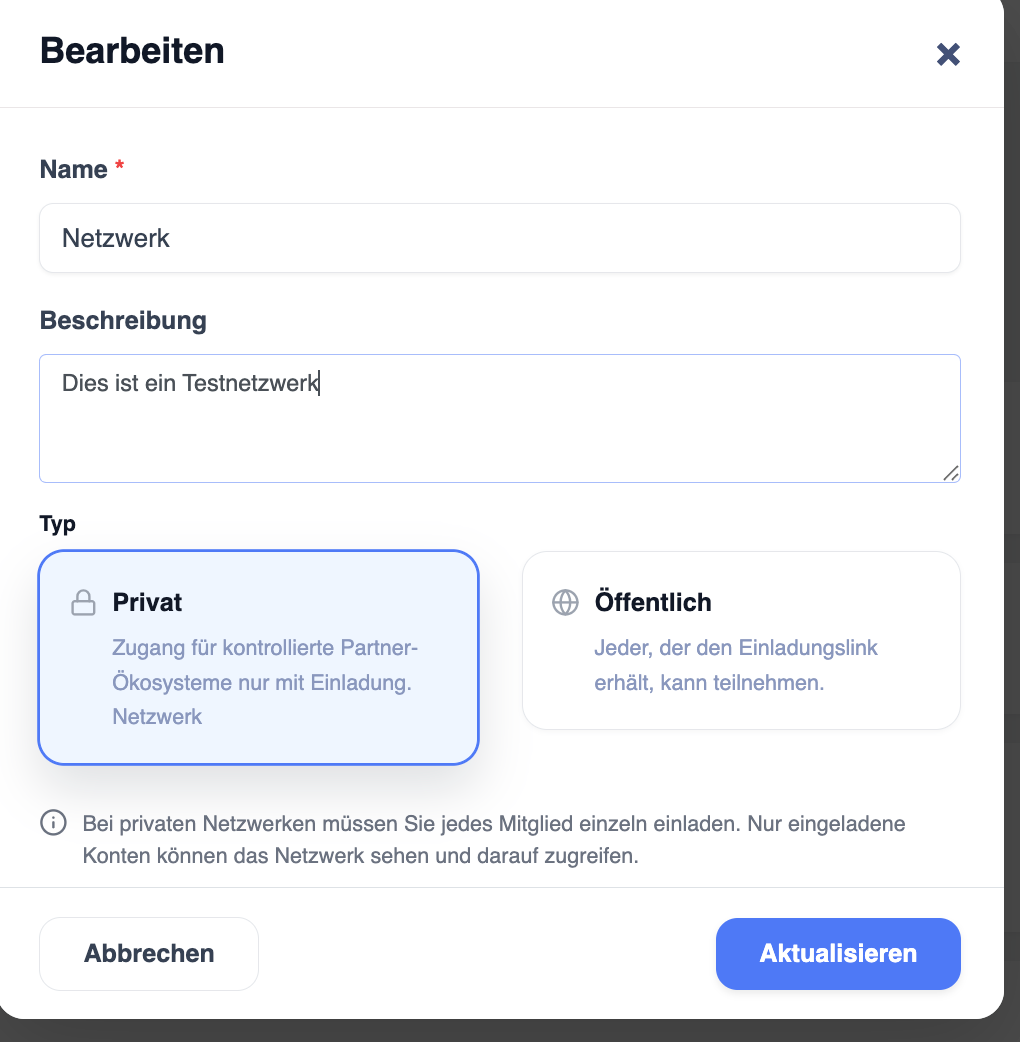
You can change the following information:
Network name
The network name is displayed throughout the platform and should clearly indicate the purpose of the network.
Choose a meaningful name that members can easily recognise.
Description
The description provides additional information about the network.
A good description might include the following:
-
Purpose of the network
-
Target audience
-
Operating rules
-
Availability of charging points
-
Contact details
Network visibility
Depending on your system configuration, you may be able to change the network visibility.
Private network
Only invited members can access the network.
The network does not appear in the list of public networks.
Public network
The network can be found by all users via the ‘Public Networks’ page.
Users can join directly via the ‘Join network’ option or via the link.
Note: Converting a public network into a private network does not automatically remove existing members. Existing memberships remain active unless they are manually removed.
Managing charging points
Charging points are the most important component of any charging network.
Only charging points assigned to the network can be used by its members.
Administrators should regularly check the allocation of charging points to ensure that the network reflects the current state of the infrastructure.
View assigned charging points
Open the ‘Charging Points’ tab.
The charging point list displays information such as:
-
Charging point name
-
Charger ID
-
Current status
-
Location
-
Date added
- Manufacturer
- Power
- Charging sessions (via the network)
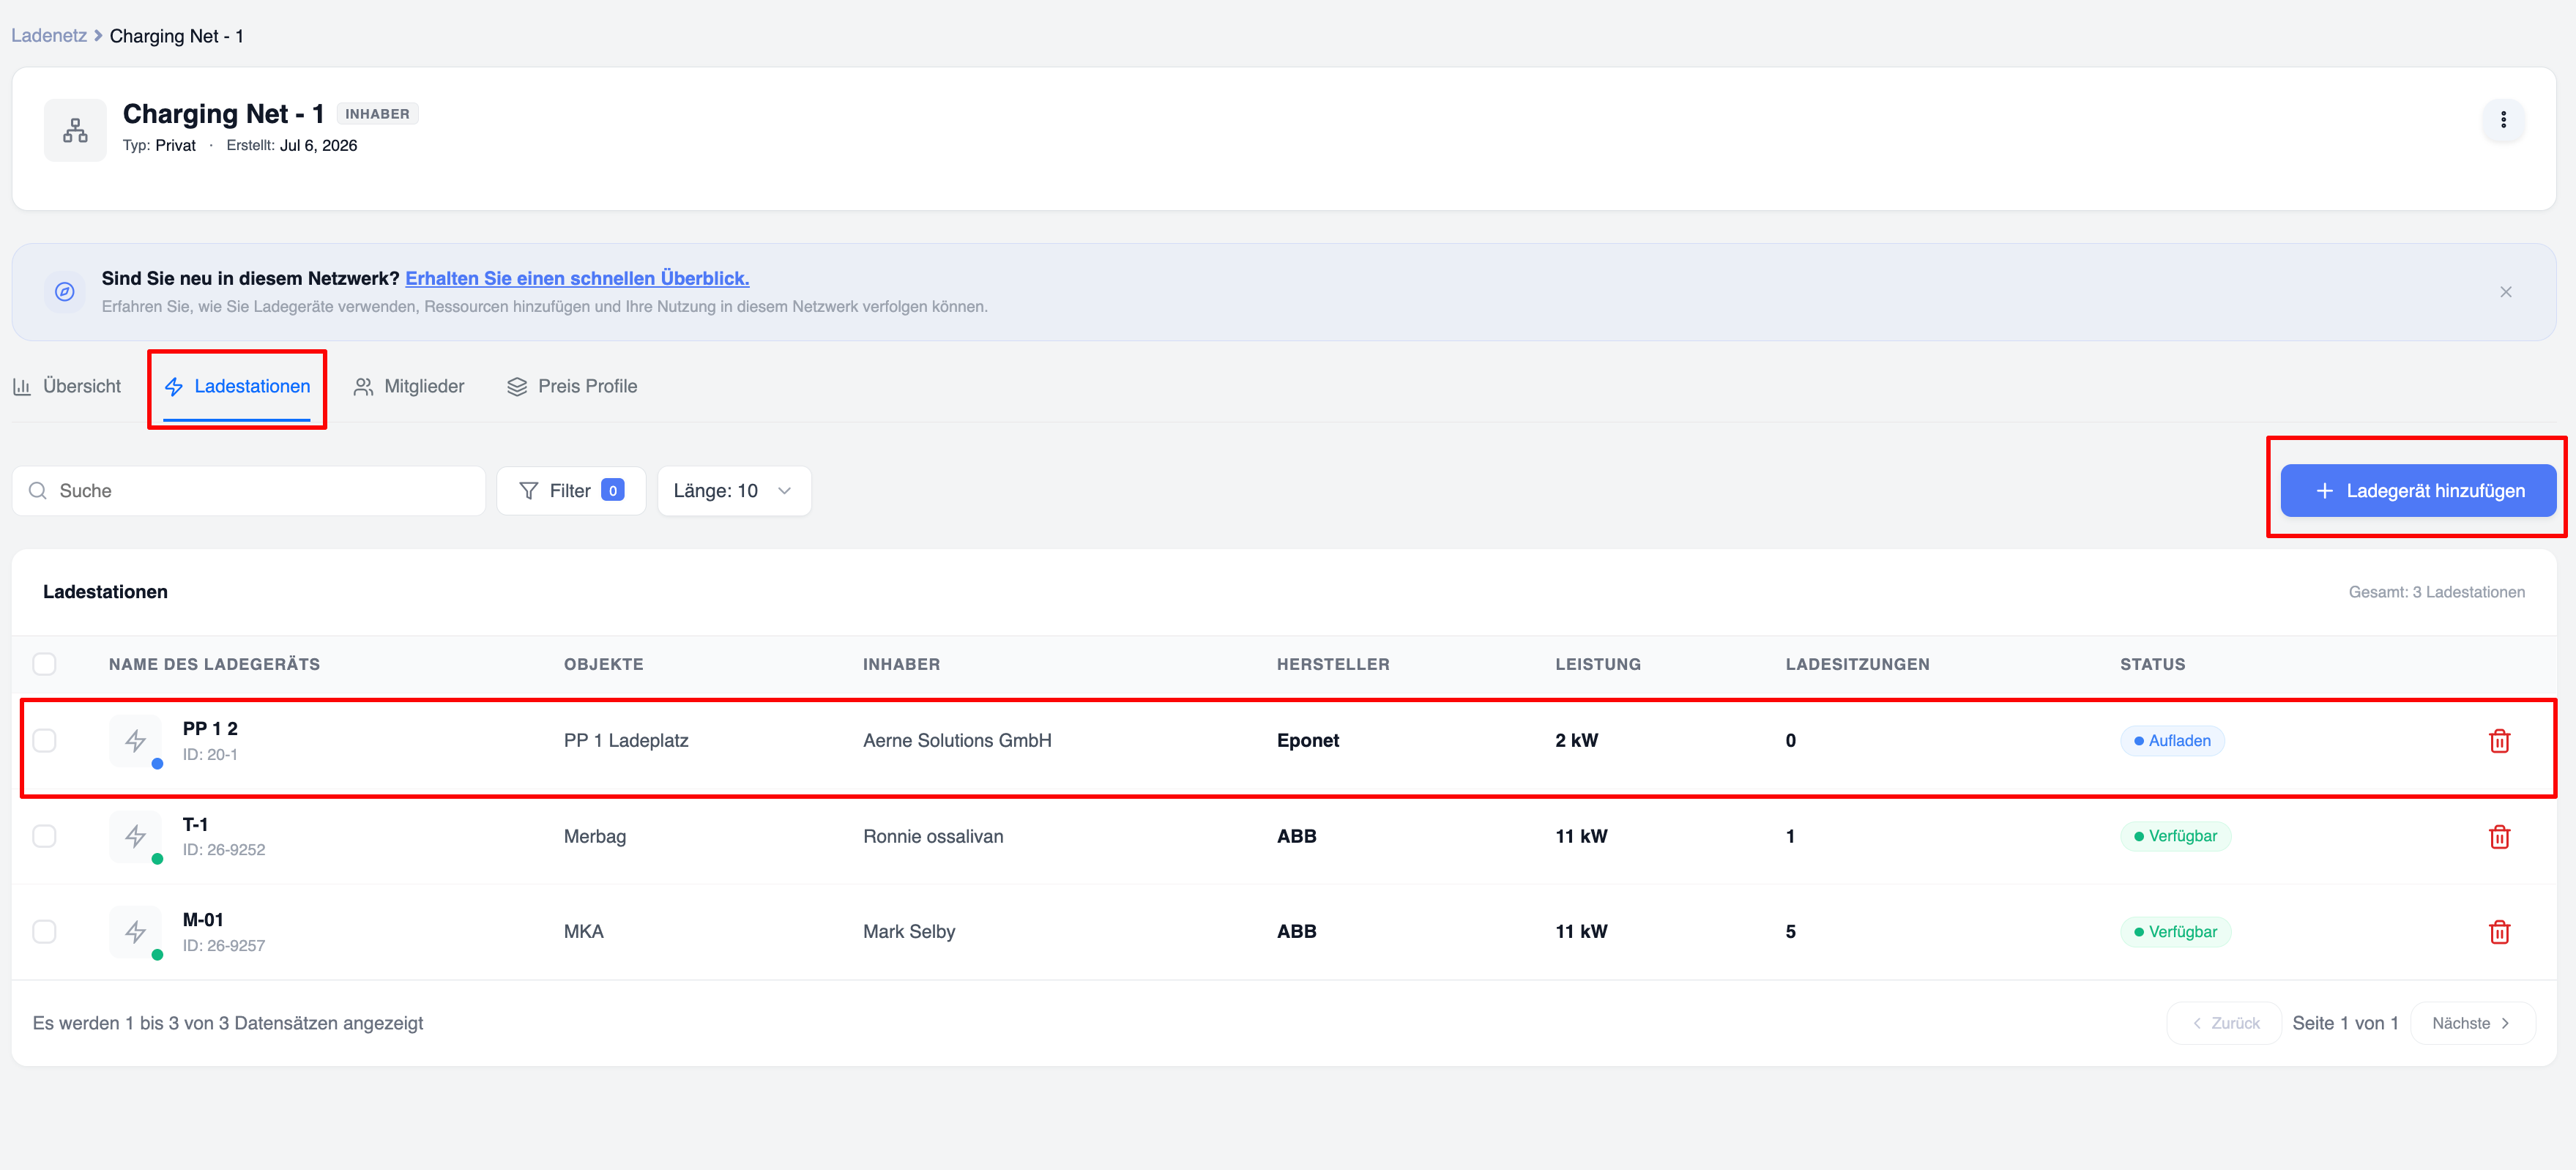
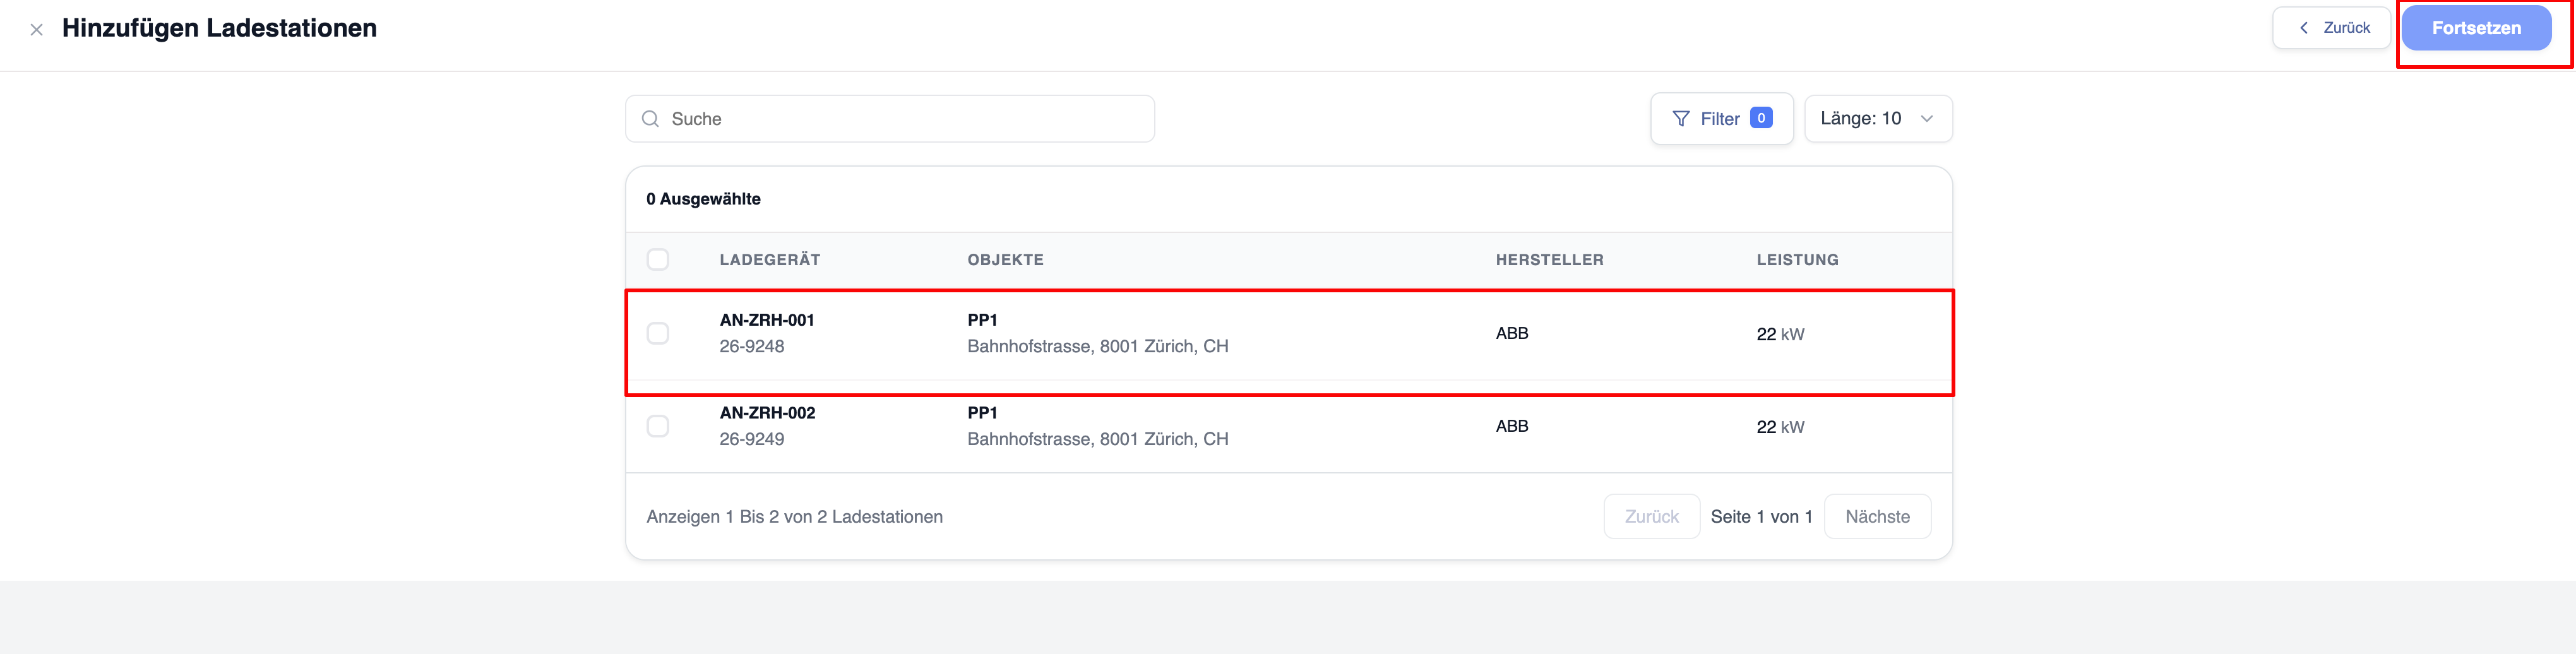
Add charging stations
By adding chargers, they become immediately available to authorised network members.
Only the owners of the chargers can add them to the network; the network operator can only invite users, and users must add their chargers to the network themselves
To add chargers:
-
Open the ‘Charging Points’ tab.
-
Click on ‘Add charging point’.
-
Browse the list of available chargers or search for them.
-
Select one or more charging stations.
-
Click ‘Next’.
-
Check your selection.
-
Click on ‘Save’.
The selected chargers will be assigned to the network immediately.
Search for charging points
Organisations that manage a large number of charging points can use the search bar to find a charging point quickly.
You can search using the following criteria:
-
Charging point name
-
Charger ID
-
Location
The search results are updated immediately as you type.
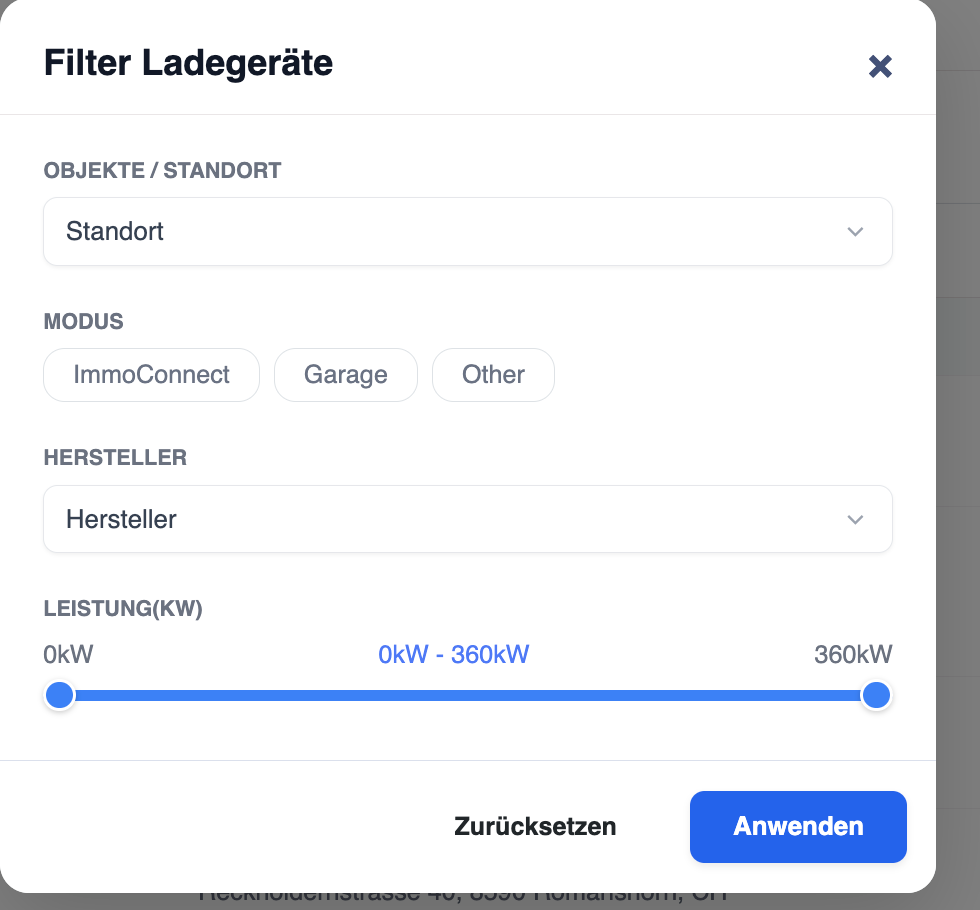
Filter charging points
Filters make it easier to find specific charging points.
Common filters include:
- Location
- Mode
-
Manufacturer
- Power
The filter function helps administrators identify chargers that require attention.
Removing charging stations
If a charger is no longer to be shared via the network, it can be removed.
To remove a charger:
-
Open the ‘Charging Stations’ tab.
-
Find the charger.
-
Click on the action menu.
-
Select ‘Remove from the network’.
-
Confirm the action.
The charger will immediately disappear from the network.
Members will no longer be able to start new charging sessions on this charger via this network.
Ongoing charging sessions will not be interrupted.
Only network owners, members with the appropriate permissions and the charger owner can remove chargers from a network
Managing price profiles
Price profiles determine how charging sessions within the network are billed.
The pricing rules assigned to the user who initiated the charging session apply to that session.
Price profiles may include the following:
-
Electricity price per kWh
-
Time-dependent pricing
-
Parking charges
-
Parking charges
-
Fixed session charges
-
Weekly schedules
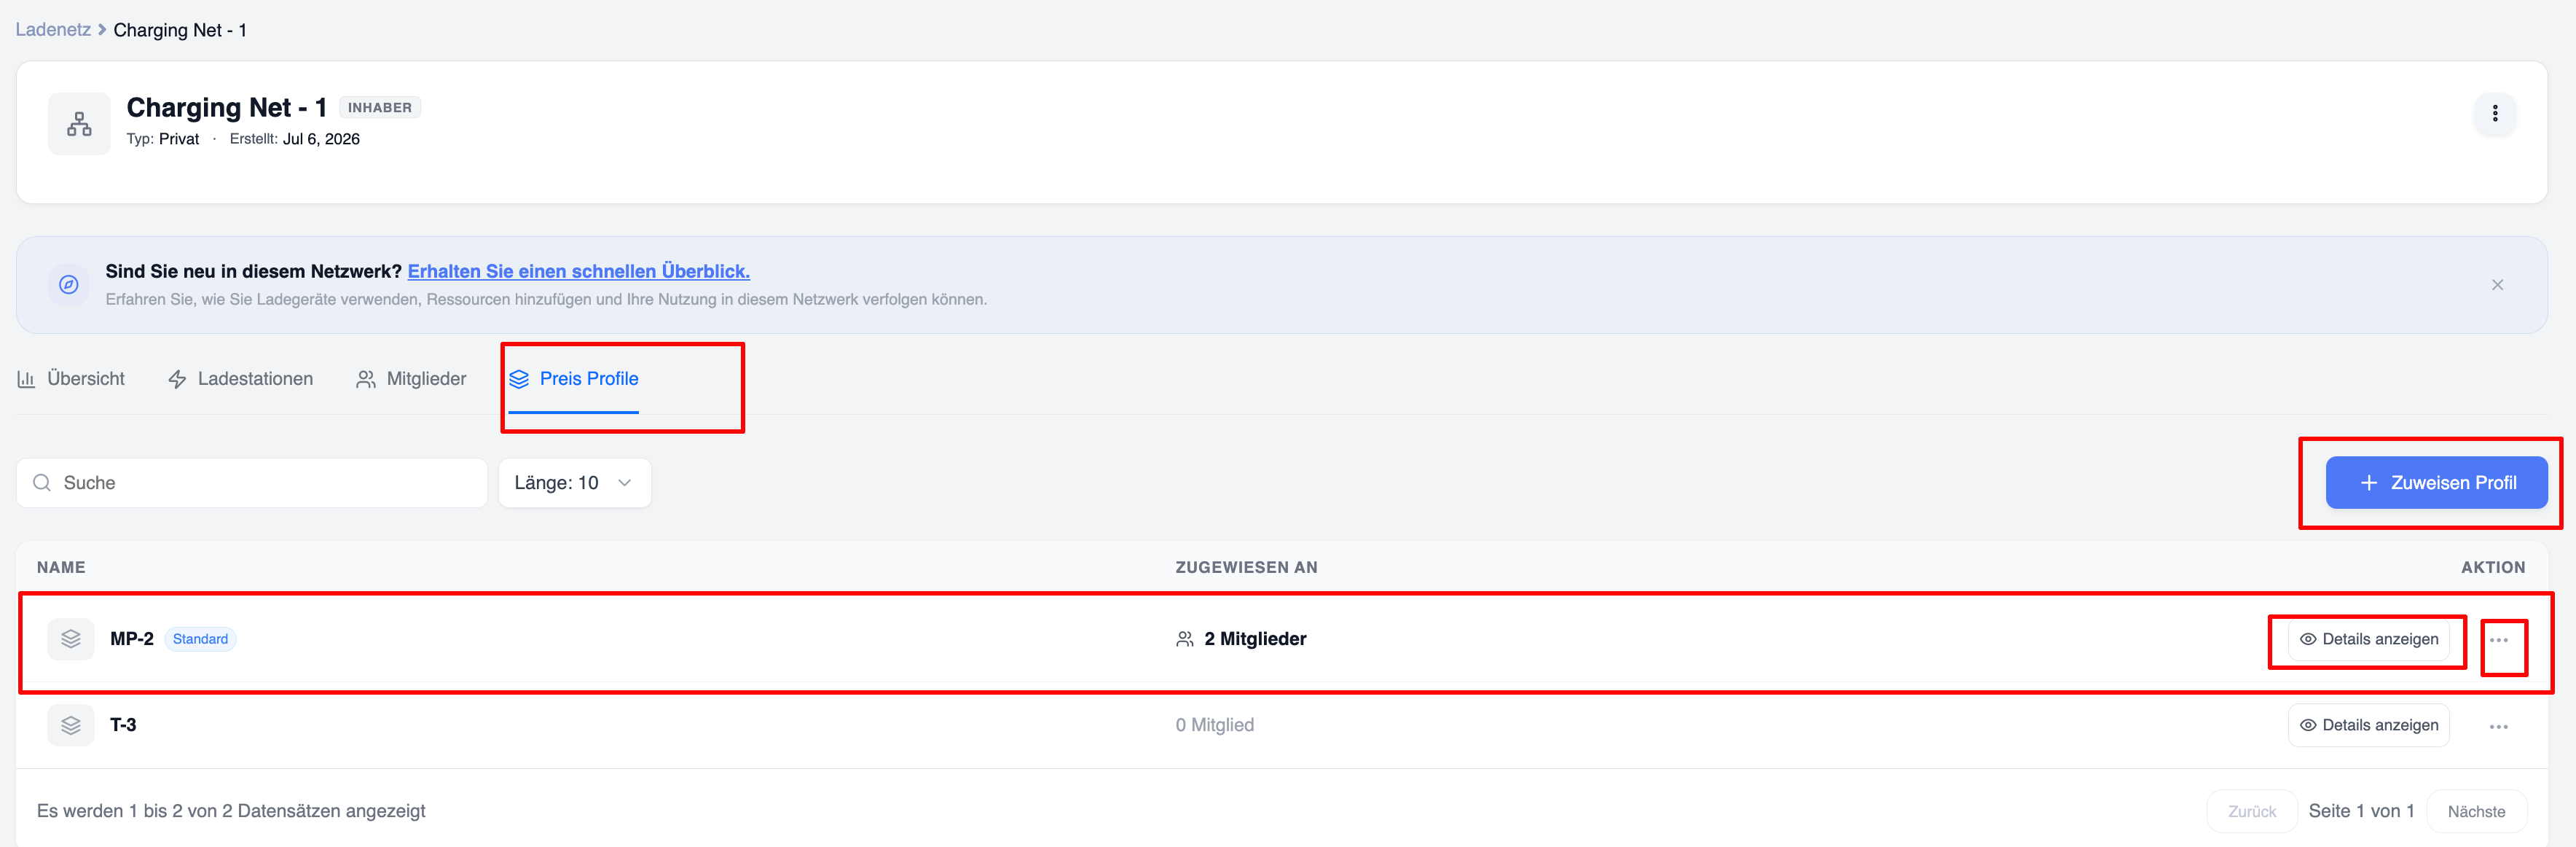
View existing pricing profiles
Open the ‘Price Profiles’ tab.
The page displays all pricing profiles linked to the network.
Typical information includes:
-
Profile name
-
Assigned members
Create a new pricing profile
To create a pricing profile:
-
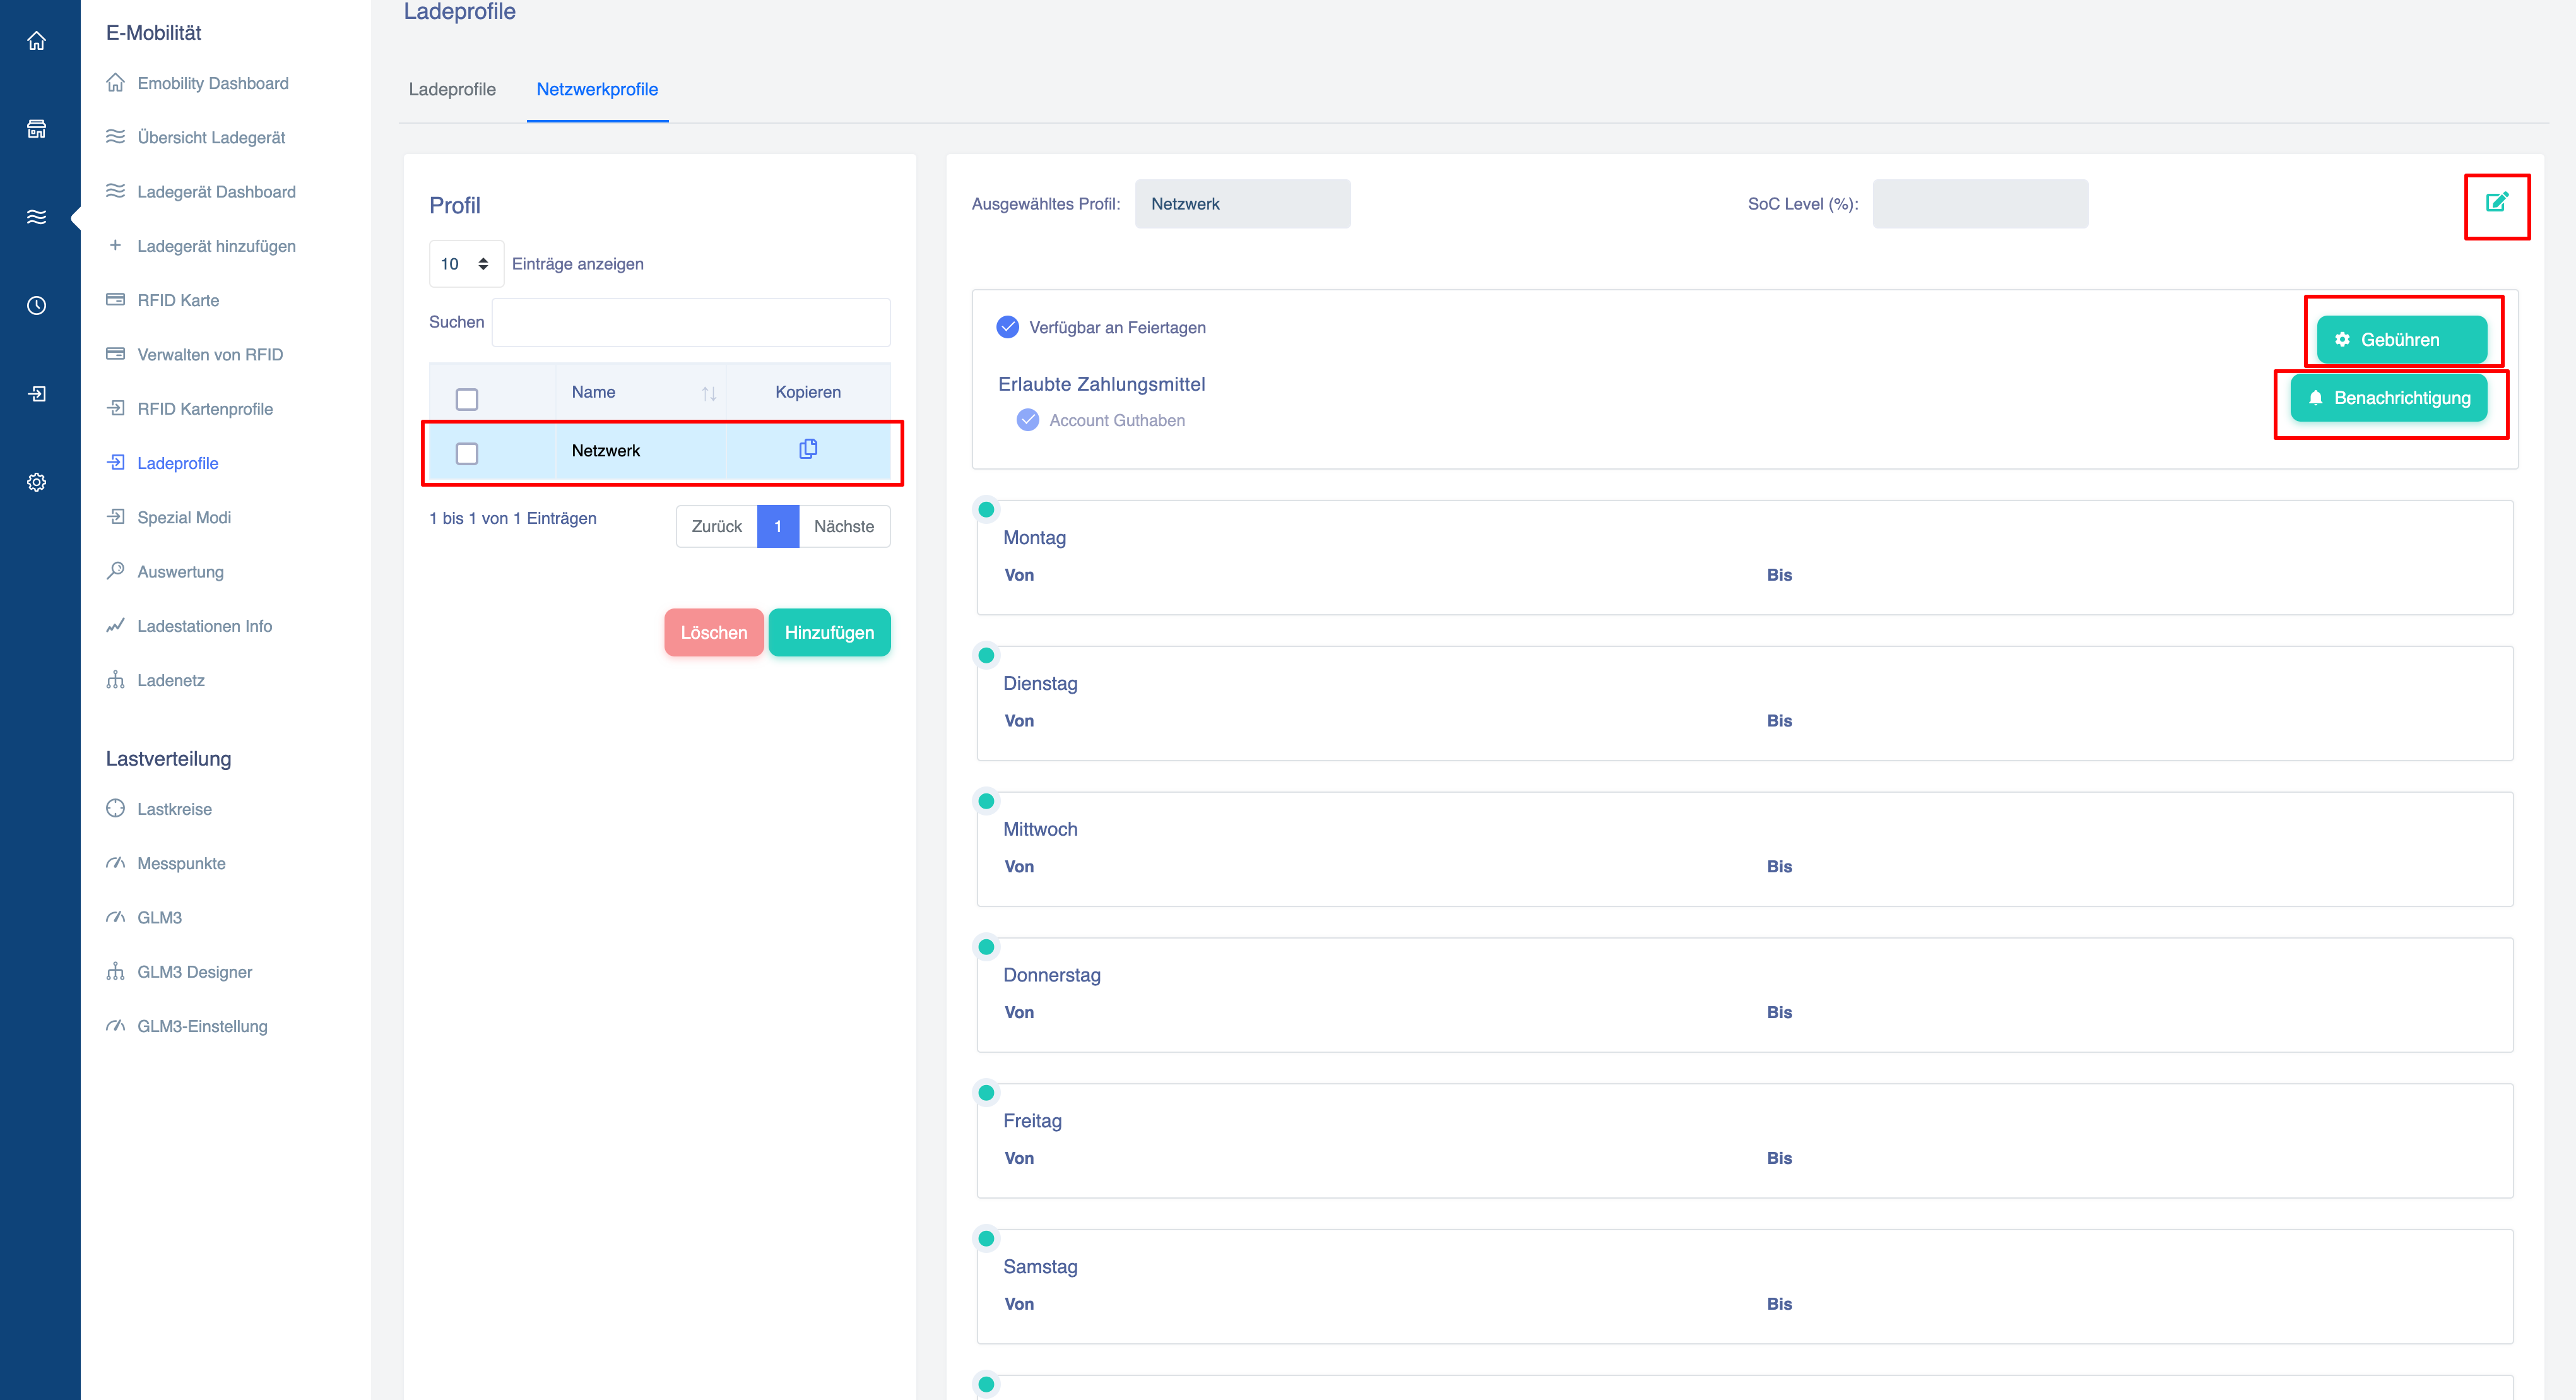
Open the ‘Price Profiles’ tab or the eMobility dashboard
-
Click on ‘Create network profile’.
-
Enter a profile name.
-
Configure the charging tariffs.
-
Configure any optional parking or lockout charges.
-
Set active days and schedules.
-
Save the profile.
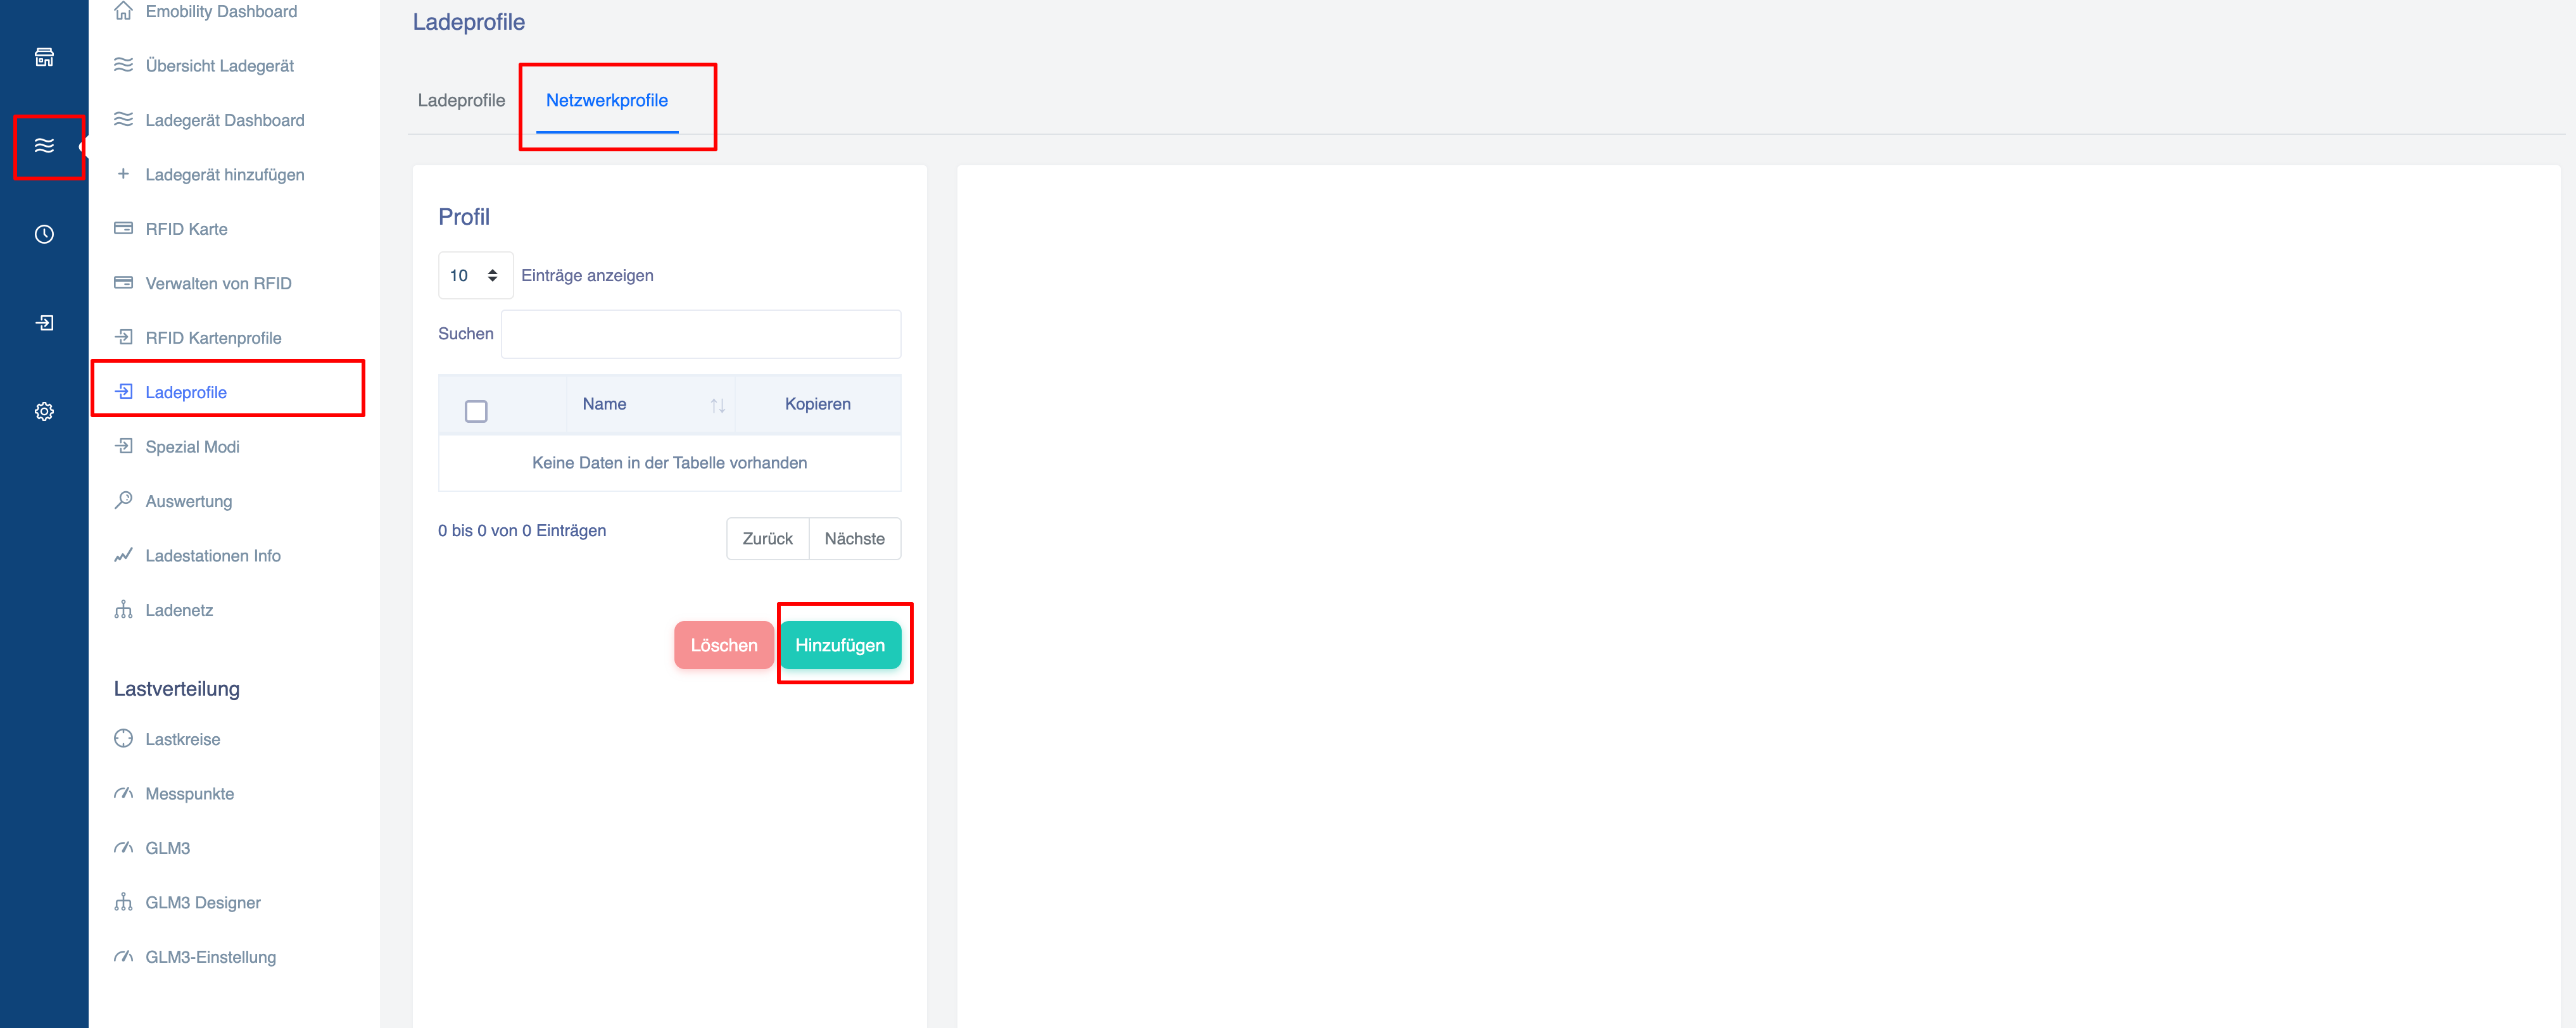
Add profile to the network:
- Select a profile from the drop-down list
- Use the ‘Refresh’, ‘+ Add profile’ or ‘Edit’ icon to update the network profile
- Set the default profile for the network by ticking the ‘Set as default’ box
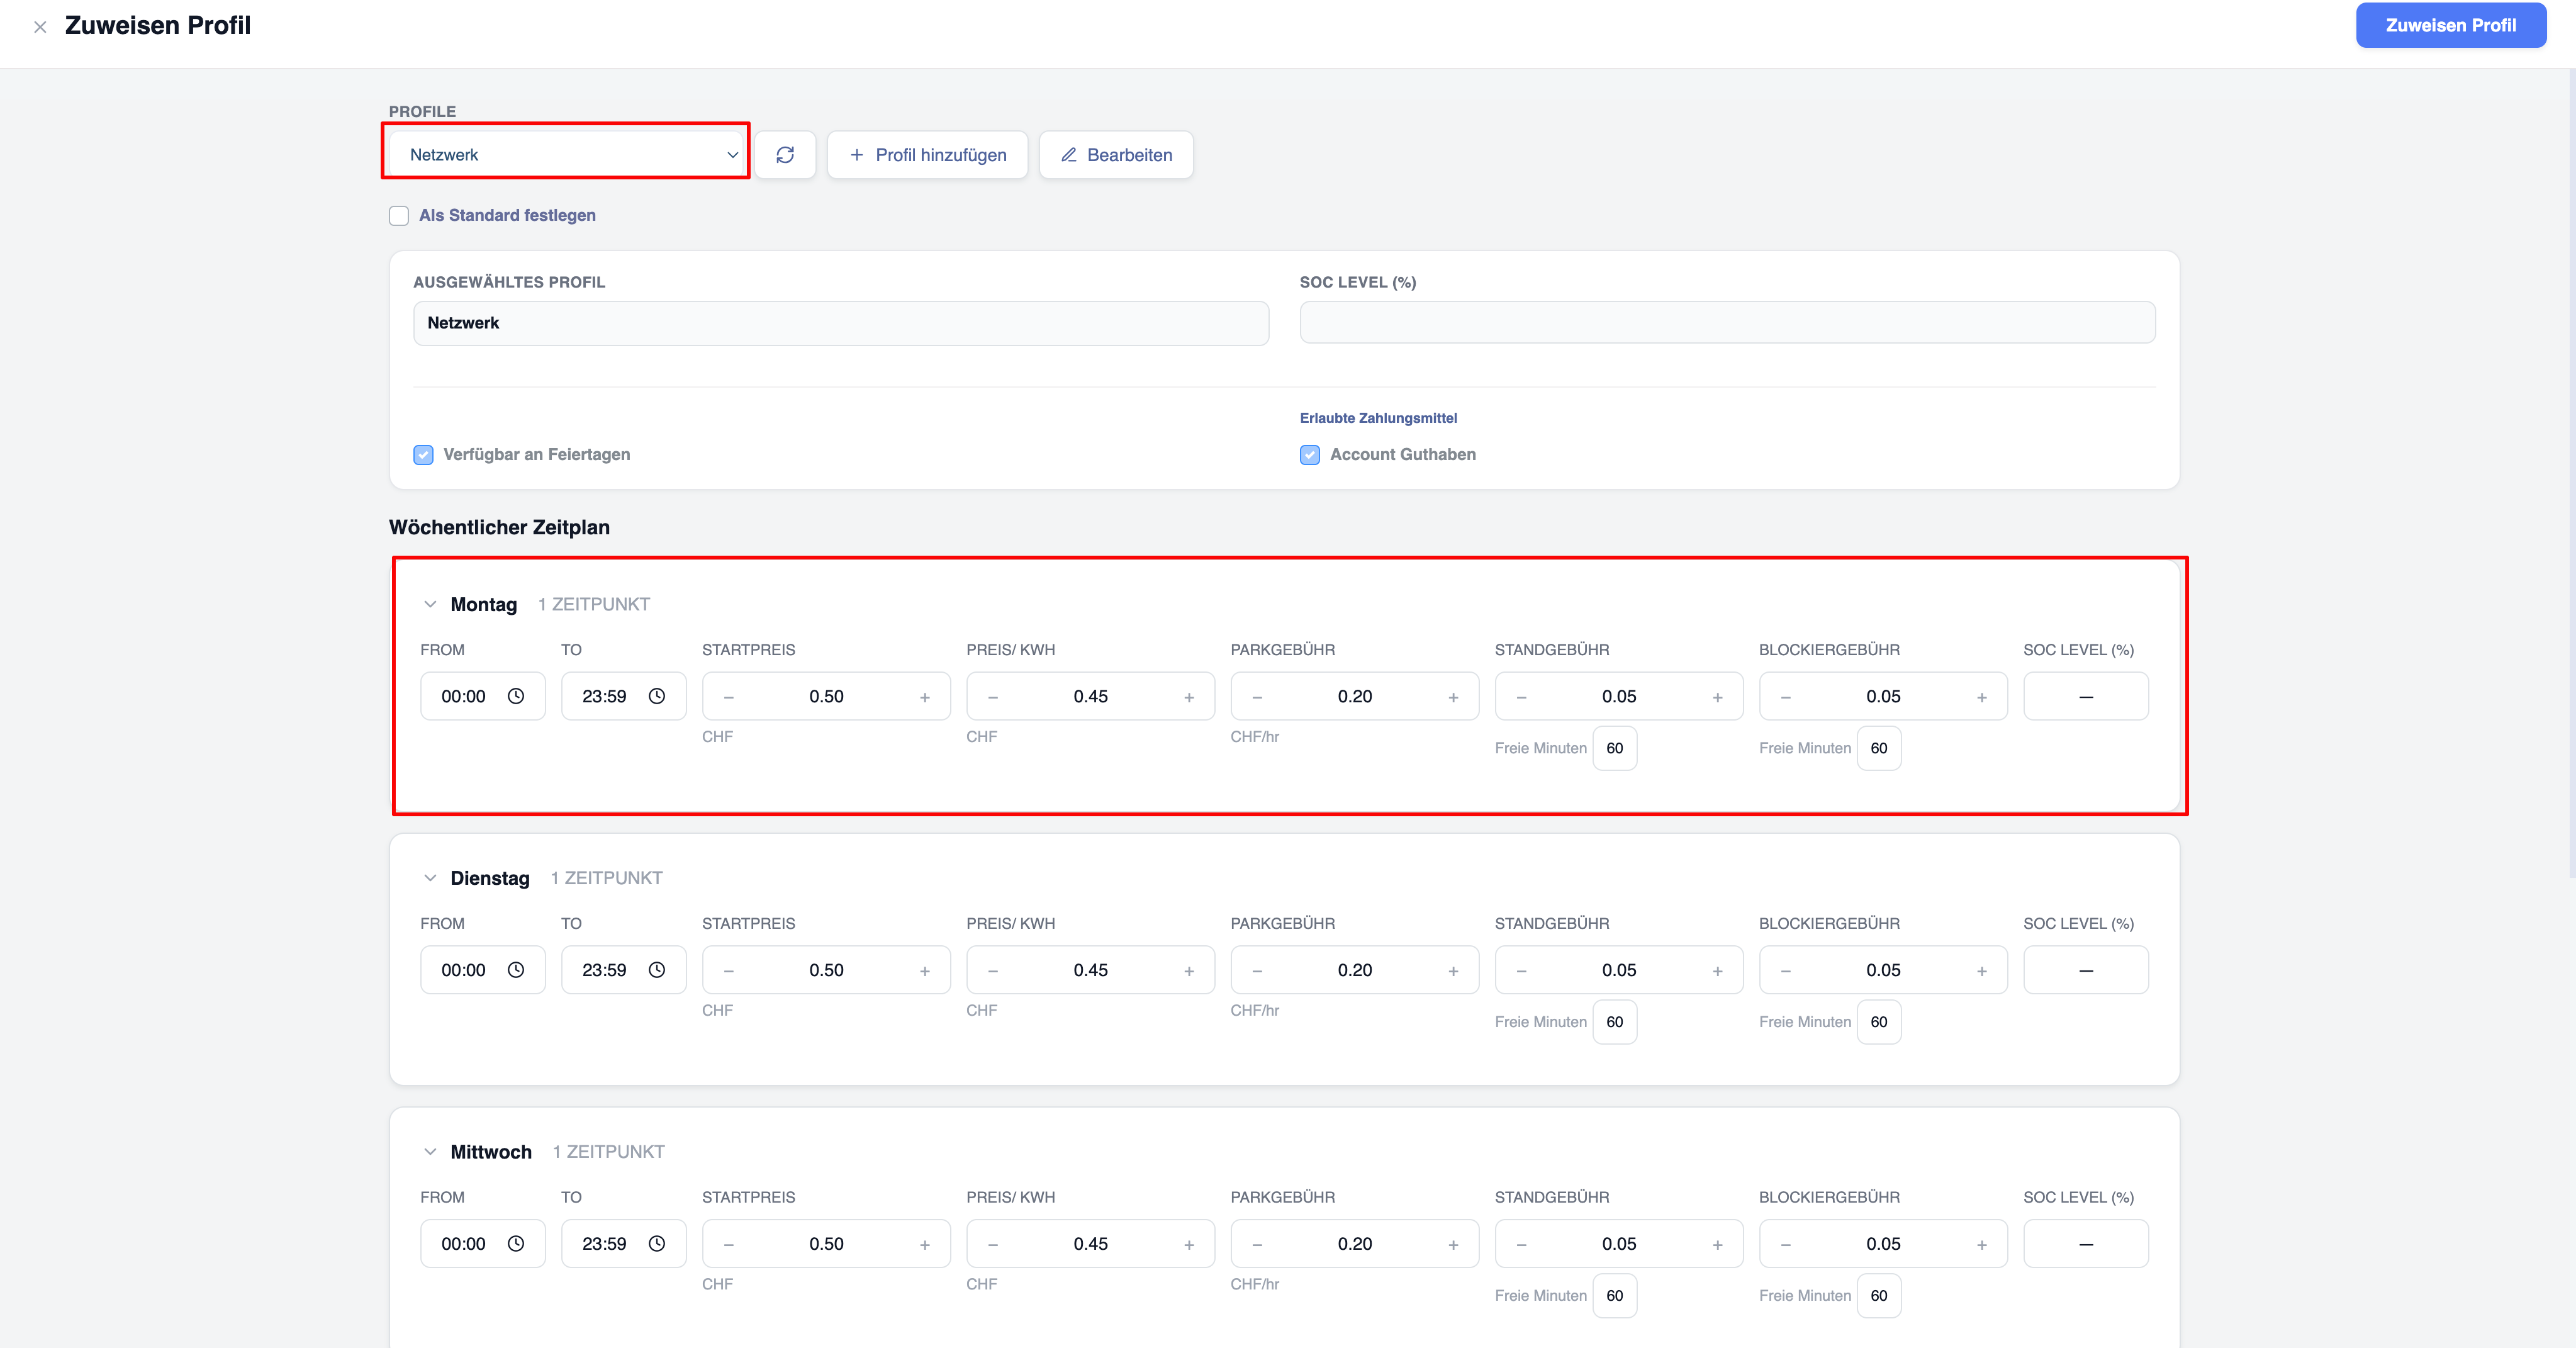
The profile is available immediately.
Edit pricing profiles
Prices may change over time.
To update an existing profile:
-
Select the desired profile (the ‘Price Profile’ tab)
-
Click ‘Edit’.
-
Change the required values.
-
Save.
The changes will apply to future charging sessions.
Assigning price profiles
Price profiles can be assigned to members and set as the default for the network

This offers organisations the flexibility to offer different charging tariffs to different users.
When a user charges at any charging point on the network, they are charged according to the price profile assigned to them by the network operator or administrator.
Deleting price profiles
Unused pricing profiles can be deleted.
Before deleting a profile:
-
Ensure that it is no longer assigned.
-
If necessary, check whether another profile is available.
To delete a profile:
-
Select the profile.
-
Click ‘Delete’.
-
Confirm the action.
If a deleted profile was assigned to a user, it will be removed and the user will be assigned the default network profile.
Manage members
Members are users who are authorised to upload files to your network.
Managing membership ensures that only authorised users have access.
View members
Open the ‘Members’ tab.
The members list usually displays the following:
-
Name
-
Email address
-
Role
Administrators can search for, filter and sort members to simplify administration.
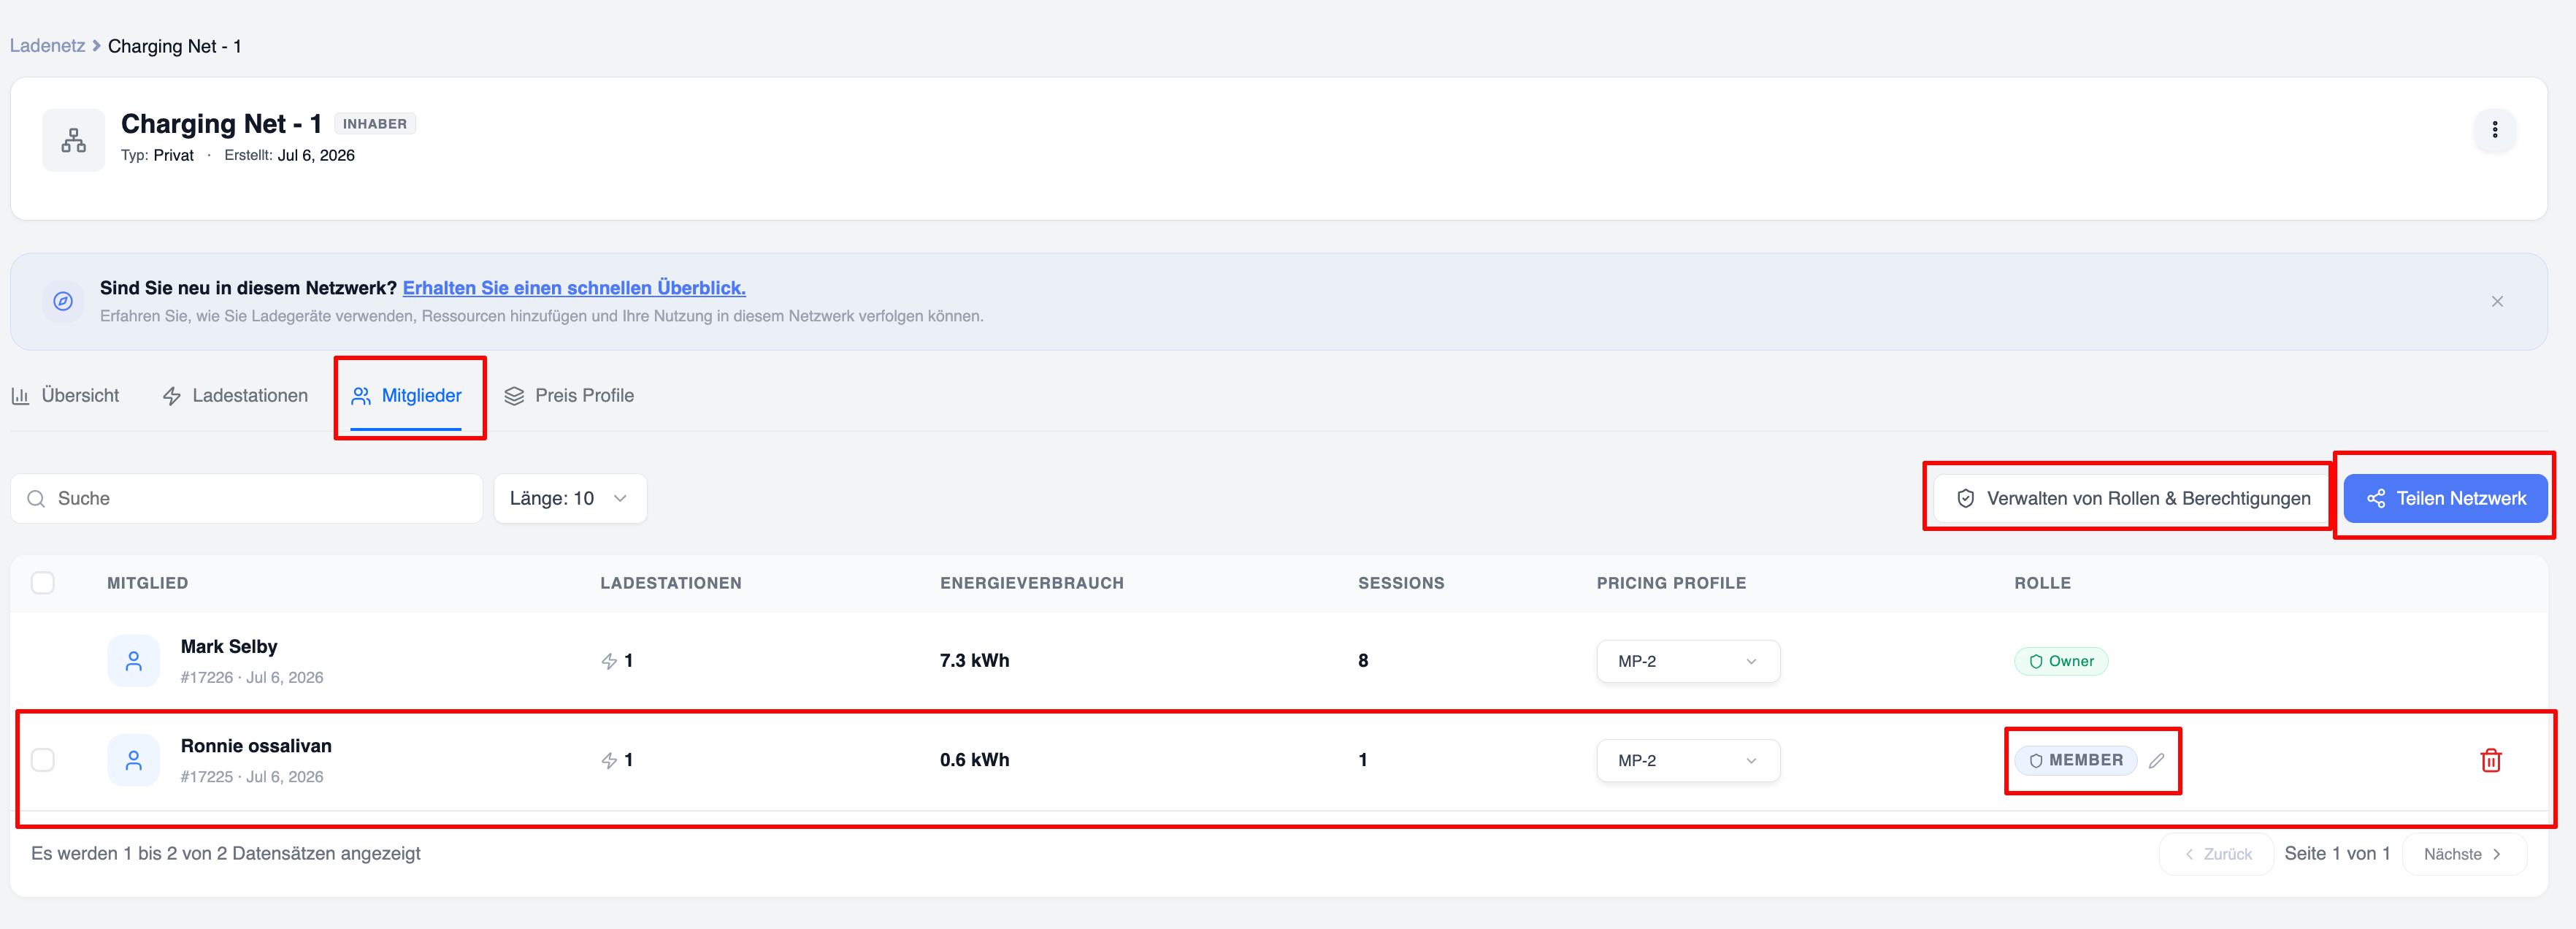
Inviting members
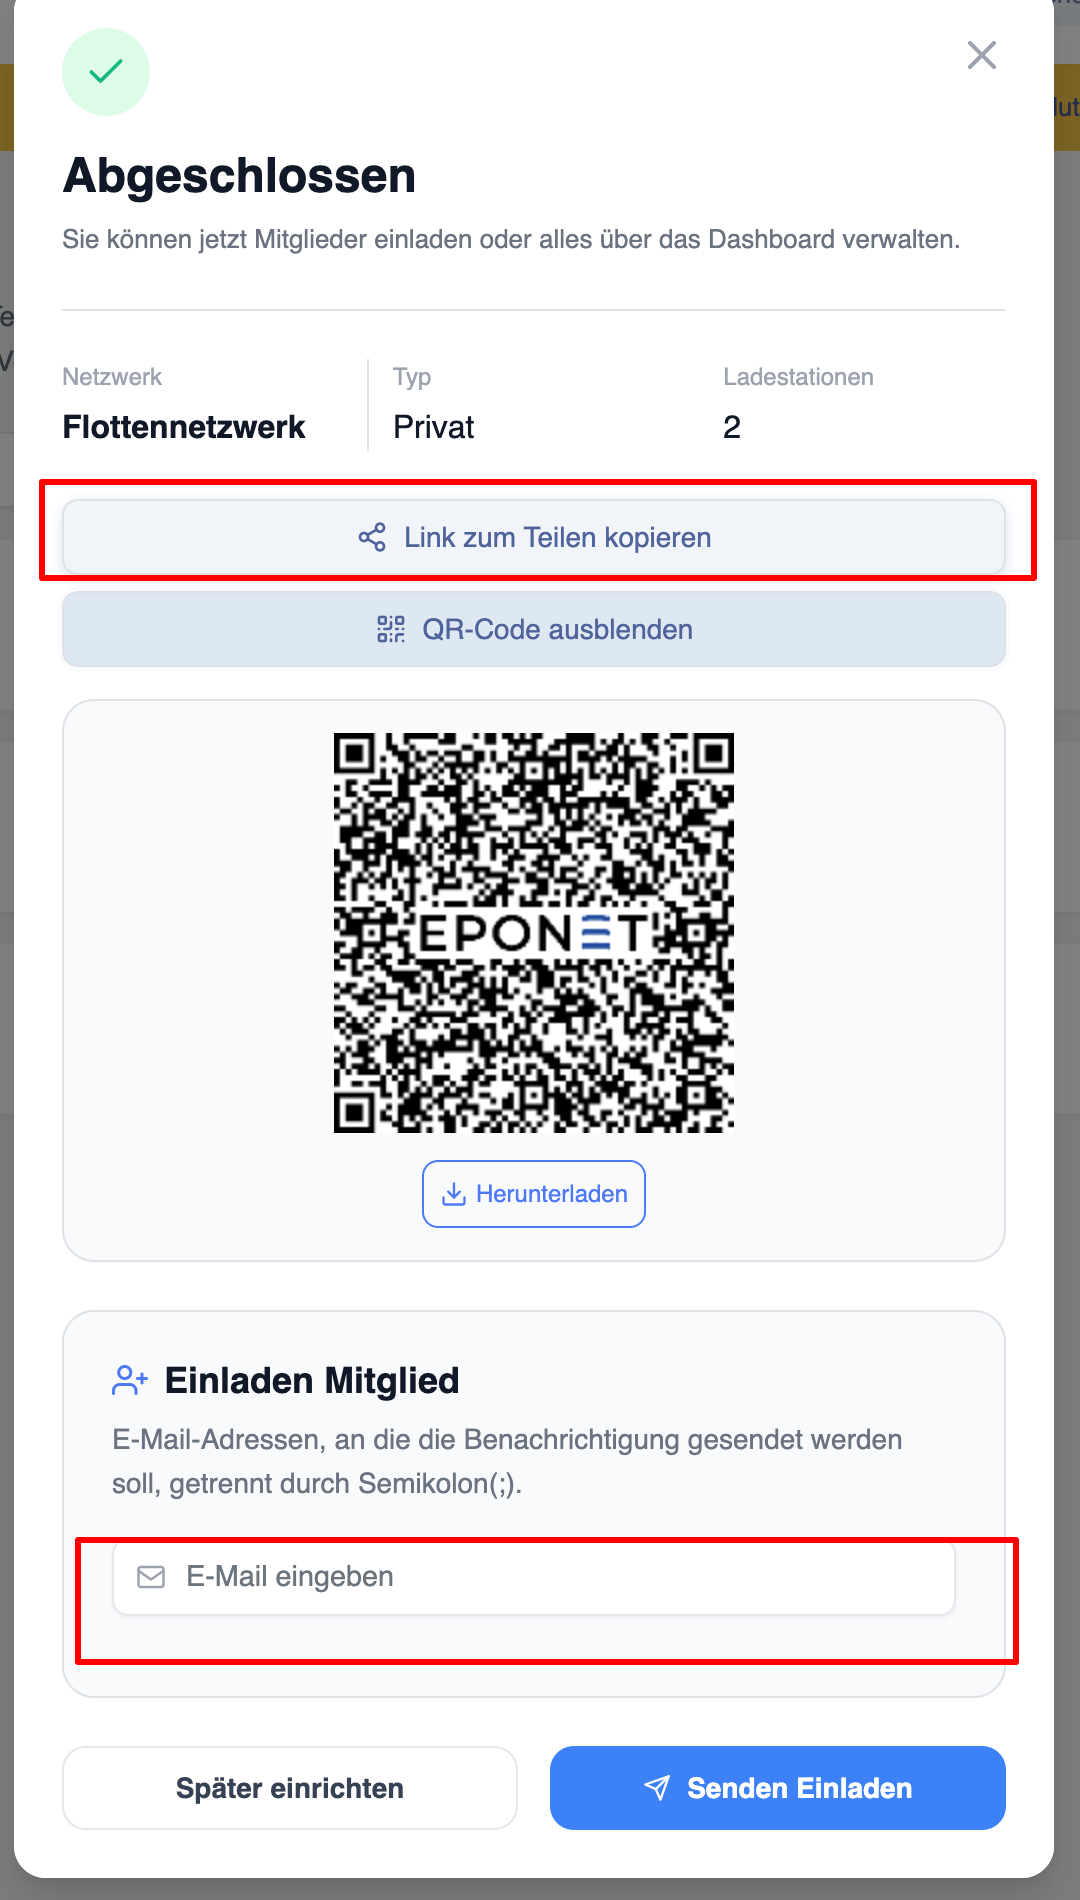
New members can be invited in various ways.
Click on ‘Invite members’.
The available invitation methods include:
Invite by email
Enter one or more email addresses.
Invitations are automatically sent to the ‘Notifications’ section of your Eponet account.
Invitation link
Generate a secure invitation link.
The link can be forwarded directly to users.
Users who click on the link will be guided through the sign-up process.
QR code (available soon)
Create a QR code for the network.
Users scan the QR code using the mobile app.
Managing existing members
Administrators can adjust members’ access rights as required.
Possible actions include:
-
Viewing member details
-
Change role
-
Remove a member
These actions are available via the member actions menu.
Removing members
If you no longer want a member to have access:
-
Search for the member.
-
Open the actions menu.
-
Click on ‘Remove member’.
-
Confirm.
The user will immediately lose access to the network.
Any future attempts to charge via this network will be rejected.
Removing a member does not delete their previous charging sessions.
Incorrect charging price
Check:
-
Assigned price profile
-
Active schedule
Invitation not received
Check:
-
Check your email address
Resend the invitation if necessary.
Charger cannot be removed
Make sure that:
-
You have sufficient permissions.