
Top up Hubject roaming via the app
With Hubject Roaming, you can use your Eponet RFID card in many other charging networks. A single activation gives you access to one of the world’s largest roaming networks.
How do I start using Hubject Roaming?
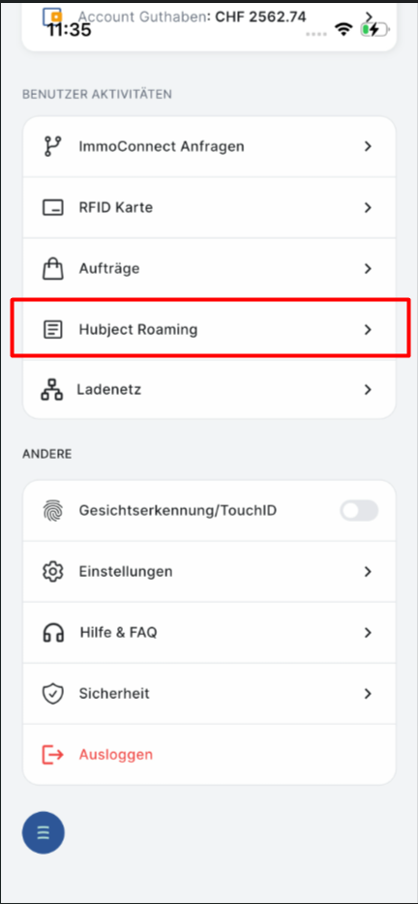
There are two simple ways to open the Hubject Roaming page:
Option 1 – Via a charging station on the map
-
Open the Eponet app and view the map.
-
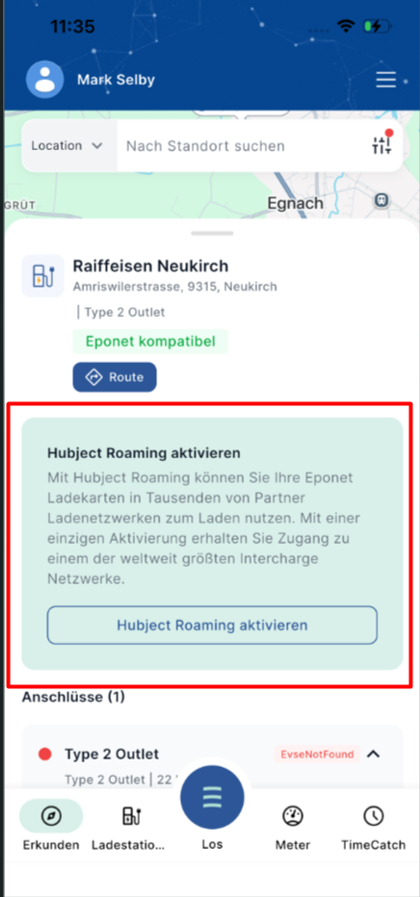
Tap on any charging station that supports Hubject (you’ll see the green ‘Eponet compatible’ label).
-
If none of your cards have been activated for Hubject yet, a green information box will appear:
-
Tap the blue ‘Activate Hubject Roaming’ button. You’ll be taken straight to the Hubject Roaming activation page.
Option 2 – Via the main menu
Overview of the activation page
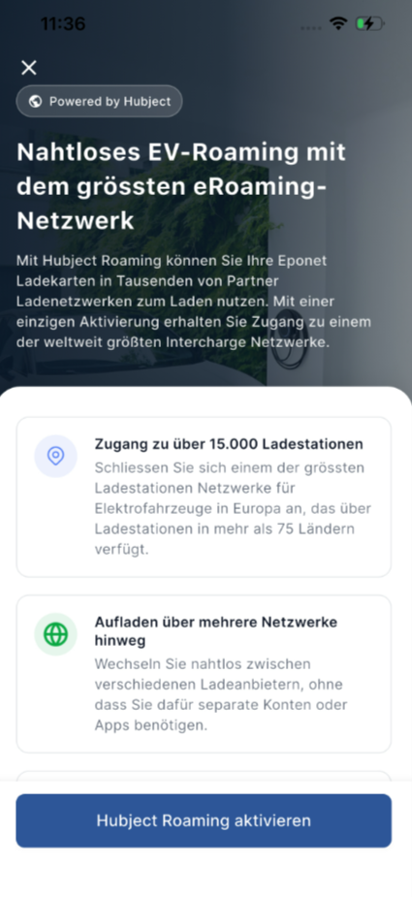
First, a brief introduction will appear, explaining the benefits of Hubject Roaming.
Tap ‘Activate Hubject Roaming’ to continue.
Step 1 – Select a profile and your RFID card(s)
- On the activation screen, you need to select two things:
- A profile (this determines the monthly fee and the price per kWh)
- One or more RFID cards
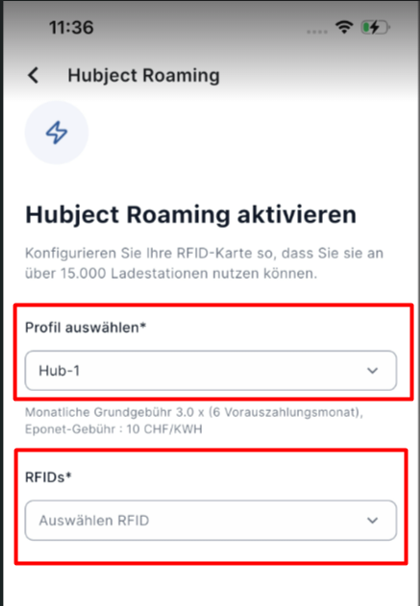
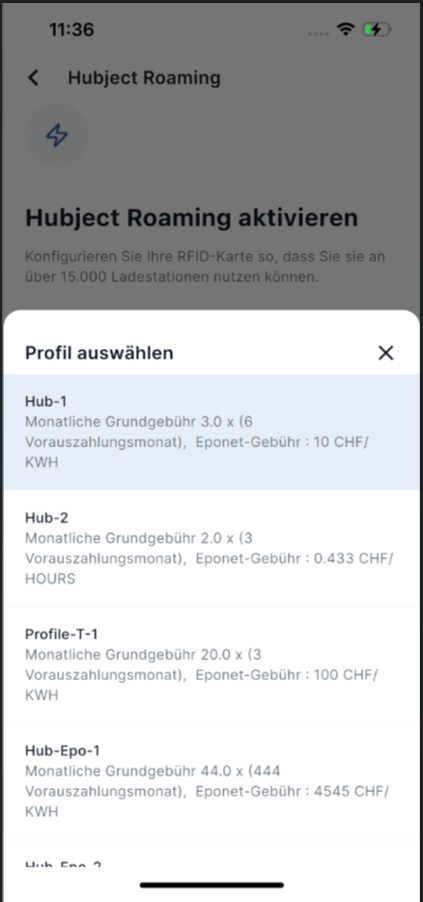
- Tap the ‘Select profile’ field. A list of available profiles will appear. Select the one that best suits your needs.
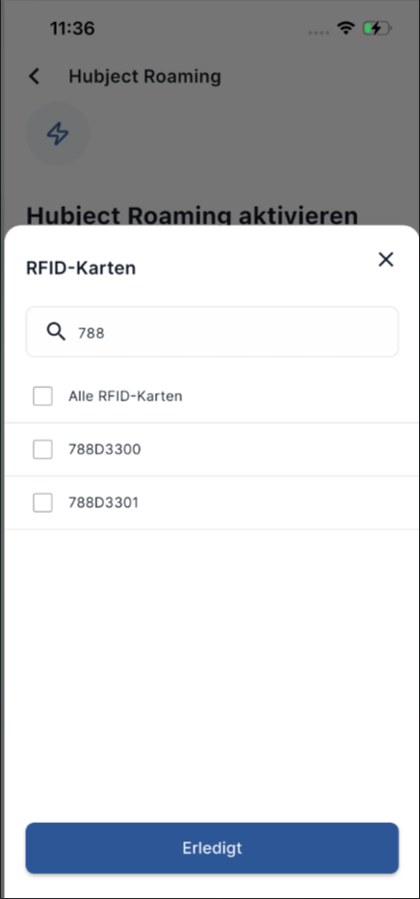
- Tap the ‘RFIDs’ field. You can select one or more cards at the same time. Simply tick the boxes next to the cards you wish to activate.
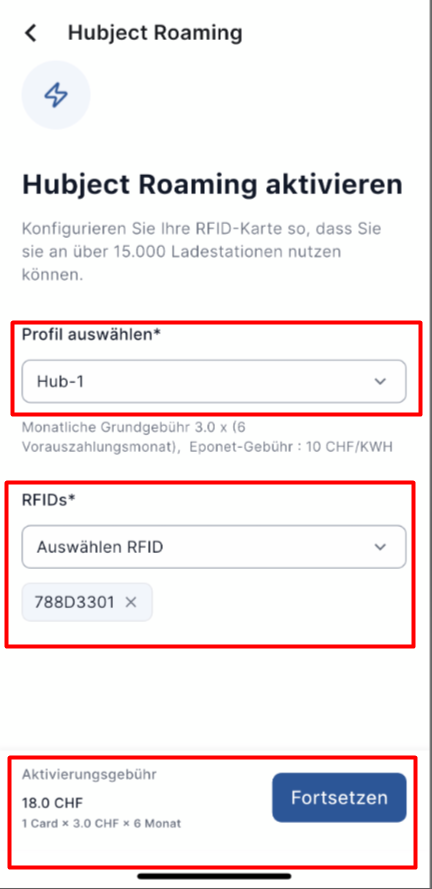
- Once you have selected the cards, they will be listed below the field and the calculated activation fee will be displayed at the bottom.
- Tap ‘Continue’.
Step 2 – Review and pay
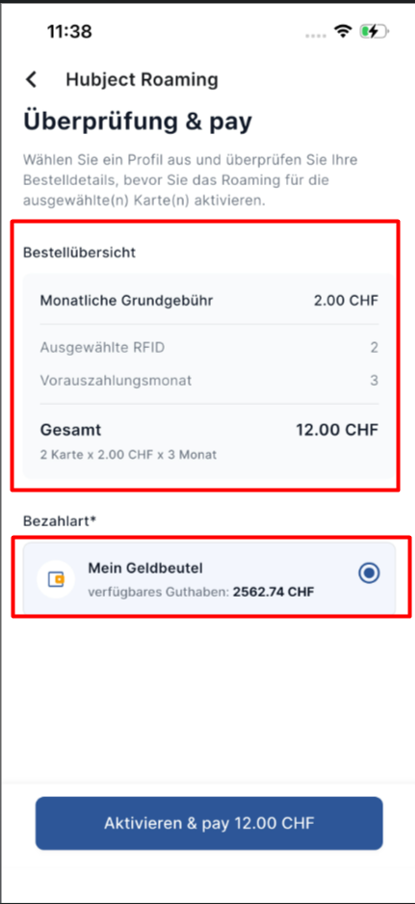
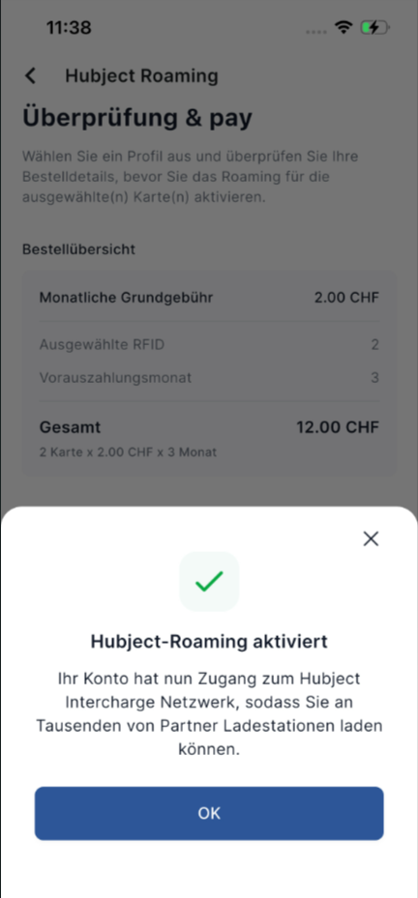
- Check the order summary carefully:
- Monthly fee
- Number of RFID cards selected
- Months in advance
- Total amount payable now
- Select your payment method (usually ‘My Wallet’ / your credit balance).
- Tap the blue ‘Activate & pay’ button.
Step 3 – Confirmation
Once payment has been successfully processed, a confirmation message will appear:
Tap ‘OK’. Your selected cards are now activated for Hubject Roaming!
After activation – Managing your Hubject cards and sessions
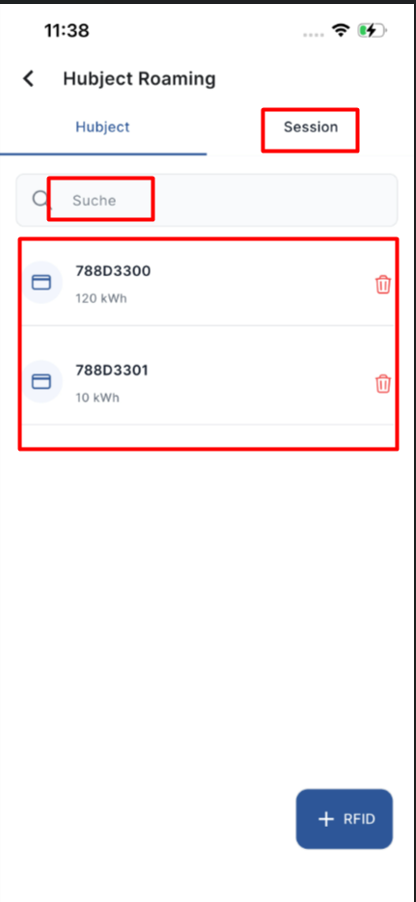
View your activated RFID cards
- Return to ‘Hubject Roaming’ (via the menu).
- You will see the ‘Hubject’ tab showing all the cards you have activated. You can also search for a card or add more later using the ‘+ RFID’ button.
View your charging sessions
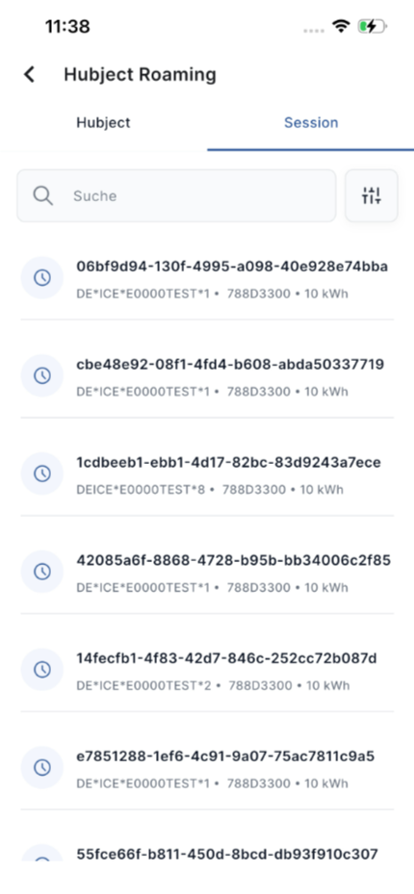
- Switch to the ‘Session’ tab.
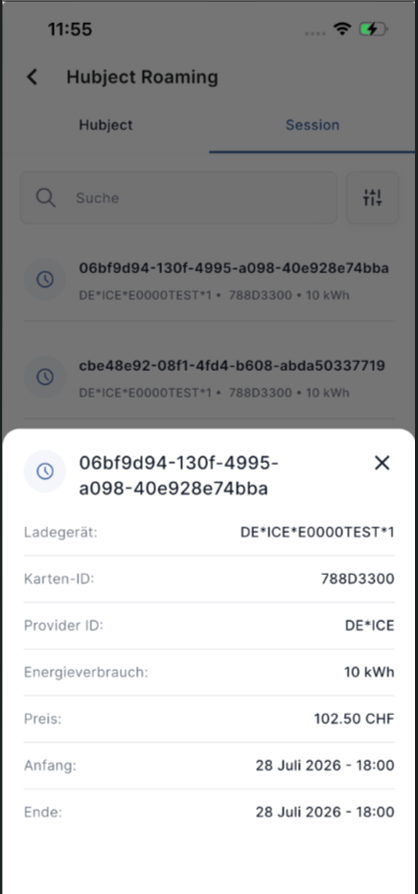
- Here you can see all charging transactions carried out with your Hubject-enabled cards.
- Tap on any charging session to view the full details (charging point, energy consumed, price, start/end time, etc.).
Filter charging sessions
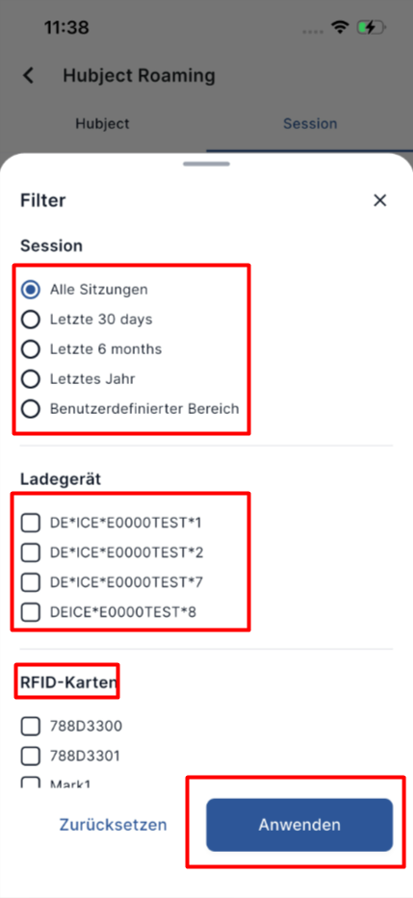
Tap the filter icon (funnel) to narrow down the list using the following criteria:
- Time period (last 30 days, 6 months, 1 year or a custom period)
- Specific charging point
- Specific RFID card
Tap ‘Apply’ to apply the filters.
After activation – start charging with your Hubject cards
Once your cards have been activated:
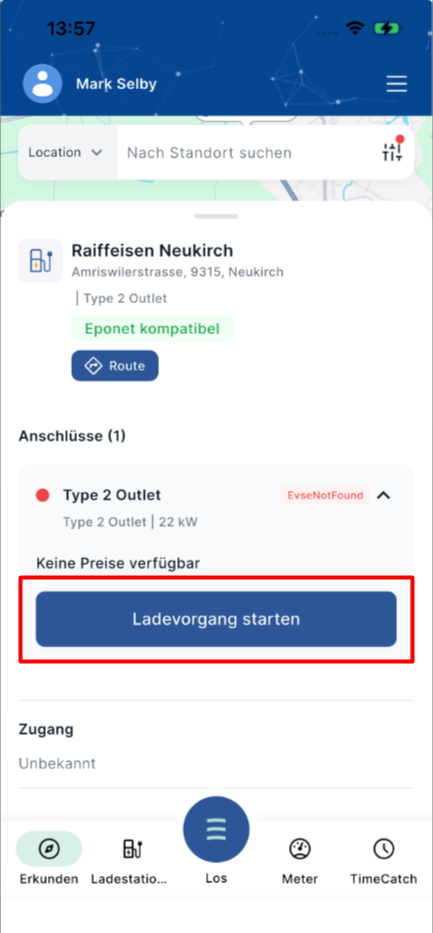
- Select any Hubject-compatible charging point on the map.
- You will now see a large blue button labelled ‘Start charging’.
- Tap ‘Start charging’.
- A window titled ‘Select RFID card for charging’ will open.
- All your Hubject-compatible cards will be displayed in the list.
- Tap the card you wish to use.
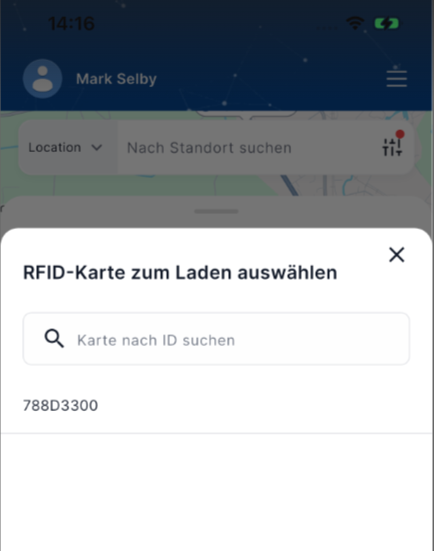
Charging will then start using the selected card.
How to easily find Hubject charging points on the map
Before or after activating Hubject Roaming, you can quickly display only Hubject-compatible charging points:
- Tap the filter icon (funnel icon) in the top right-hand corner of the map screen.
- In the filter menu:
- Toggle the ‘Eponet-compatible’ switch (this includes Eponet and compatible Hubject charging points).
- Under ‘Operator’, tick the box next to ‘Hubject’.
- Tap ‘Apply’. The map will now only show Hubject charging points (and Eponet-compatible charging points).
This makes it very easy to find stations where you can use your Hubject-compatible cards.
Important: What happens if you remove or delete a card?
If you delete or remove a Hubject-compatible RFID card:
- you’ll only be charged for the current month.
- Fees for future months that you have already paid for in advance will be automatically refunded to your Eponet Wallet.
You can safely remove a card at any time without losing the prepaid balance for the remaining months.
A simple example
You have activated 1 card with the Hub-2 profile:
- Monthly fee = 2.00 CHF
- You have paid for 3 months in advance → Total amount = 6.00 CHF
If you remove the card halfway through the first month:
- The fee for month 1 (CHF 2.00) will still be charged
- The fees for months 2 and 3 (4.00 CHF) will be credited to your wallet
You will never lose the money for the months you will no longer be using.
This rule applies to every card you remove, regardless of whether you delete one or more cards.
A brief summary of the entire process
- Open Hubject Roaming (at a station or via the menu).
- Select a profile.
- Select one or more RFID cards.
- Check the cost and pay.
- Your cards are now ready to use – you can top them up at thousands of partner stations!
- Check your sessions and filter them at any time on the ‘Sessions’ tab.
-
If you remove a card later → you’ll only be charged for the current month; future months will be credited to your balance
That’s it! You can now refuel seamlessly across the entire Hubject network using your Eponet cards.