Top up RFID cards
Description
This page explains how to invite other users’ RFID cards using the RFID card number, send invitations via email address and generate QR codes.
The invited RFID cards can be activated on the ‘My/Tenant’ charger so that users can start a charging session with the cards.
In the ‘Invited RFID Cards’ section, administrators can create, manage and monitor invitations for RFID access. Invitations can be sent using physical RFID card numbers, via email or via a QR code. This feature is particularly useful when employees, customers, guests, contractors or partner organisations need to be granted temporary or permanent charging access without having to manually create an RFID card for each user.
Loading RFID cards
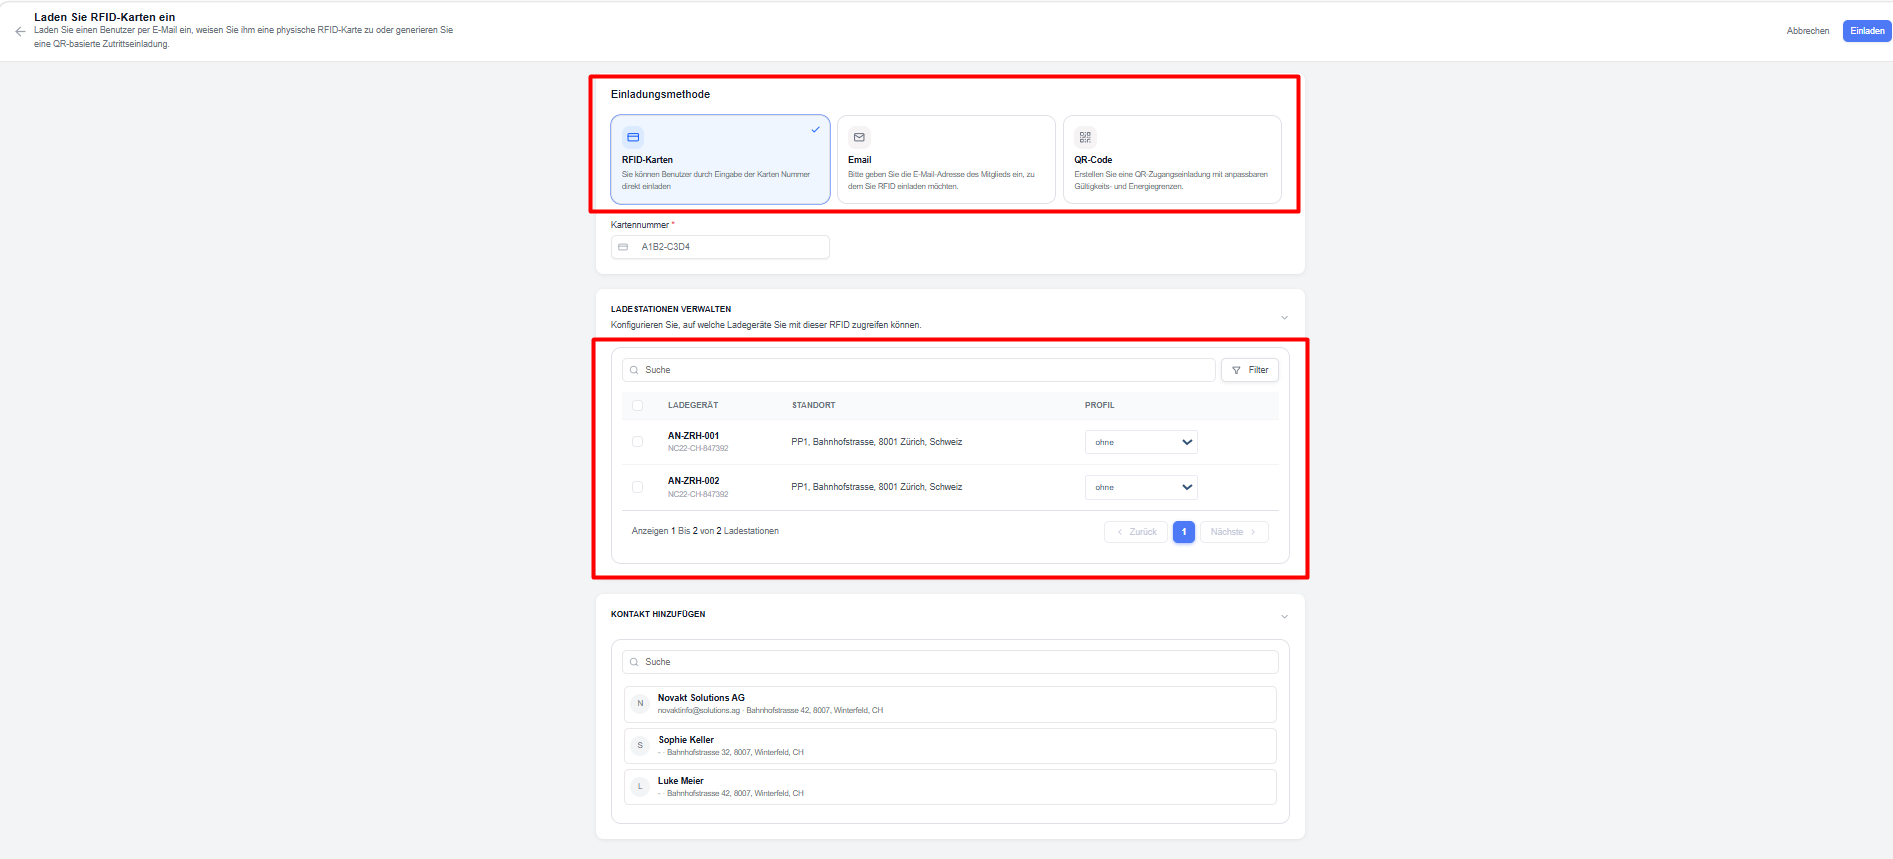
Loading using the card number –
An RFID card can be loaded directly by entering the card number. If the card is already in the Eponet portal, it will be loaded straight away:
When loading the card, the user can configure the following:
- Accessible charging points
- Assigned charging profiles at the charging stations
Steps
- Select ‘RFID card’.
- Enter the RFID card number.
- Select one or more charging points.
- Configure the charging profiles if required.
- Assign a contact person.
- Click on ‘Invite’.
- The invited user can use the physical RFID card immediately at the assigned charging points.
Typical use cases
- Employees with company-issued RFID cards
- Fleet drivers
- Existing users of the charging network
- Long-term access allocations
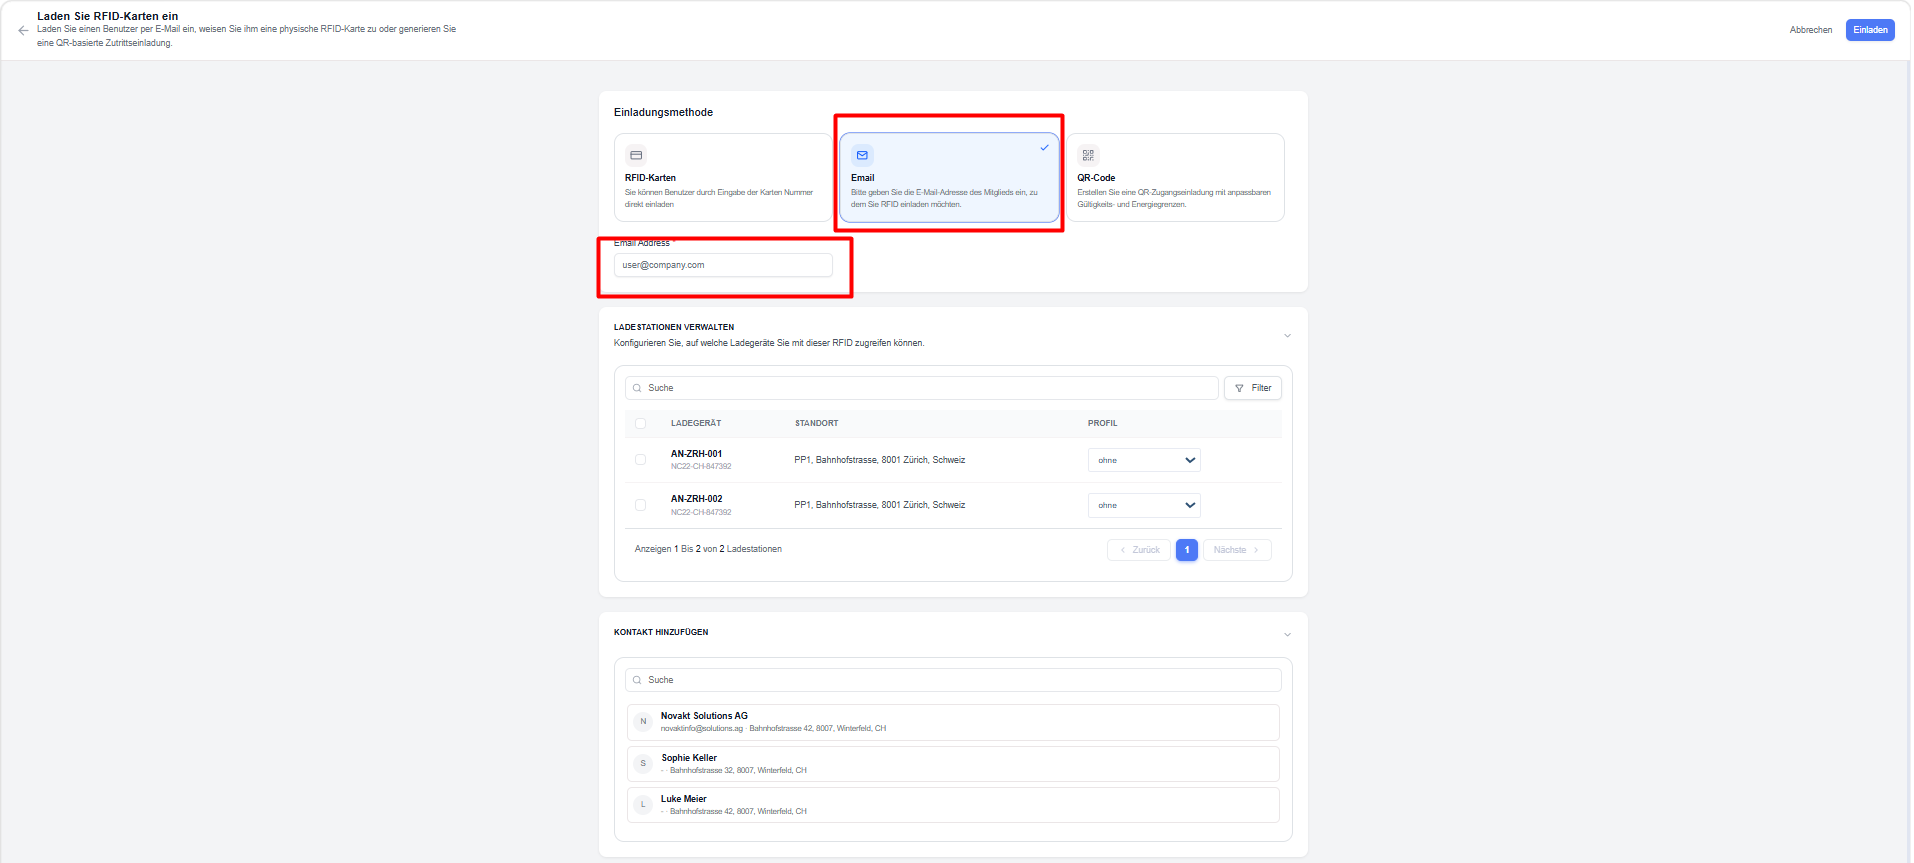
Email invitations –
RFID access can be granted via an email invitation.
When creating an invitation, the user can configure the following:
- Recipient’s email address
- Accessible charging points
- Charging profiles assigned to the charging points
Once the invitation has been sent, the recipient will receive instructions on how to accept it in the portal’s notifications section.
Steps
- Select ‘Email’ as the invitation method.
- Enter the recipient’s email address.
- Configure the access permissions for the chargers.
- Assign charging profiles.
- Send the invitation.
The recipient will receive an email with instructions on how to accept the RFID invitation and activate access.
Benefits
- No physical RFID card is required initially
- Simple onboarding process
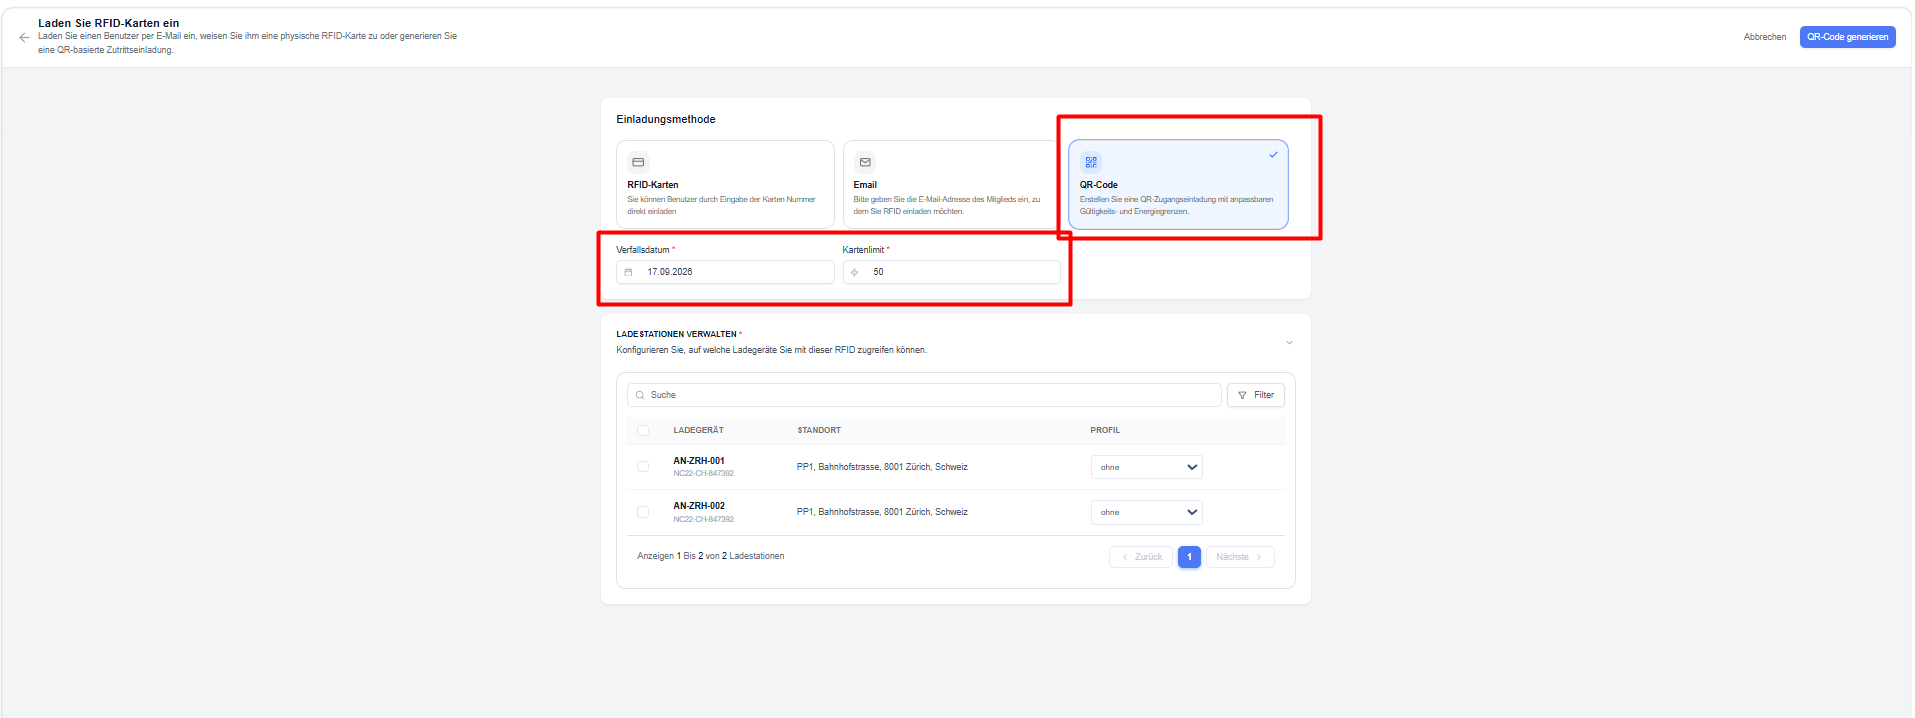
Access via QR code
QR codes offer a simplified method of granting RFID access.
Users can:
- generate a QR code.
- Set the validity period.
- Set usage restrictions (number of cards that can be loaded via the QR code)
- Select charging stations and assign charging profiles
- Share the QR code with the intended users.
Users can scan the QR code and complete the registration process to gain access.
Steps
- Select ‘QR code’.
- Configure the invitation settings.
- Select the authorised charging points.
- Assign charging profiles.
- Generate the QR code.
- Share the QR code with the recipient.
The recipient can scan the QR code and complete the registration process to gain access to charging.
Benefits
- Easy to share
- No email address required
- Suitable for public or event-related access for multiple users
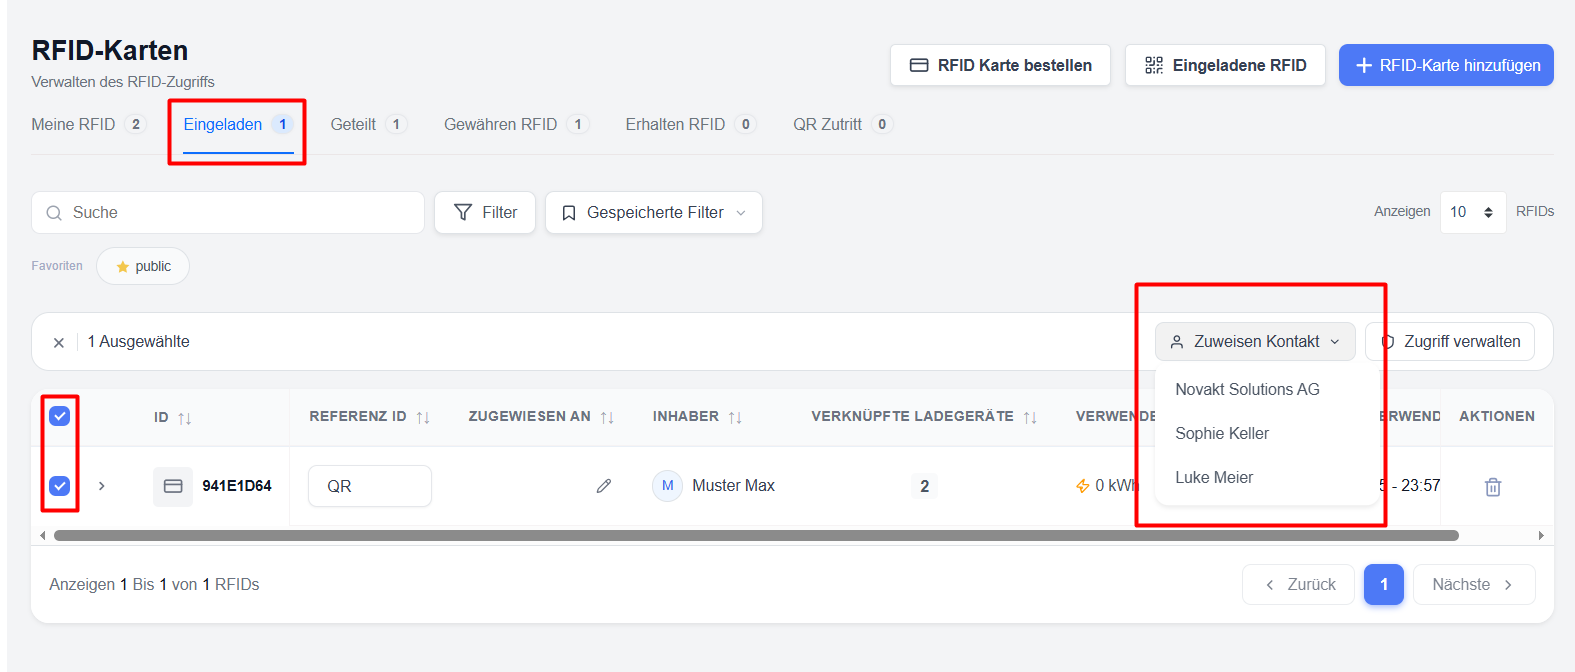
Access management using ‘Invited’ cards and charging profiles
The ‘Invited RFID Cards’ tab displays all RFID cards and invitations that have been created and issued to users.
Users can:
- Invite new RFID cards
- Send invitations by email
- Generate QR code-based invitations
- Assign RFID invitations to contacts
- Manage access permissions for chargers
- Apply charging profiles
- Monitor energy consumption and usage history
- Revoke access to charging stations as required
This enables users to maintain a clear overview of all activities relating to the shared use of RFID invitations.
Understanding the RFID invitation list
The invitation list provides a complete overview of all invited RFID cards and the permissions assigned to them.
Available information
RFID ID – Unique identifier for the RFID invitation.
Reference ID – A user-defined reference number that can be assigned for internal tracking purposes.
Assigned to – Displays the contact to whom the RFID card is assigned (this is for filtering purposes only and does not determine the card’s allocation)
Owner – Displays the user or organisation that owns the RFID card.
Linked Charging Points – Displays the number of charging points currently assigned to the registered RFID card.
Energy consumption – Displays the total charging energy consumed using the RFID card.
Last Use – Displays the most recent charging activity.
Actions – Allows administrators to delete or manage RFID access or charging points
Managing charging point access
Each registered RFID card can be granted access to one or more charging points.
Access management options
Users can:
- Grant access to charging points
- revoke access to charging points
- Apply charging profiles
- Assign permissions in bulk
When assigning charging access, users can select individual charging points and specify how the RFID card behaves at each charging point.
Assigning charging profiles
A charging profile can be selected for each charging point assignment.
Examples of this include:
- Normal
- Free charging
- Business profiles
- Customised charging rules
Profiles define billing costs, restrictions and operational behaviour.
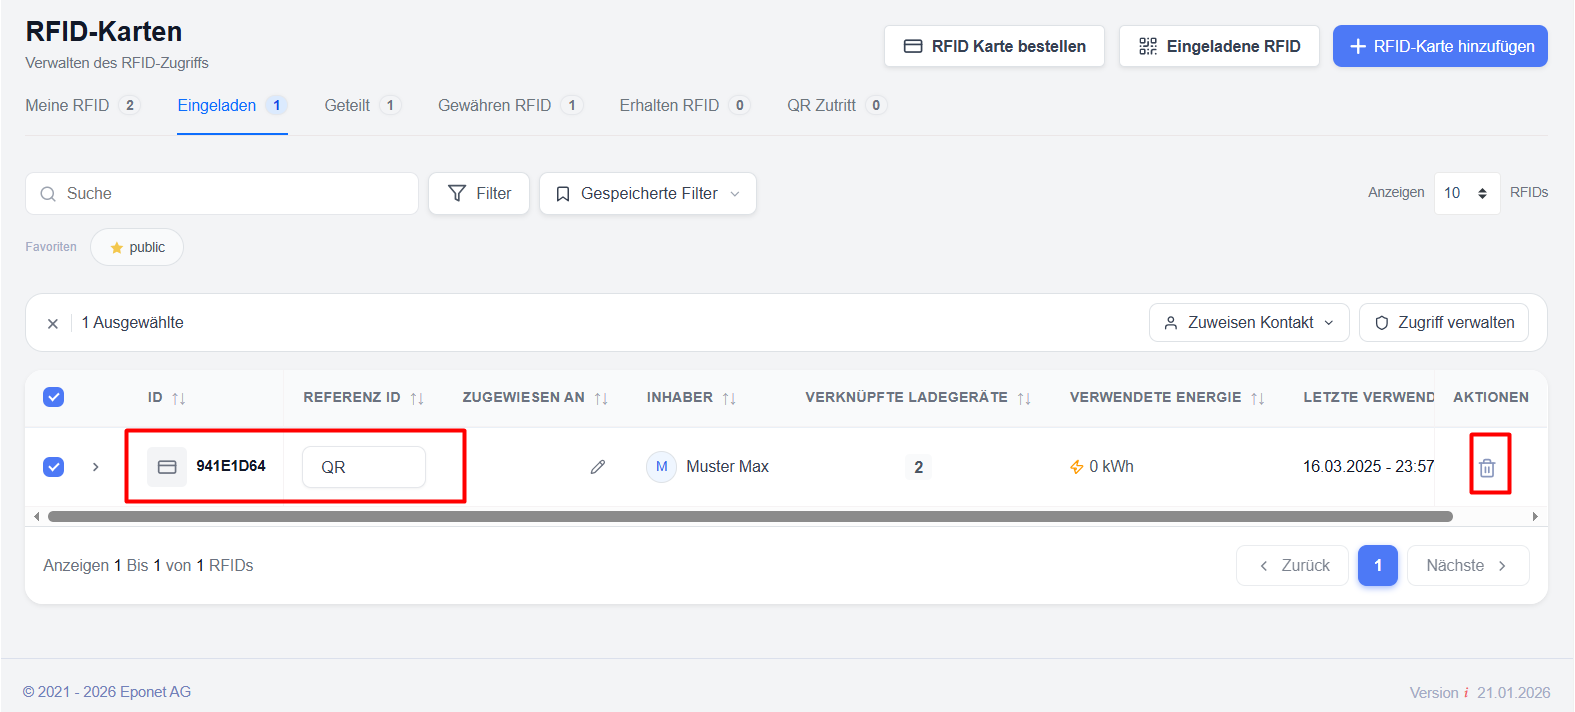
Bulk actions
The ‘Invited RFID’ module supports the bulk management of multiple RFID invitations simultaneously.
Available bulk actions
Assign contact – Assign the same contact to multiple RFID invitations.
Manage access – Grant or revoke charger access for multiple RFID cards at once.
Apply billing profiles – Configure billing profiles for multiple invitations at the same time.
Benefits
- Faster management
- Standardised configuration
- Reduced manual effort
- Improved operational efficiency
Management of existing charging point permissions
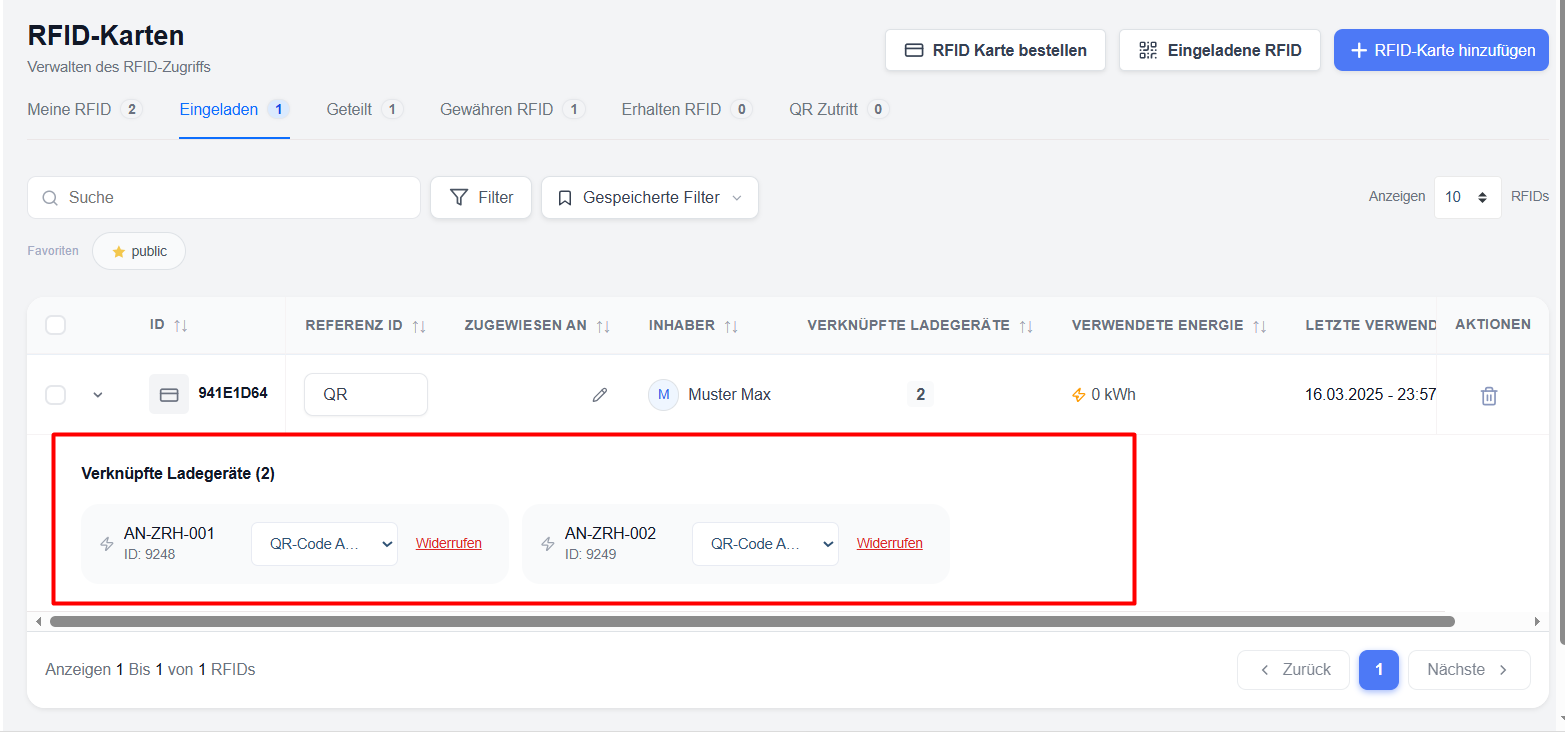
Users can view permissions for charging points directly in the invitation list.
View linked chargers
- Expand an RFID invitation using the arrow icon.
- View all linked charging stations.
- Check the assigned charging profiles.
- Check the access permissions.
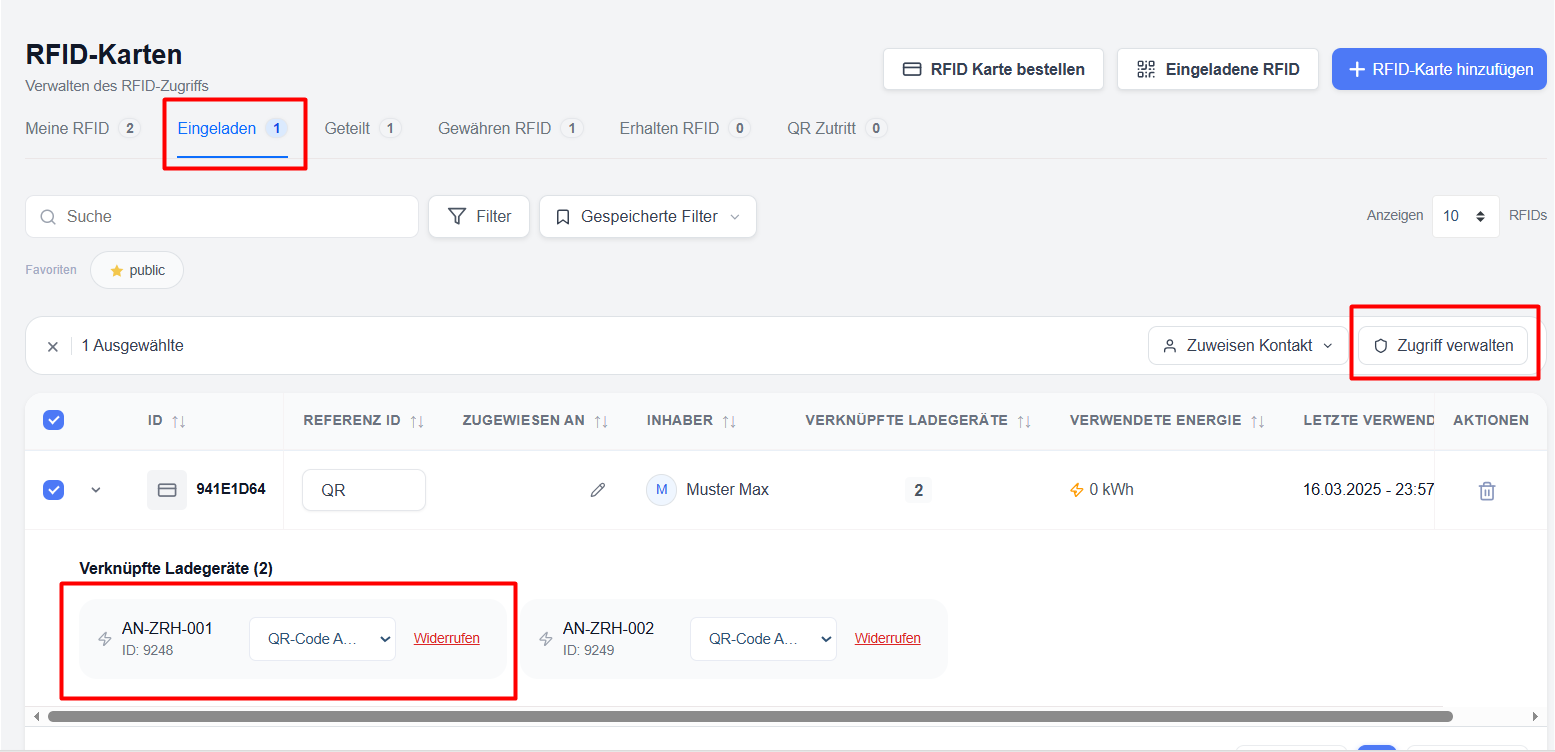
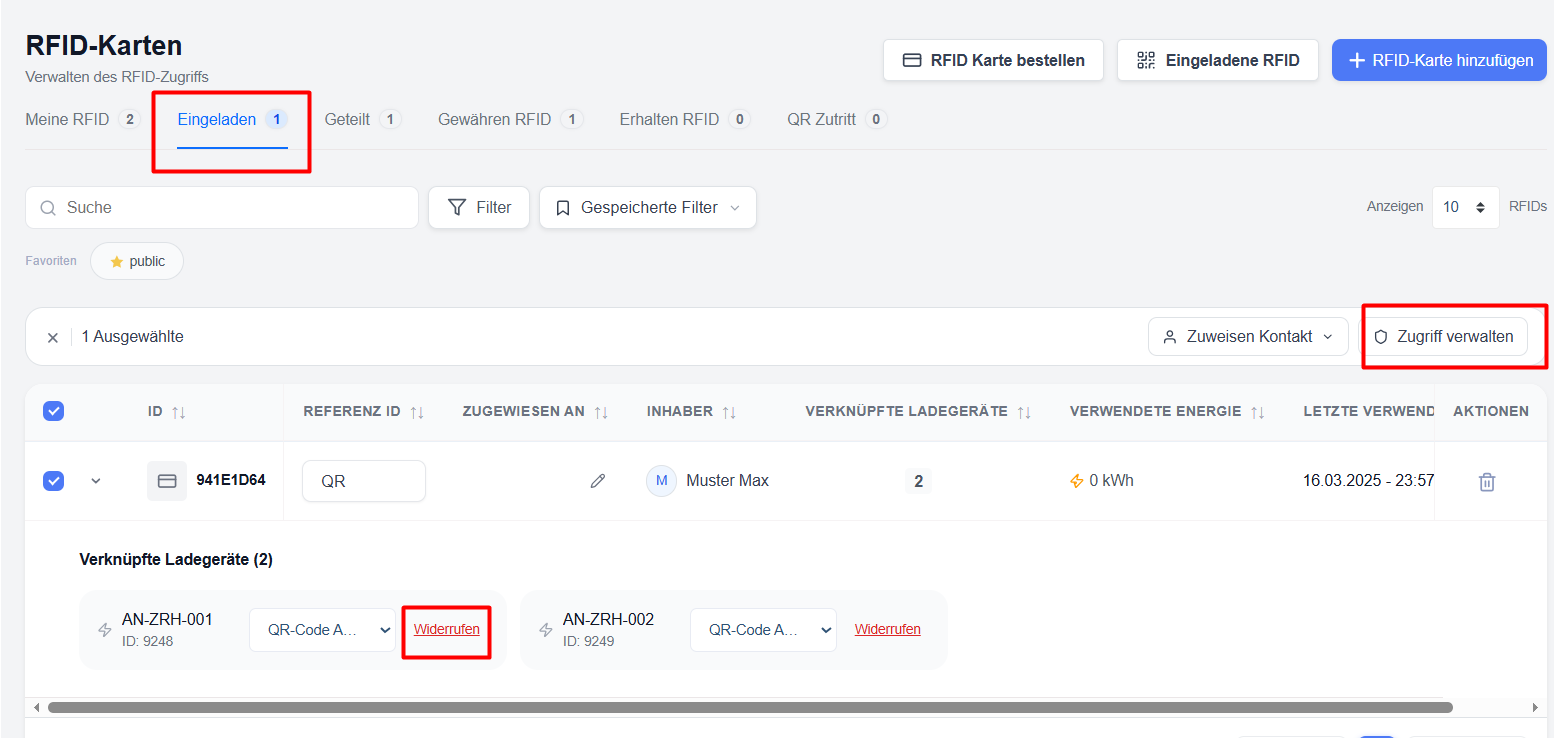
Revoke access
If a user should no longer have access to a charging point:
- Expand the RFID invitation.
- Search for the charging point.
- Click on ‘Revoke’.
- Confirm the action.
The charging station will immediately become inaccessible to this RFID invitation.
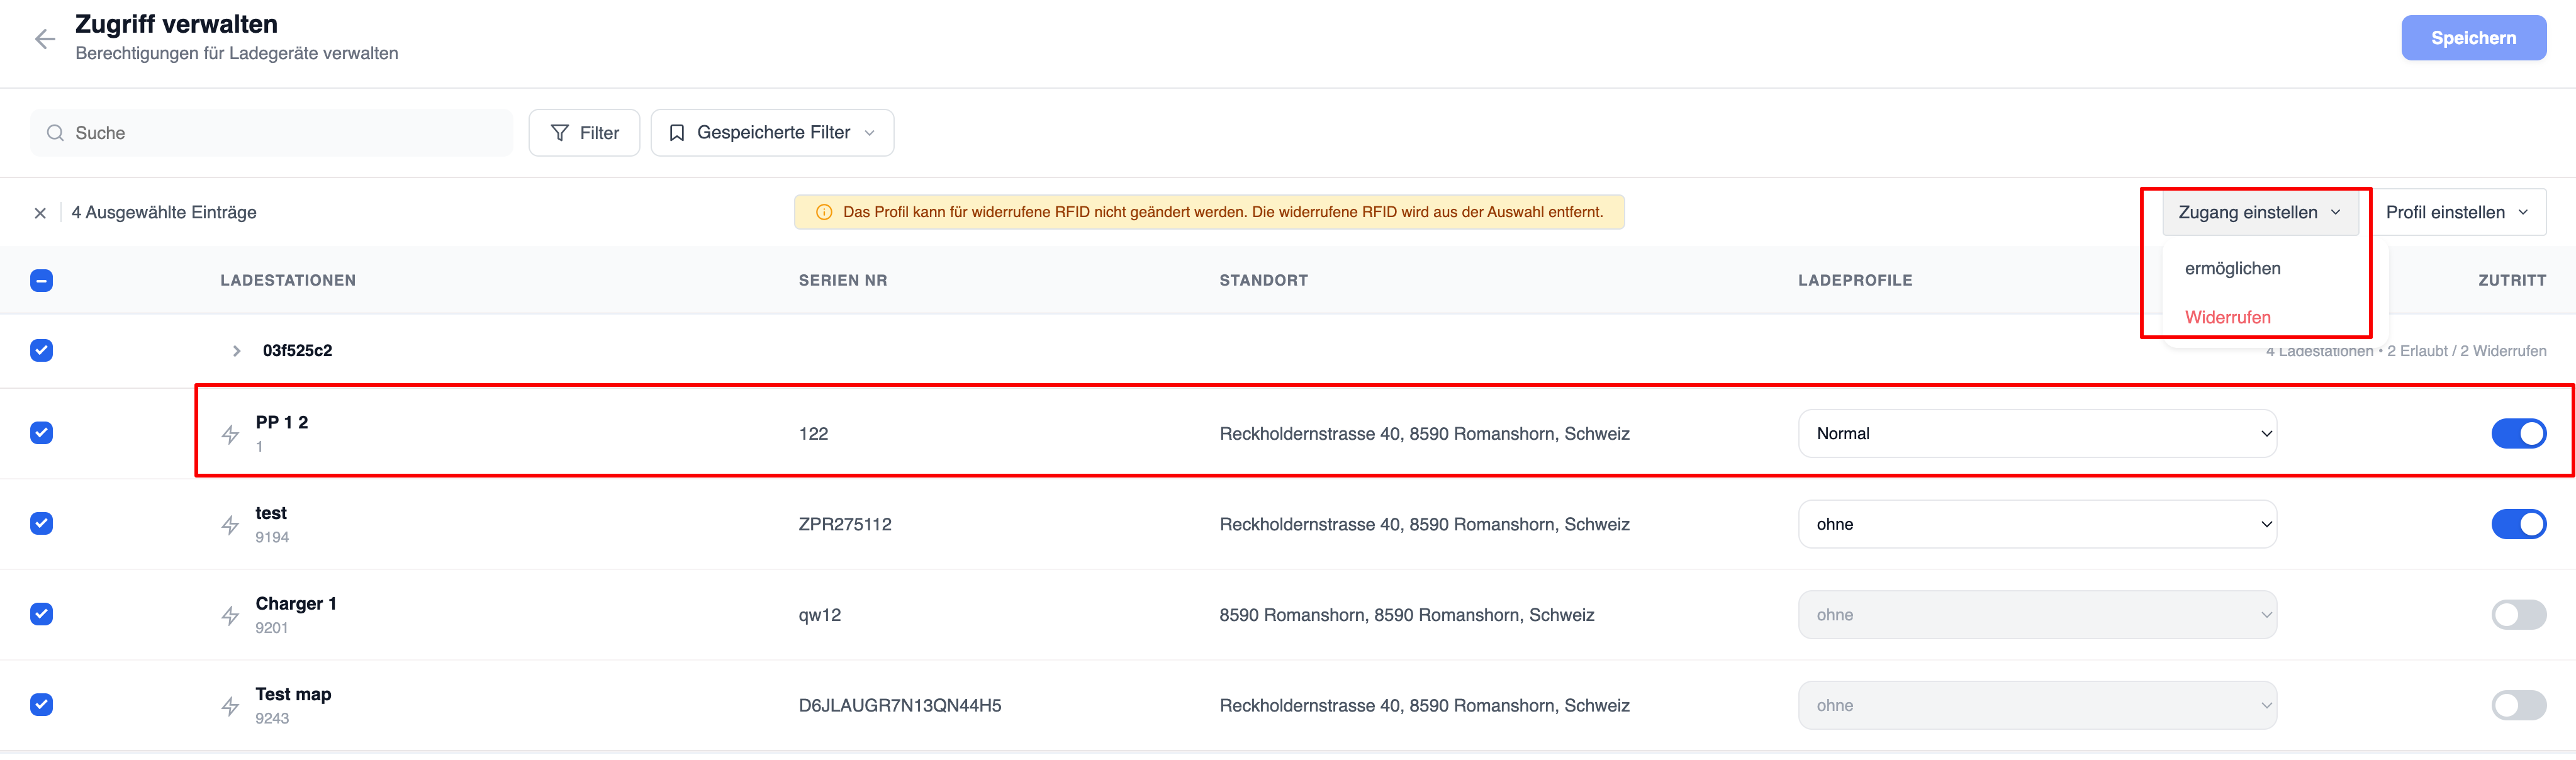
‘Access Management’ screen
The ‘Manage Access’ screen provides a central interface for managing access rights for multiple charging stations.
Available controls
Access status
Users can:
- activate access to the charging point
- deactivate access to the charging point
- Apply changes to multiple chargers
Charger profiles
Profiles can be assigned individually to each charger.
Bulk update of permissions
Multiple chargers can be selected and updated simultaneously.
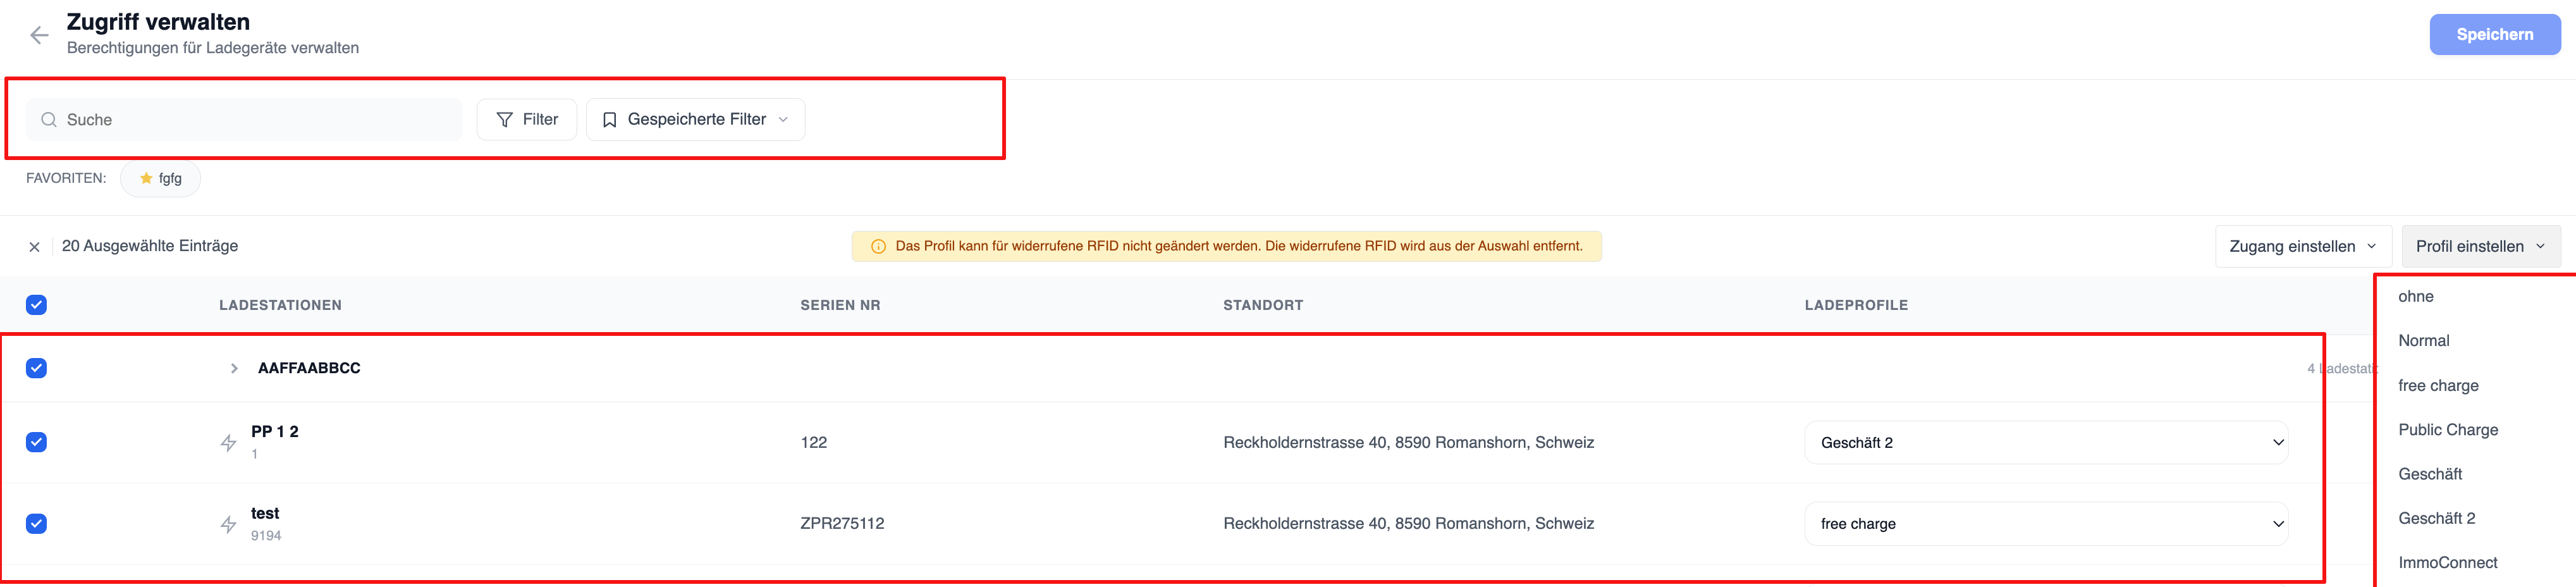
If a card is authorised for a specific charging point but no charging profile has been assigned, the charging sessions carried out are treated as free charging.