Bulk promotion for chargers
Description: How to select multiple chargers and perform group operations, including managing public charging stations, Hubject settings, depot charging, monitoring configuration and RFID access management.
Selecting multiple chargers
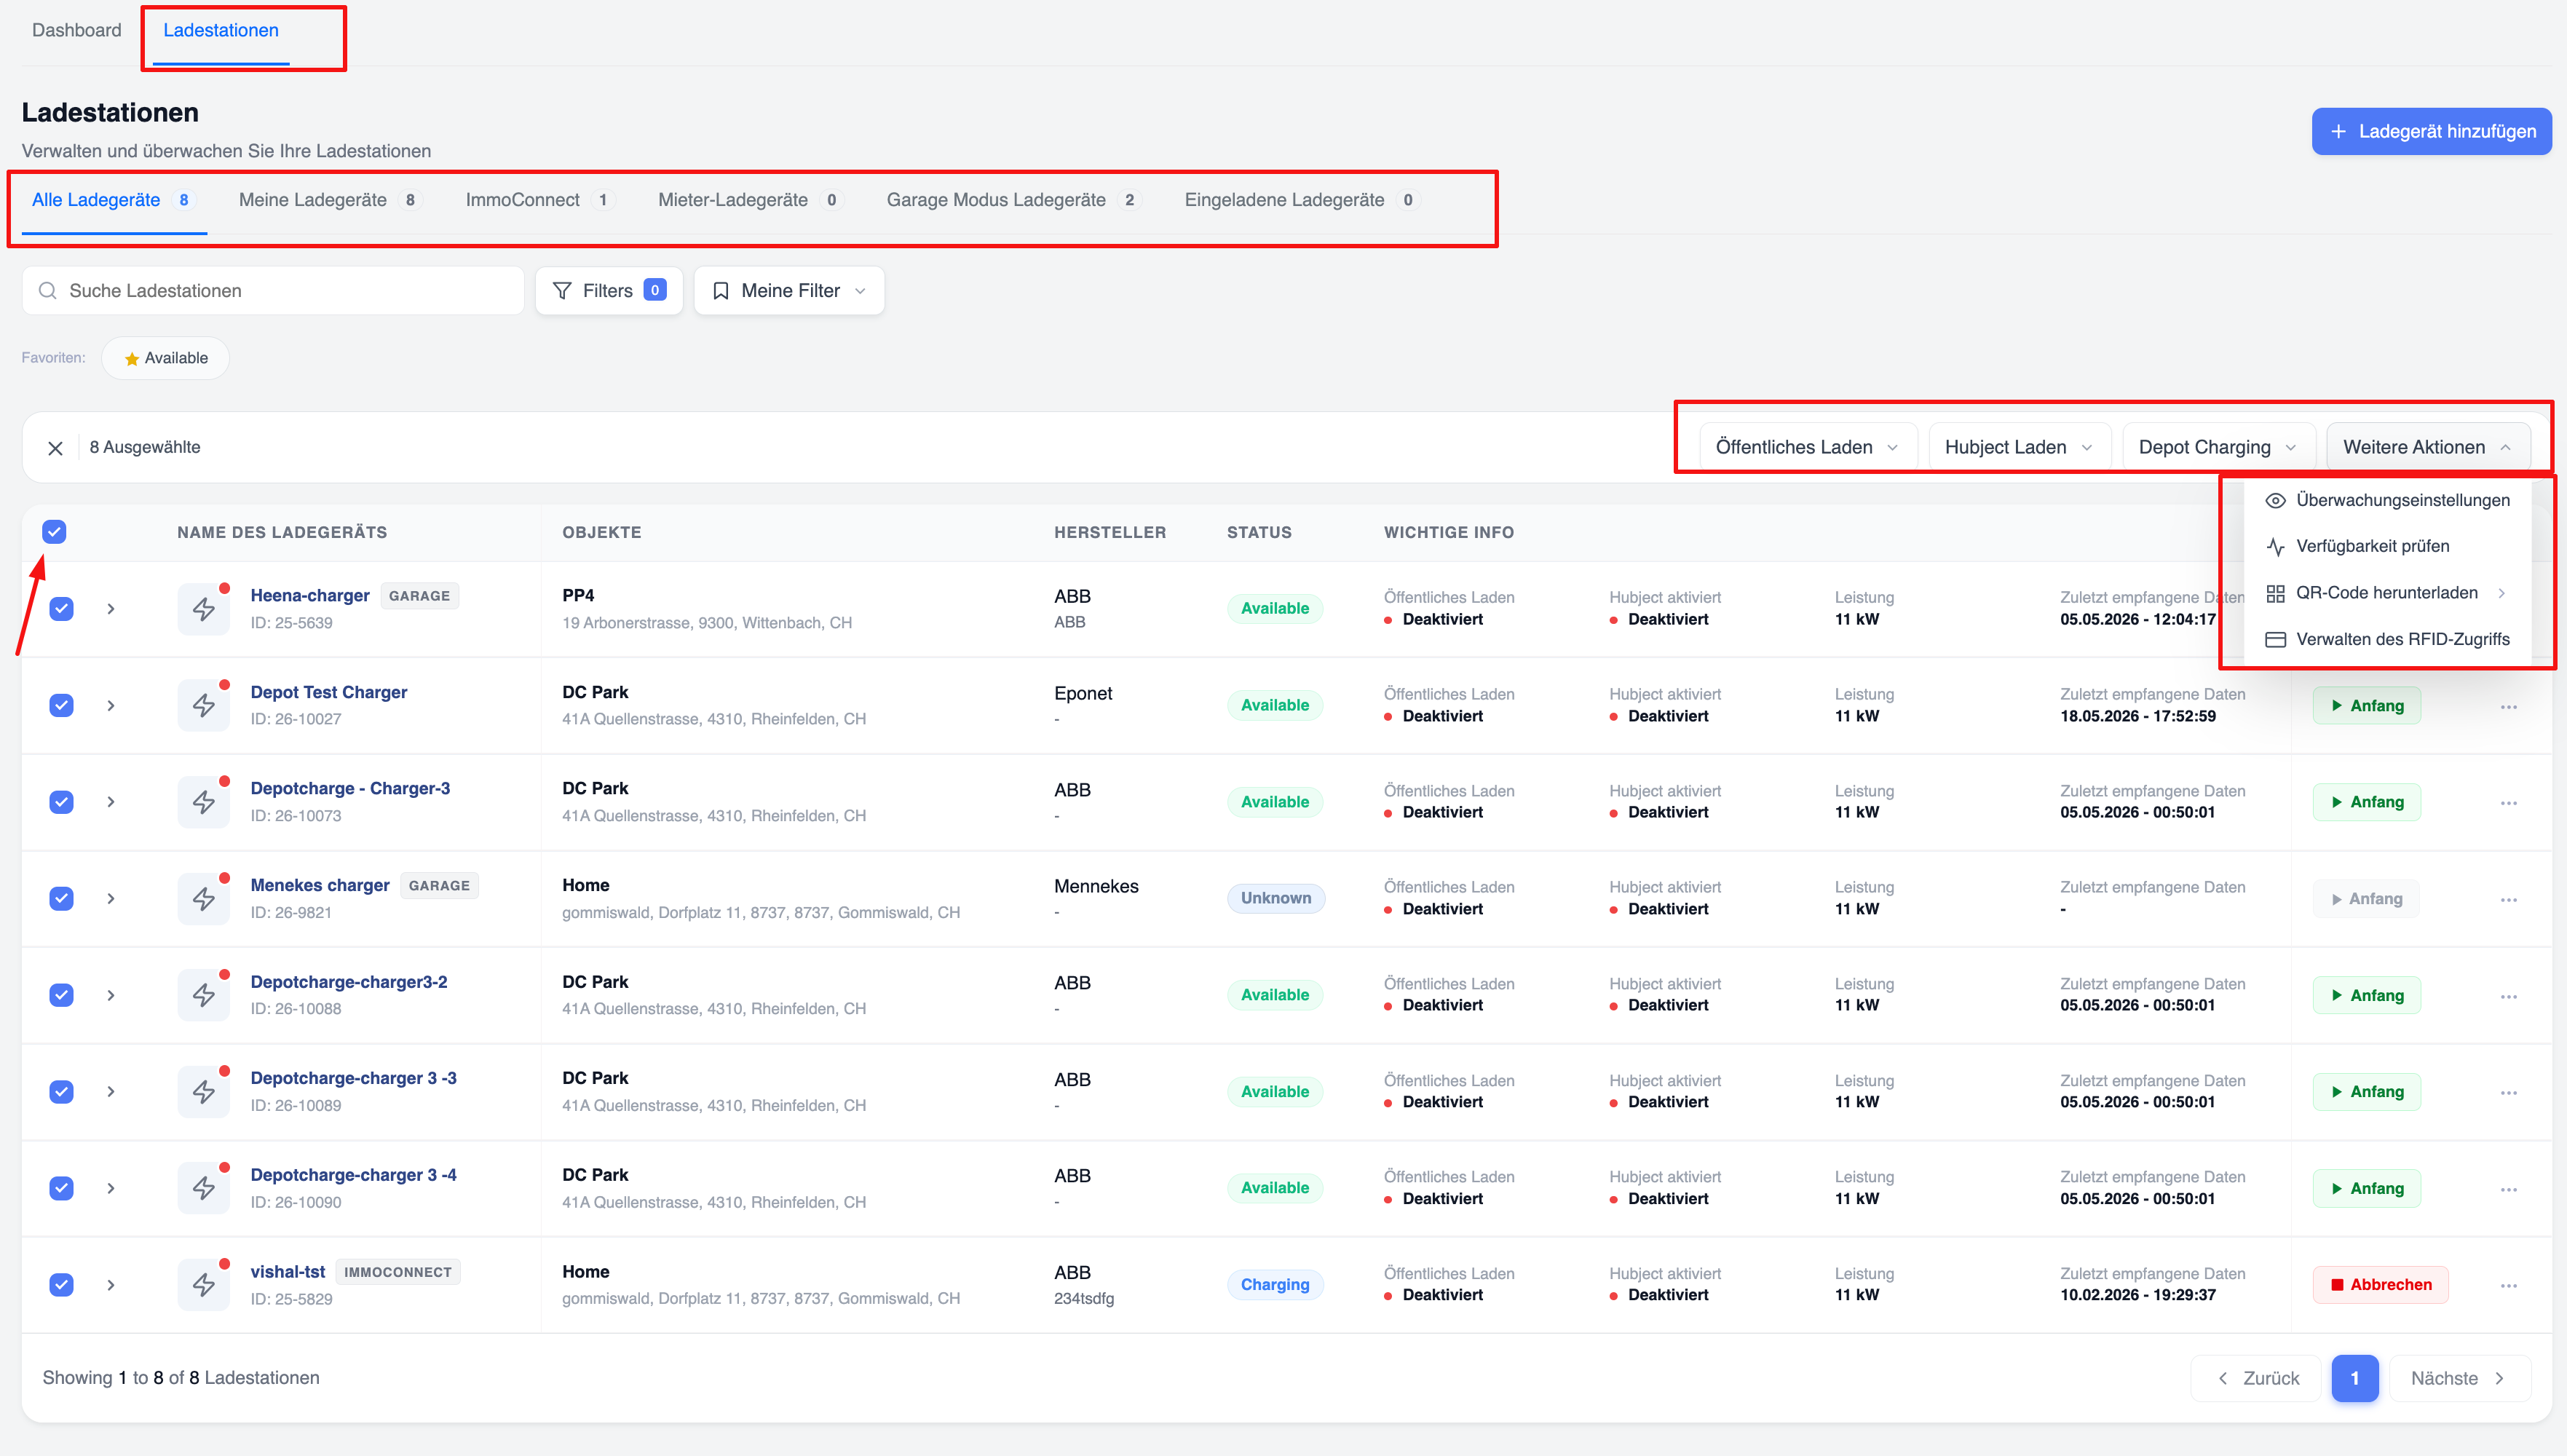
Bulk actions begin by selecting chargers on the overview page. Each row has a tick box on the left-hand side. Ticking one or more tick boxes activates the bulk action bar at the top of the table.
The bulk action bar displays ‘X selected’ (where X is the number of selected chargers) and a ‘×’ button to clear the entire selection. A master tick box in the table header selects or deselects all currently visible chargers at once.
Overview of the bulk action toolbar
Once at least one charger is selected, four action menus appear on the right-hand side of the bulk action bar:
- Public Charging – A drop-down menu to enable or disable public charging for all selected chargers simultaneously.
- Hubject – A drop-down menu to enable or disable Hubject roaming for all selected chargers.
- Depot Charging – A drop-down menu to enable or disable depot charging mode for all selected chargers.
- Further actions – A drop-down menu displaying additional bulk actions (described on the following pages).
‘More Actions’ menu
Clicking the ‘More Actions’ drop-down menu displays four options:
- Monitoring settings – Configure offline and status alerts for all selected chargers at once.
- Check Availability – Triggers a check of the availability status for all selected chargers.
- Download QR Code – Opens a sub-menu to download QR codes for all selected chargers.
- Manage RFID access – Opens the full screen for managing RFID access for the selected chargers.
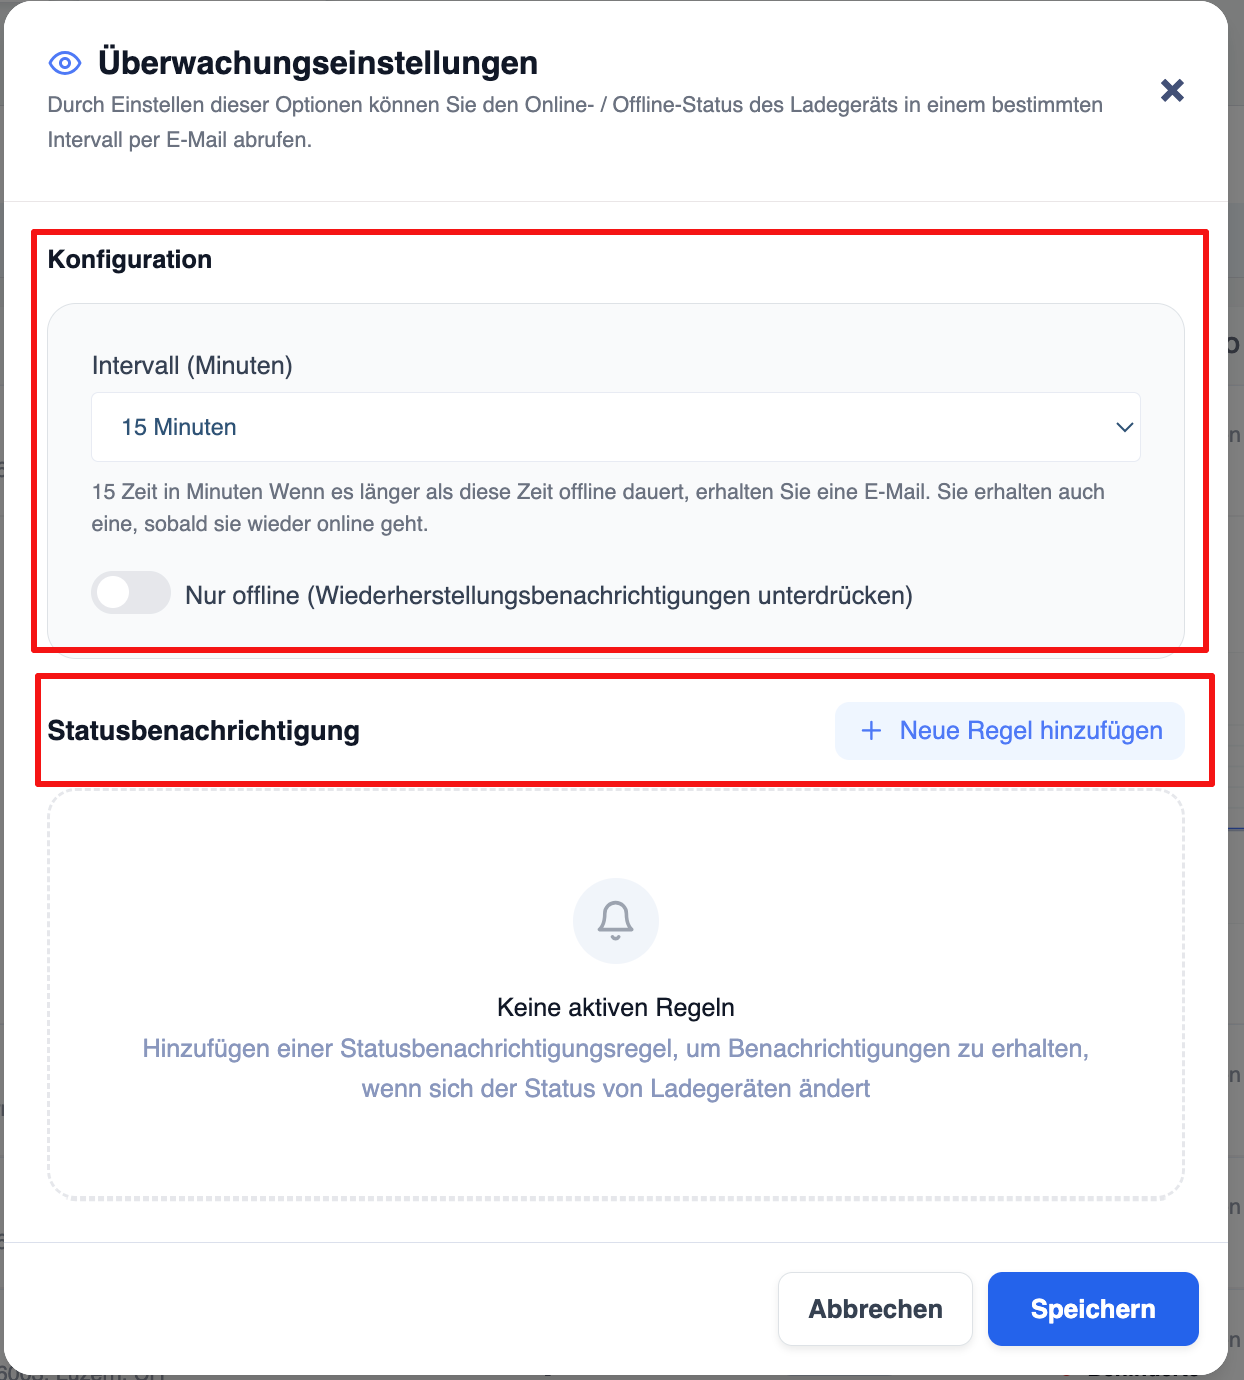
Monitoring settings
Selecting the ‘Monitoring settings’ option in the ‘More actions’ menu opens a modal dialogue box. The dialogue box is divided into two sections:
1. Offline Interval Configuration
This section determines when an email notification is sent if a charger goes offline.
- Interval (minutes): A drop-down menu to specify how long a charger must remain offline before a notification email is triggered. The default value is 15 minutes. The help text explains: “If the charger remains offline for longer than this duration, you will receive an email notification. You will also receive a notification when it comes back online.”
- Offline only (suppress recovery notifications): A toggle switch. When disabled (default), both offline notifications and recovery notifications (back online) are sent. When enabled, only offline notifications are sent and recovery emails are suppressed.
2. Status notifications
In this section, you can add rules that trigger notifications as soon as a charger changes its OCPP status (e.g. from ‘Available’ to ‘Faulty’).
- You can create a new rule using the ‘+ Add notification’ button in the section header.
- If no rules exist, an empty state is displayed with a bell icon and the message: “No active rules – Add a status notification rule to receive notifications when chargers change their status.”
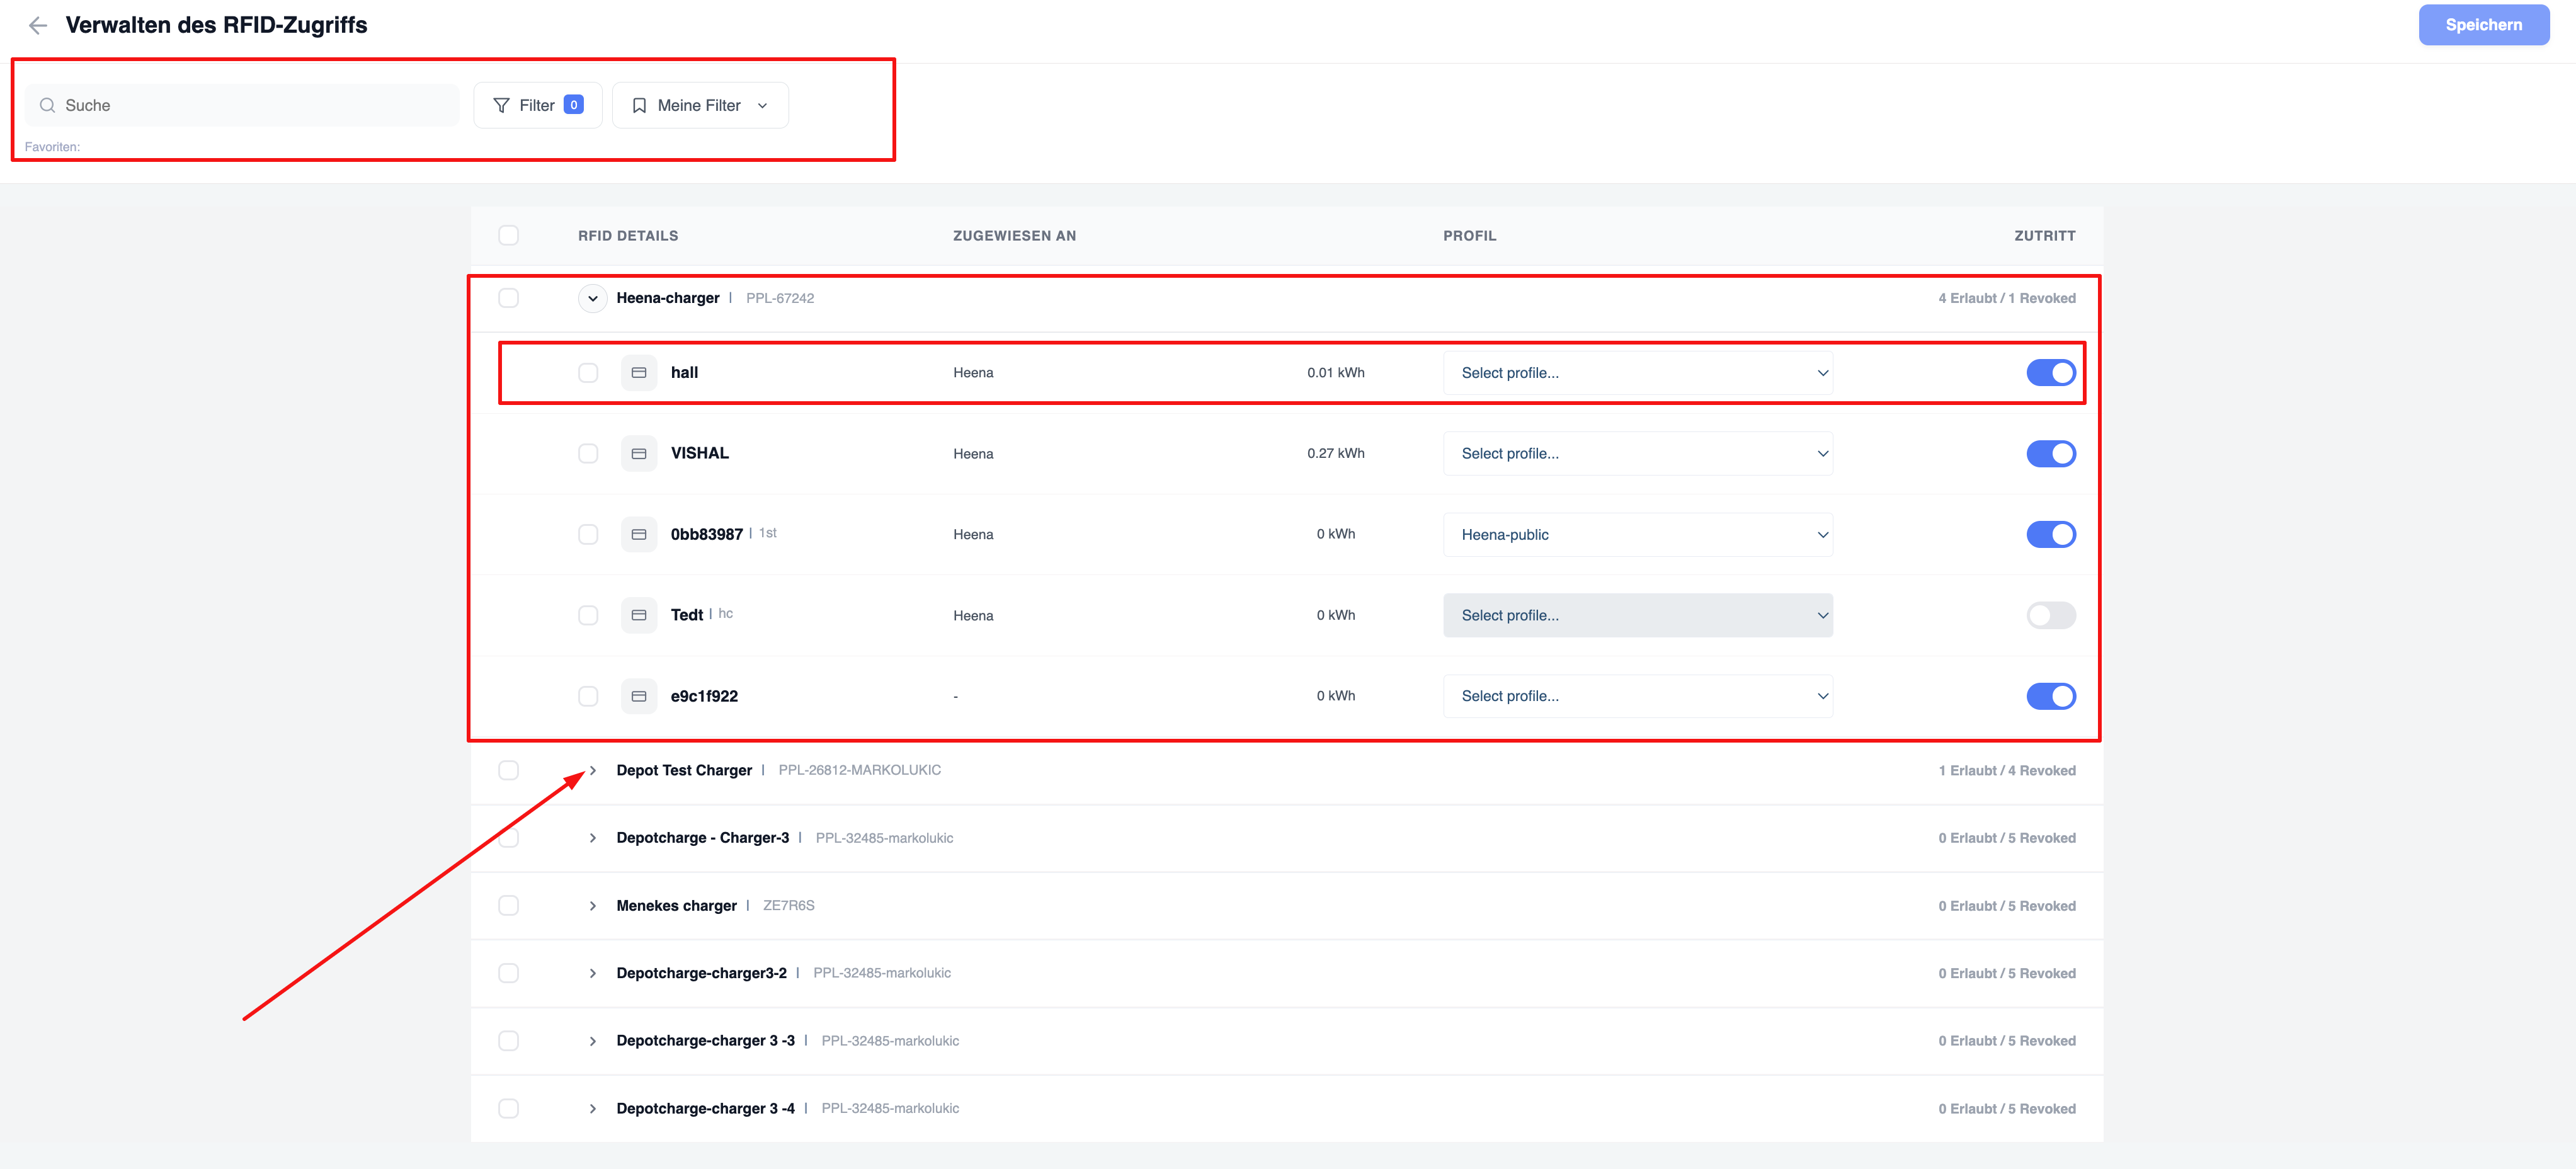
Overview of RFID access management
Selecting “Manage RFID Access” from the “More Actions” menu opens a separate full-page screen titled “Manage RFID Access”. This screen relates to the chargers selected in the bulk action bar.
At the top of the page:
- A search bar for searching for specific RFID cards by name or ID.
- A ‘Filter’ button that displays the number of active filters.
- A ‘My Filters’ drop-down menu for accessing saved filter presets.
- A ‘Save’ button in the top right-hand corner to apply any changes made on this screen.
RFID access tree structure
The RFID access list is organised as a collapsible tree, grouped by chargers:
Charger rows (top-level): Each charger appears as a top-level row displaying the charger name, serial number (e.g. PPL-67242) and an access summary (e.g. 4 authorised / 1 revoked). Clicking the expand arrow opens the charger and displays the associated RFID cards.
RFID card rows (sub-level): Each card row under a charger displays the following:
- Checkbox – for selecting individual cards for bulk operations
- Card icon – visual identifier for the RFID card type
- RFID ID – name or token of the card (e.g. hall, VISHAL, 0bb83987, Tedt, e9c1f922) and any tag labels
- Assigned to – the user or tenant to whom the card is assigned (e.g. Heena)
- Energy consumption – total energy consumption of this card at this charger (in kWh)
- Profile – a drop-down menu for assigning a charging profile (e.g. ‘Heena-public’ or ‘Select profile...’)
- Access switch – a blue switch means that access is “Permitted”; a grey switch means that access is “Revoked”
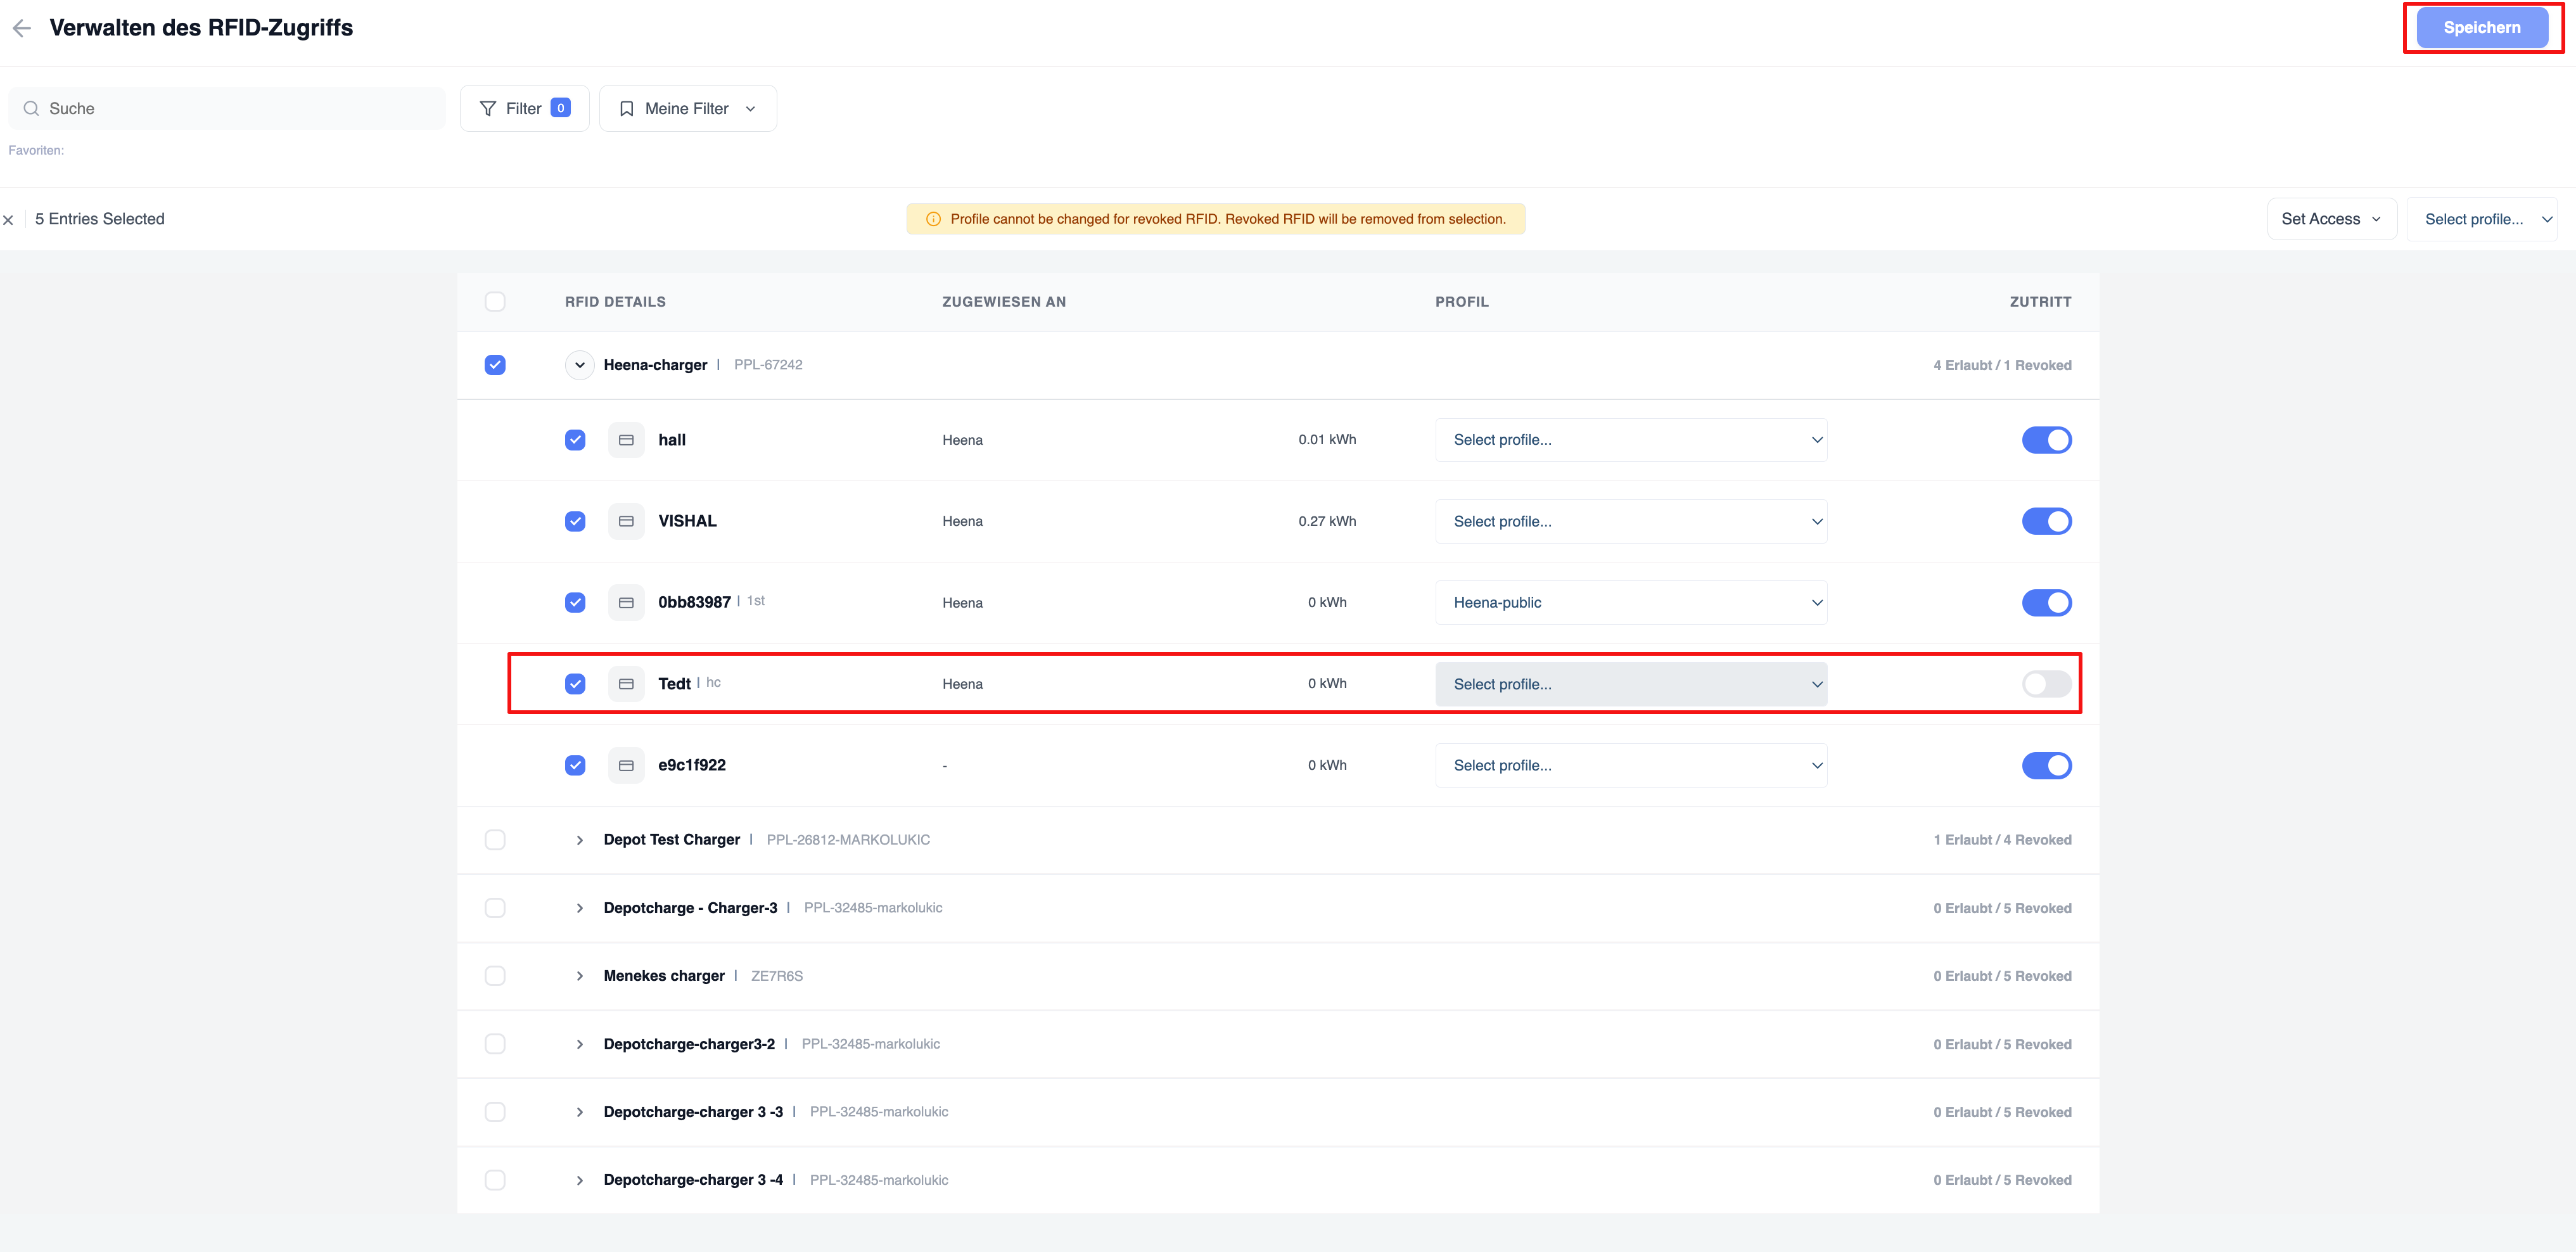
RFID bulk operations
If multiple RFID card rows are selected (across one or more charging stations), a collective selection bar appears displaying “X entries selected”.
If access has been revoked for any of the selected cards, a warning banner appears: “Profile cannot be changed for revoked RFID card. Revoked RFID card will be removed from the selection.” Revoked cards are automatically excluded from profile assignment.
On the right-hand side of the selection bar, two drop-down menus for bulk actions appear:
- Set access – Grants or revokes access for all selected RFID cards in a single step.
- Select profile – Assigns a single billing profile to all selected (non-revoked) RFID cards simultaneously.
Save RFID changes
After making changes – enabling/disabling access, assigning or changing profiles – click the “Save” button in the top right-hand corner of the screen to apply all changes.
Changes are applied per charger-RFID combination. The access overview in the header row of each charger (e.g. 4 authorised / 1 revoked) is automatically updated after saving to reflect the current status.
Blocked RFID cards (indicated by a grey/deactivated switch) cannot be assigned to profiles via bulk operations and are skipped if included in a multi-select profile assignment.