
Assign a charger to a location
Once a location has been created, you must tell the system which charging points belong to that location. This is done on the ‘Assign charging points’ tab.
Step-by-step guide:
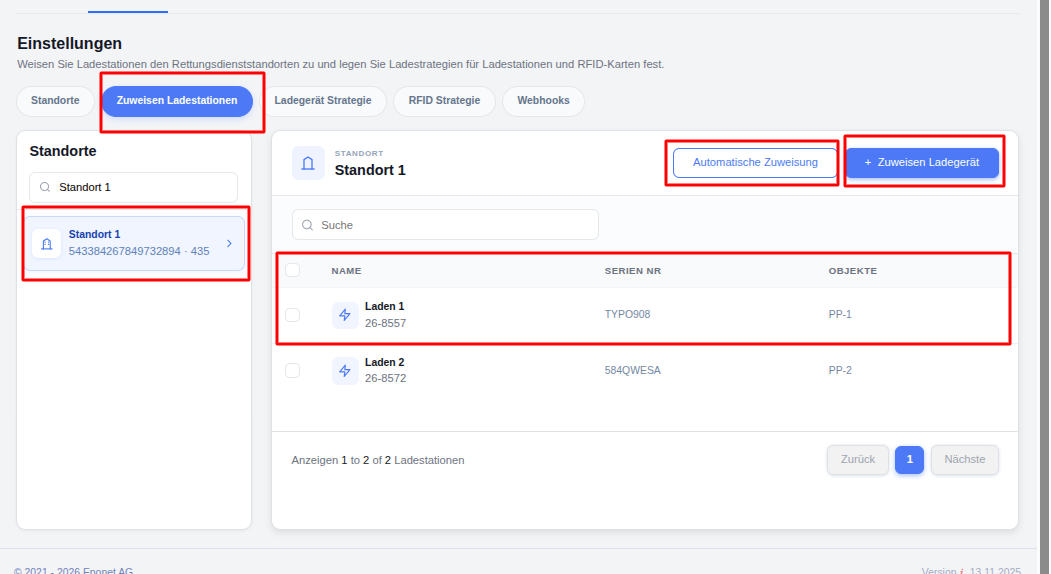
- Go to EMS → Settings → ‘Assign Charging Stations’.
- On the left-hand side, click on the location you wish to work with (e.g. ‘Location 1’). The location details (Wago ID and Ec-ID) will be displayed.
- On the right-hand side, you will see:
- A search field
- The ‘Automatic assignment’ button
- The ‘+ Assign Charger’ button
- A table showing chargers that have already been assigned
To assign a charger manually:
- Click on ‘+ Assign charger’.
- Select one or more chargers from the list displayed.
- Confirm your selection.
The assigned chargers are now displayed in the table with the following columns:
- NAME – Name of the charger (e.g. Charger 1)
- SERIAL NO. – Serial number
- OBJECTS – Linked object / object (e.g. PP-1)
Useful functions:
- Use the search box to quickly find a specific charger.
- You can select multiple charging stations using the tick boxes to the left of each row.
- The pagination at the bottom shows how many charging stations are assigned (e.g. ‘Displaying 1 to 2 of 2 charging stations’).
Note: When you add a new location, the location data is retrieved. Provided the correct serial number is received from the Wago station, the charging stations are automatically assigned to the location.
Note: A charging station should normally belong to only one location. If you need to move a charging station, first remove it from the old location and then assign it to the new one.
‘Automatic Assignment of Charging Stations’ option
The “Automatic Assignment” function is useful if you have a large number of chargers and the location provides corresponding charger data that should be assigned to a location (via serial numbers and connection IDs).
To use this feature:
- Go to EMS → Settings → Assign Charging Points.
- Select the desired location from the left-hand side.
- Click the ‘Automatic Assignment’ button (next to ‘+ Assign Charger’).
- The system automatically detects suitable chargers and assigns them to the selected location.
After automatic assignment:
- The newly assigned chargers are displayed in the table on the right-hand side.
- You can still remove individual chargers or add further ones manually if the result of the automatic allocation is not ideal.
Tip: Always check the list after automatic allocation to ensure that the correct chargers have been assigned.