Managing RFID cards
A comprehensive guide to the ‘Manage RFID’ module on the e-mobility platform. This guide explains how to manage RFID cards, grant access to charging points, invite users, generate QR codes, assign profiles and control access permissions. All guides are based on the current user interface.
- An Introduction to RFID Management
- Managing RFID cards
- Invite RFID cards & Manage access
- Shared cards
- RFID profiles
- Grant RFID cards
- Order RFID cards
- Read RFID card / VID vehicle number via charging station
- Replace RFID cards
- RFID card management - machines
- RFID cards - Receive receipt by e-mail
An Introduction to RFID Management
The ‘Manage RFID’ module enables users to efficiently manage RFID cards for access to EV charging points. Key features include:
- Adding and managing physical RFID cards
- Inviting users via email or QR code
- Granting or revoking access to specific chargers
- Assigning RFID profiles to control usage limits, validity periods and charging behaviour
- Viewing approved, invited, granted and received RFID cards
- Filtering and bulk actions for multiple cards
Accessing the module: Navigate to the side menu → RFID card → ‘Manage RFID’ section.
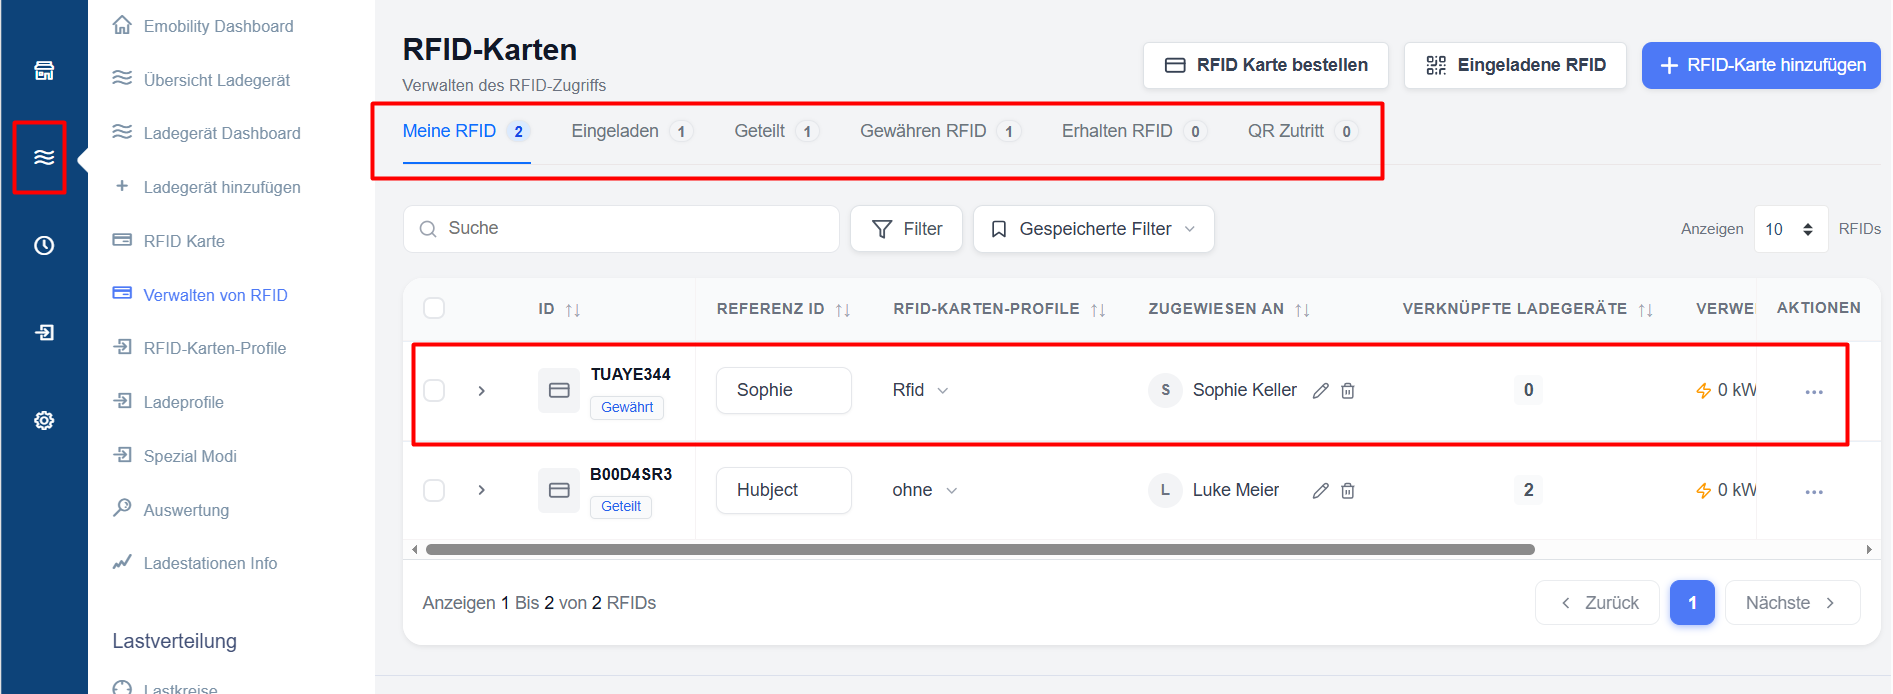
Overview of the main tabs:
- My RFID — My own cards
- Loaded – Loaded cards
- Shared — Shared cards
- Grant RFID — Grant access
- Received RFID — Received cards
- QR Access — QR Code Access Management
Navigation in the RFID management interface
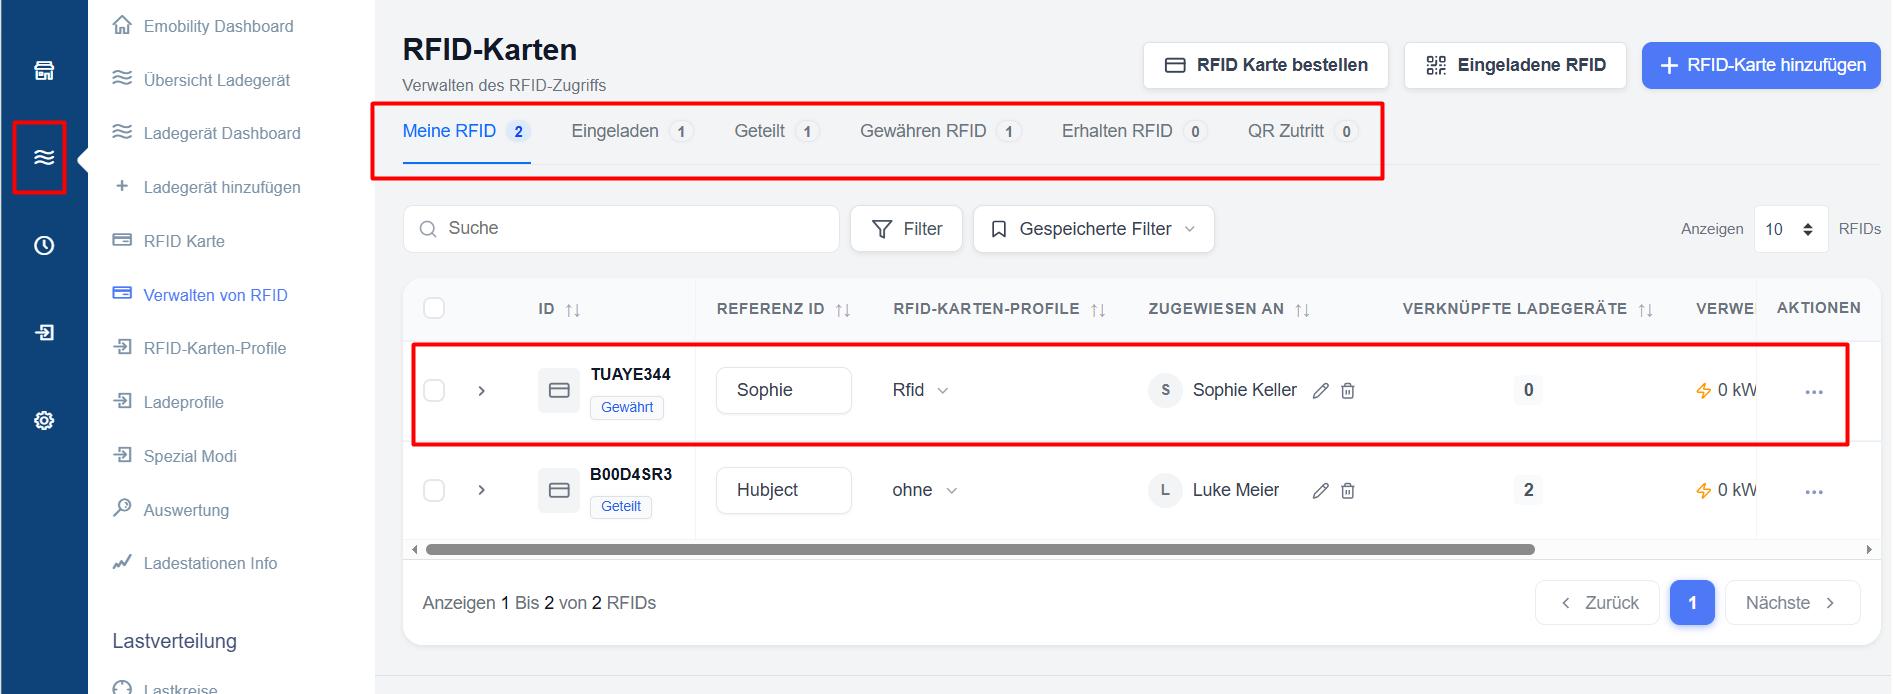
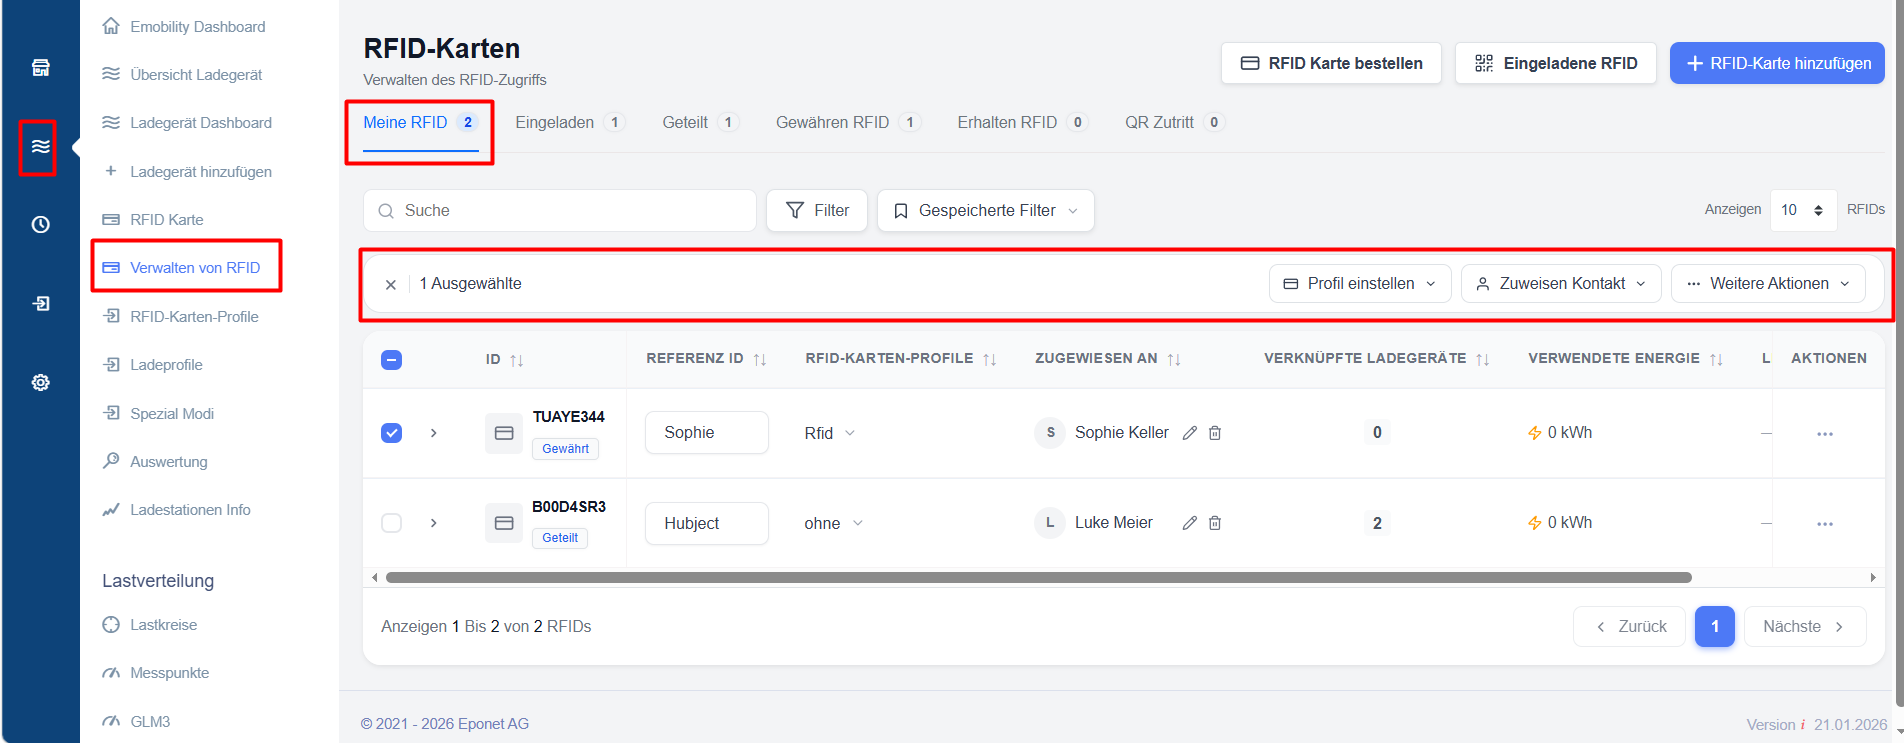
The main features of the user interface:
- Search bar and advanced filters
- Bulk selection with action buttons (Assign profile, Assign contact, Further actions)
- Table columns: ID, Reference ID, RFID card profile, Assigned to, Linked chargers, Energy used, Last use, Actions
Useful actions:
- Click the arrow (▾) next to a card to view the linked chargers
- Use ‘Revoke’ to revoke access to specific chargers
- Controls for pagination and the number of entries displayed
Search, filters and saved filters
To help users quickly find RFID cards, invitations, granted access rights, shared cards and charging authorisations, the platform offers powerful search and filter functions throughout the RFID management module.
Search
Using the search bar, users can quickly find records by entering relevant information, such as:
- RFID ID
- Reference ID
- Cardholder – ‘Invited & Received’ tab
- Assigned contact
The search results are updated instantly, allowing users to find specific records without having to manually search through large datasets.
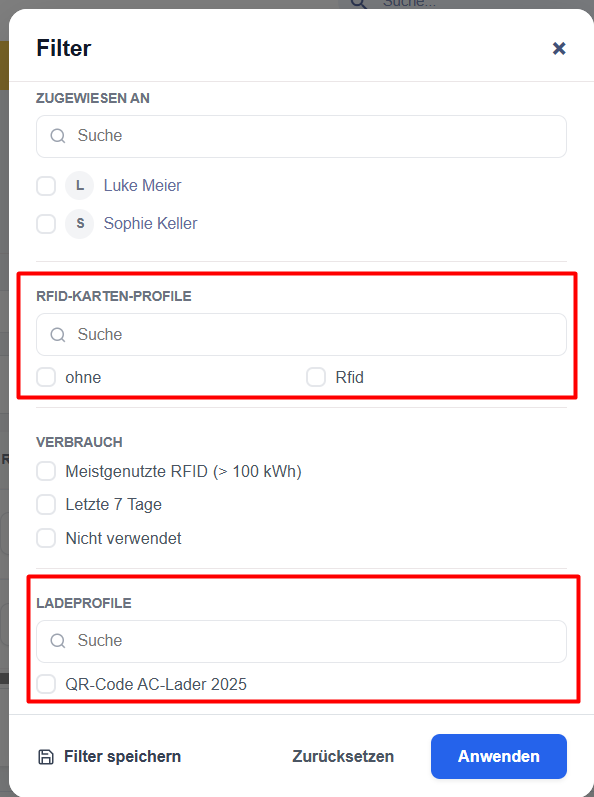
Advanced filters
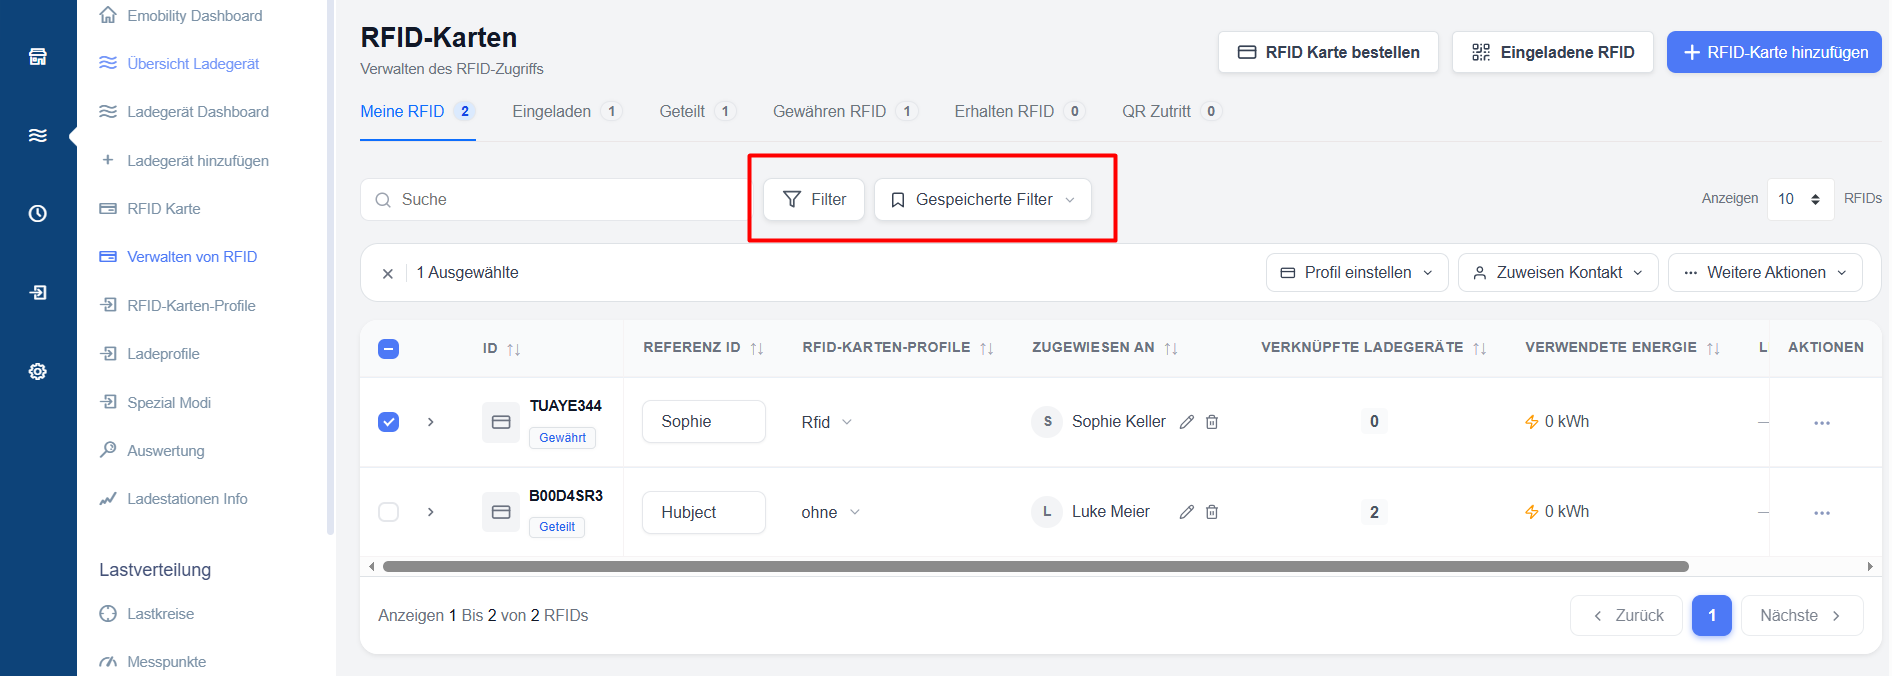
The filter option allows users to narrow down the results based on several criteria relevant to the current section.
Depending on the page, the following filters may be available:
- Assigned contact
- RFID profile
- Usage activity
- Access permissions
Multiple filters can be combined to create highly targeted search queries.
Saved filters
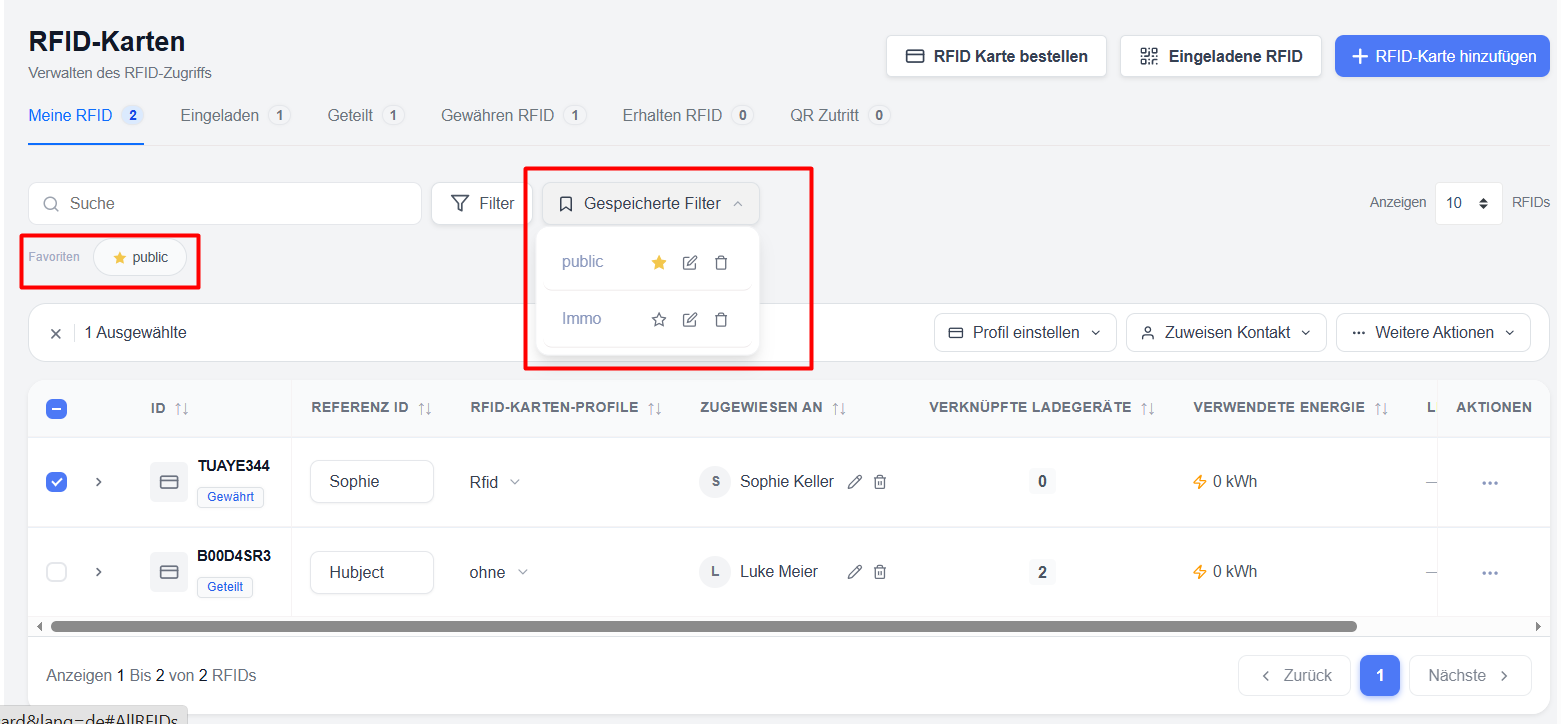
Frequently used filter combinations can be saved for later use.
To save a filter:
- Configure the desired search and filter criteria.
- Save the filter configuration.
- Give it a meaningful name.
Saved filters allow users to quickly access frequently used views without having to reapply the filter settings each time.\
Favourite filters
Saved filters can be marked as favourites for even quicker access.
Favourite filters are displayed directly on the page and can be applied with a single click, enabling quick access to frequently used data sets and workflows.
Benefits
Using search functions, filters and saved filter configurations helps users to:
- find records more quickly
- reduce manual navigation
- monitor specific RFID groups
Managing RFID cards
Description
Find out how to create RFID cards, assign ownership rights and manage access permissions for chargers.
Add RFID cards
To create a new RFID card:
The card is available for assignment and access management immediately after creation.
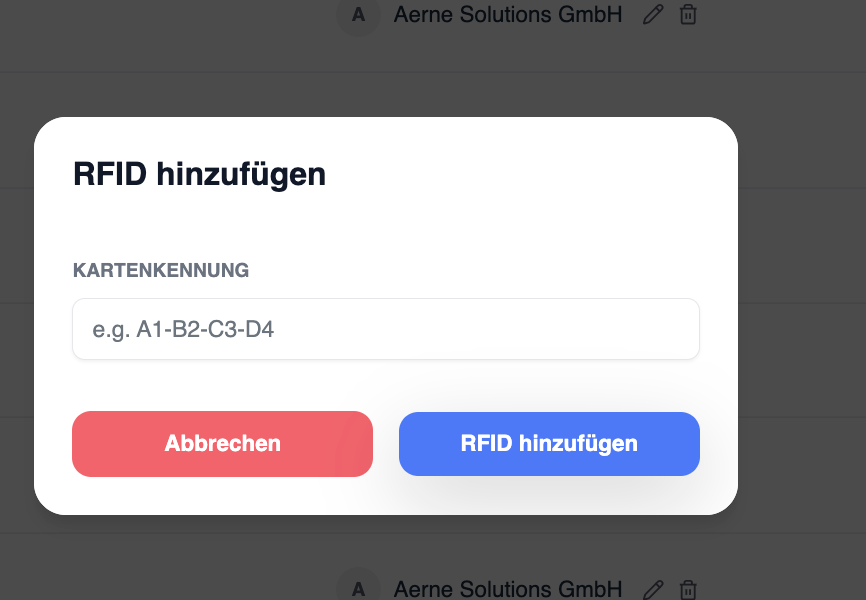
RFID numbers are entered in Eponet without spaces or colons. If a number is printed on your RFID card, e.g. 12:34:56:78, it must be entered without spaces or full stops, i.e. 12345678
If you have an Eponet RFID card, the number printed on the card corresponds to the number stored on the card, which is recorded when it is read. This is not always the case. RFID cards from other providers can also be stored, provided they comply with the current RFID standard for charging points.
Supported RFID technology: Passive HF RFID tags in accordance with ISO/IEC
14443 or ISO/IEC 15693 (NFC) at 13.56 MHz are supported
. The question may arise as to whether MiFare Classic is also supported and, if so, whether it is 1k or 4k. The answer is: it makes no difference. The charging station simply reads the chip’s UUID. It is therefore irrelevant whether the chip has 1k or 4k of memory.
Writing to RFID cards is not recommended, as depending on the charging station, the value stored in memory may be read instead of the UUID. This can lead to incompatibilities, e.g. with Hubject.
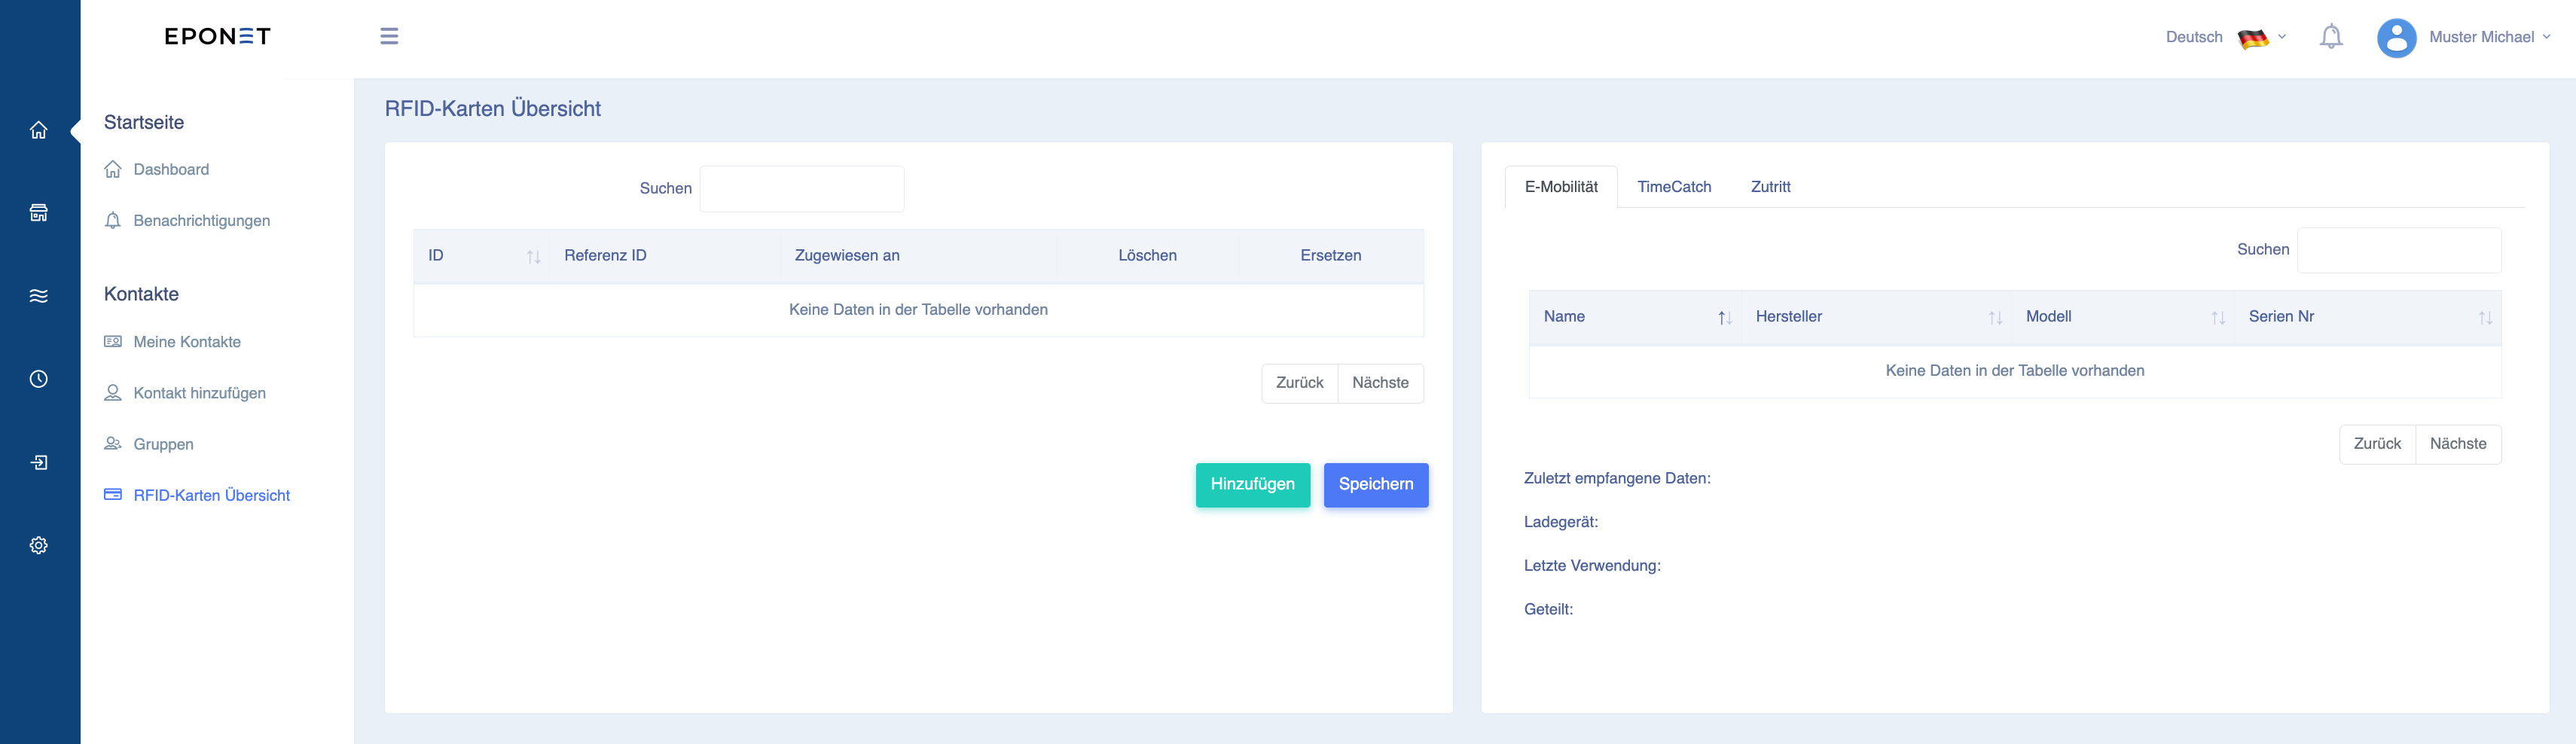
RFID Overview page :
Here you will find a complete overview of the RFID cards on this account. RFID cards can also be added here.
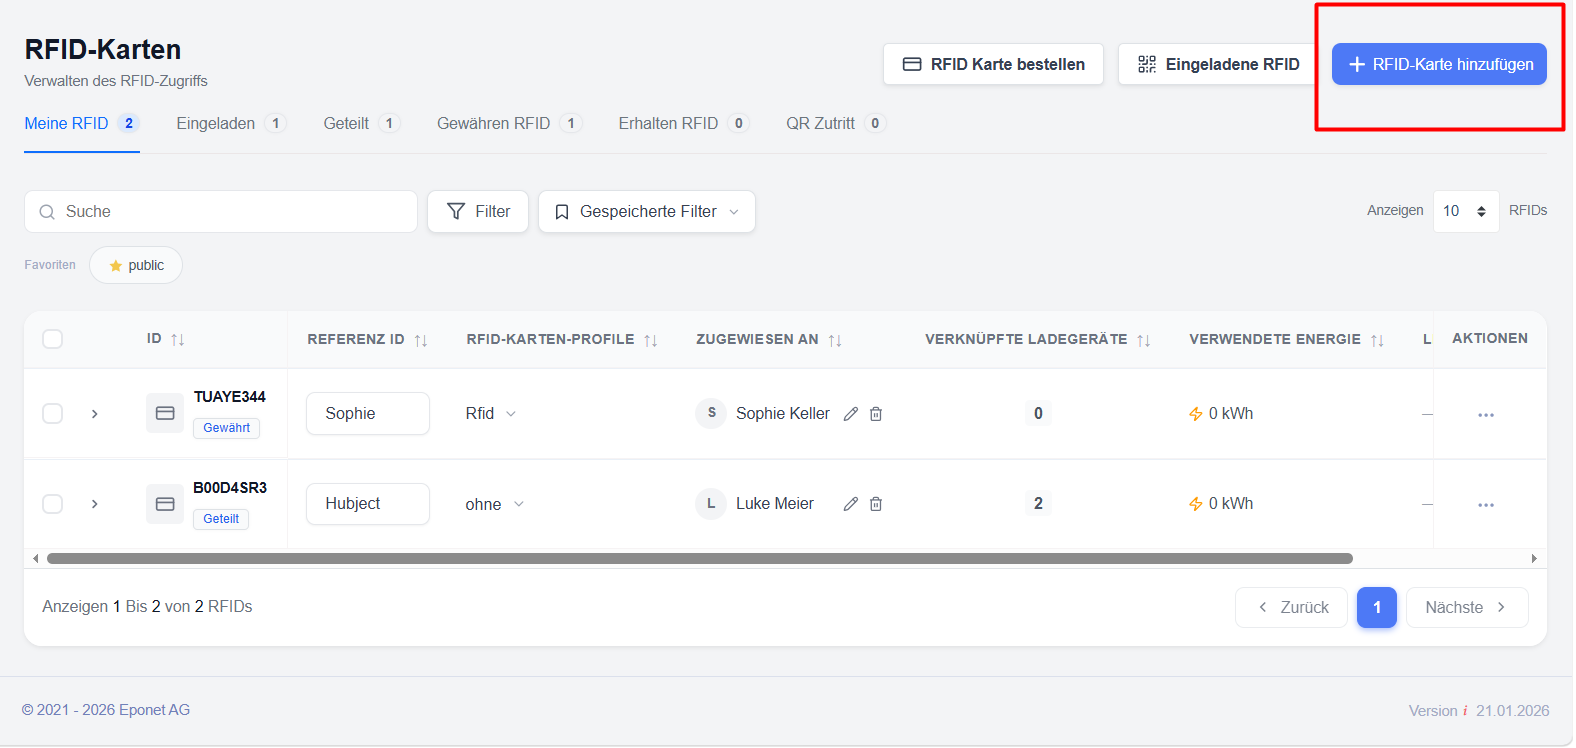
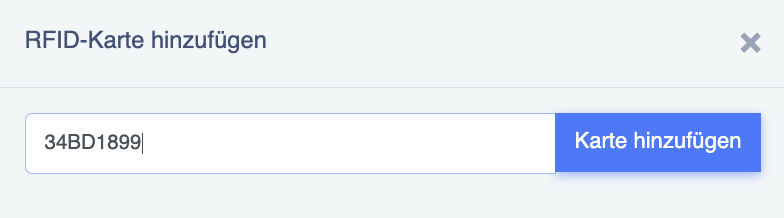
You can enter RFID cards using the Add button:
Access management
Each charging station can be granted access to one or more RFID cards to initiate the charging process – with or without an assigned charging profile.
Users can:
- Link charging points to RFID cards
- remove a card’s access to a charging station
- View the assigned charging points and the profiles assigned to them
- Monitor charger-specific profiles
Bulk management
Multiple RFID cards can be selected for bulk operations, e.g.:
- Assigning RFID profiles
- Assigning contacts
- Managing charger access
- Granting of RFID authorisations
- Revocation of access rights
Access control for charging points
Access can be configured on a per-charging-station basis, allowing organisations to control precisely where an RFID card may be used.
Screenshots
- ‘Add RFID Card’ dialogue box
- RFID card list
- ‘Access Management’ screen
- Bulk Actions menu
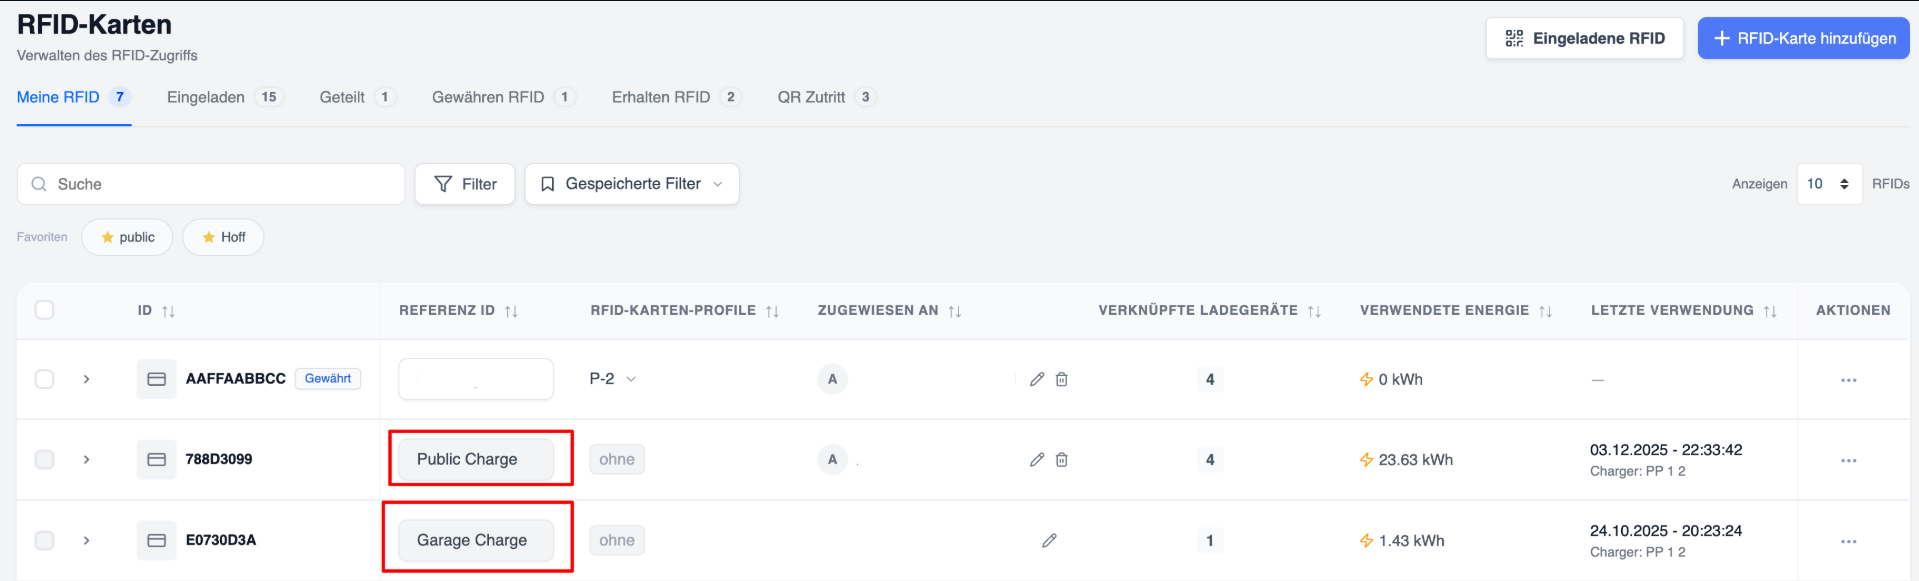
Special cards:
There are two system-generated cards that cannot be used to activate new charging points in the usual way:
- Public Card – This card is automatically generated as soon as a charging point is designated as public. All charging sessions via the public charging function are authorised exclusively with this card. Users can only view the linked charging points (public charging points).
- Garage card – This card is automatically generated when the user activates garage mode. It is used to authorise charging sessions in garage mode carried out by staff via the app.
Invite RFID cards & Manage access
Description
This page explains how to invite other users’ RFID cards using the RFID card number, send invitations via email address and generate QR codes.
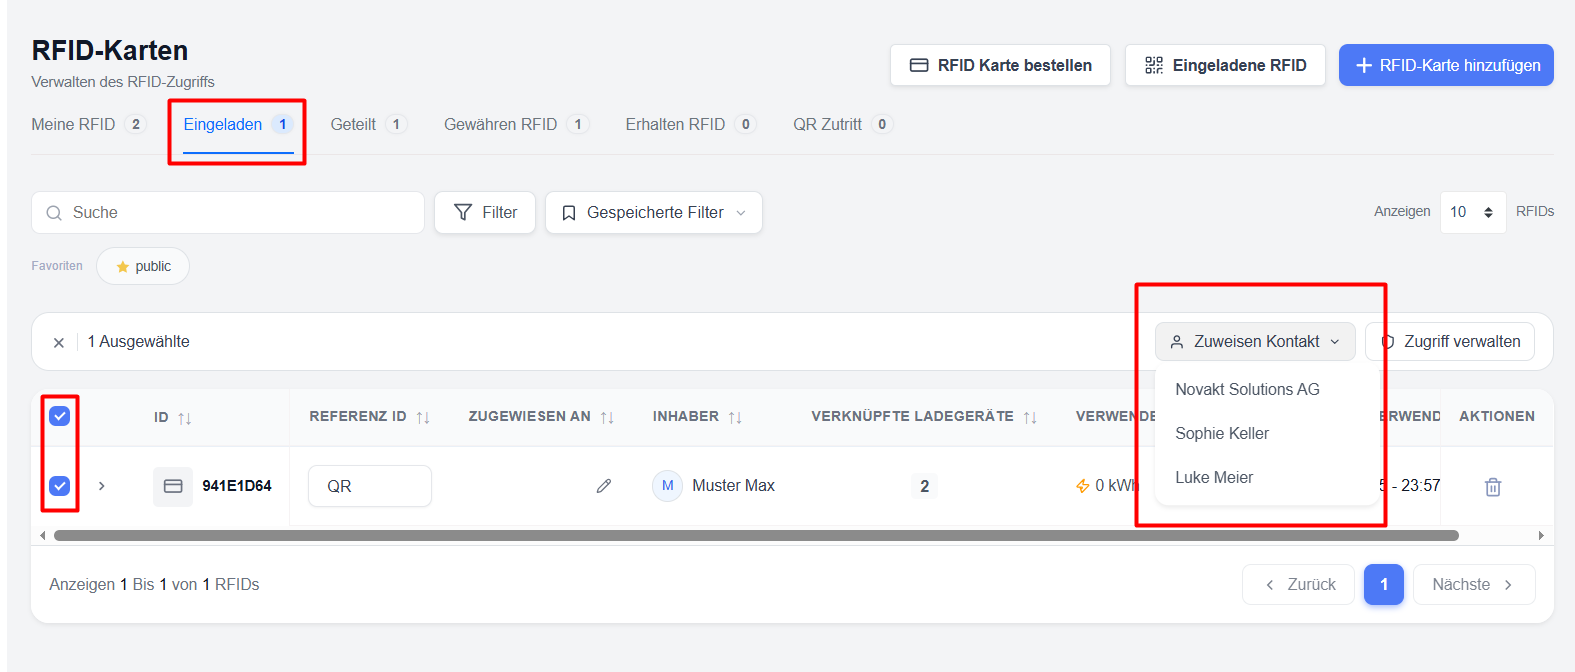
The invited RFID cards can be activated on the ‘My/Tenant’ charger so that users can start a charging session with the cards.
In the ‘Invited RFID Cards’ section, administrators can create, manage and monitor invitations for RFID access. Invitations can be sent using physical RFID card numbers, via email or via a QR code. This feature is particularly useful when employees, customers, guests, contractors or partner organisations need to be granted temporary or permanent charging access without having to manually create an RFID card for each user.
Invite RFID cards :
As a manager or operator of charging points, you can invite STWE, tenants or simply users to use the charging points. This page describes the procedure and the options available.
Prerequisites
: - You have operational charging stations on your Eponet account
- You have already created a charging profile (prices
) for the users - You know the email address or RFID number(s) of the user you wish to invite
Tip:
Don’t know the account email address or RFID card yet but still want to invite the user? Use option 3 described at the end to generate a QR code.
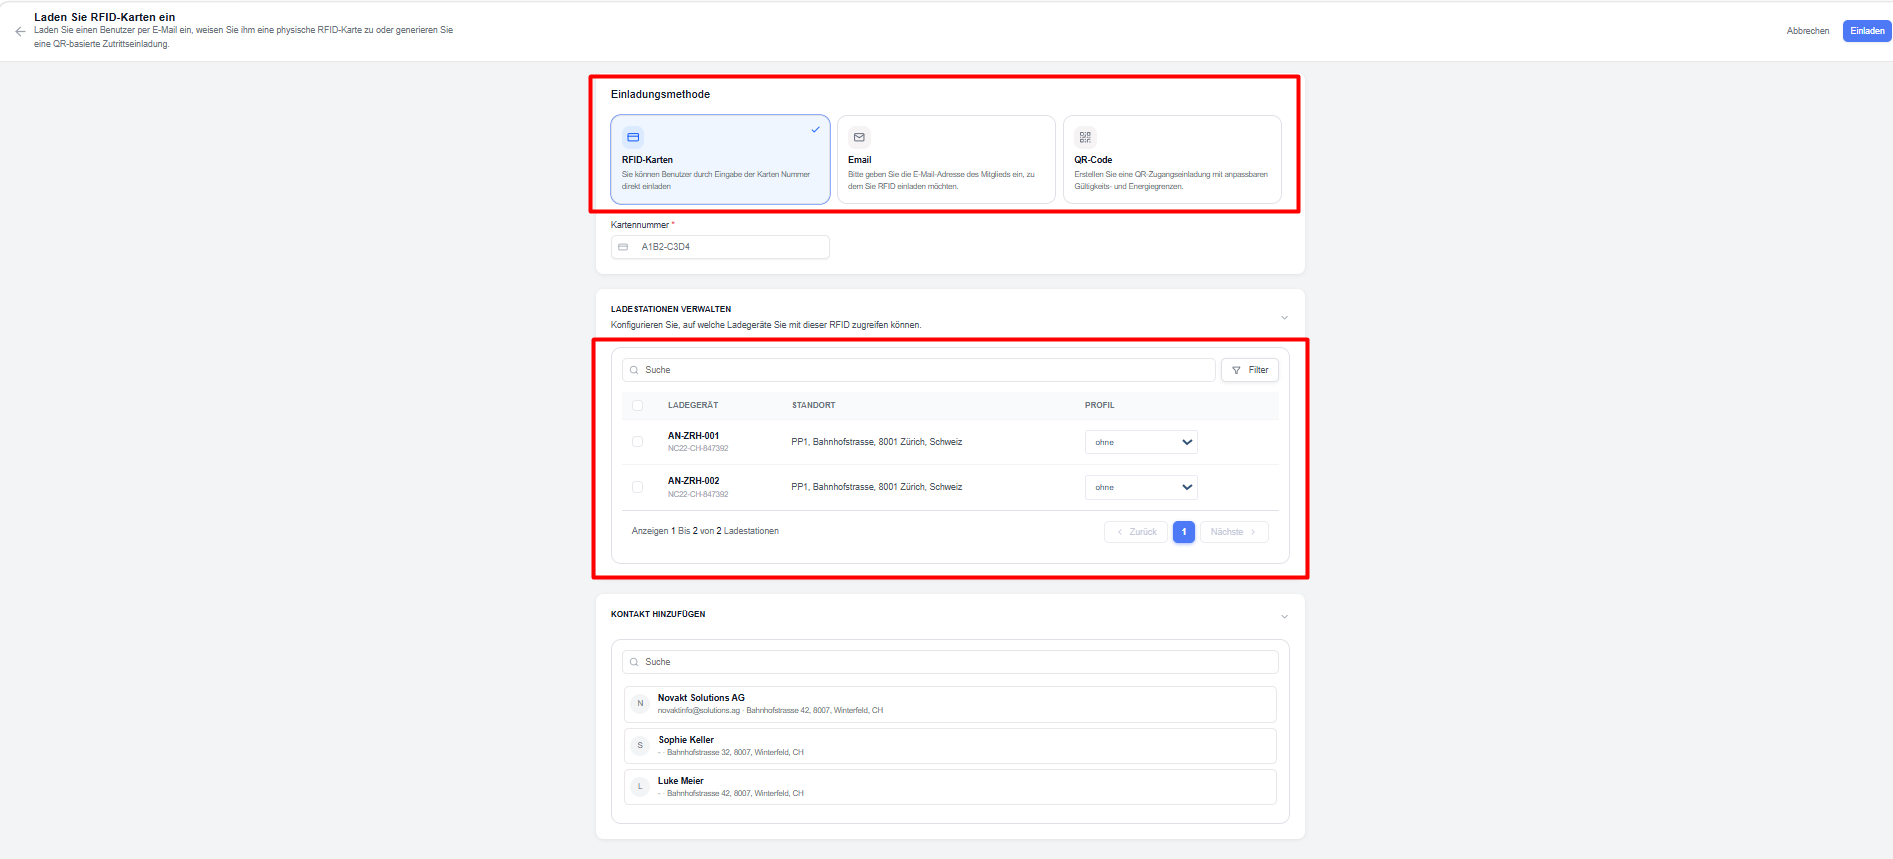
Option 1 - Invite using the card number :
An RFID card can be invited directly by entering the card number. If the card is already in the Eponet portal, it will be invited straight away:
When loading the card, the user can configure the following:
- Accessible charging points
- Assigned charging profiles at the charging stations
Steps
- Select ‘RFID card’.
- Enter the RFID card number.
- Select one or more charging points.
- Configure the charging profiles if required.
- Assign a contact person.
- Click on ‘Invite’.
- The invited user can use the physical RFID card immediately at the assigned charging points.
Typical use cases
- Employees with company-issued RFID cards
- Fleet drivers
- Existing users of the charging network
- Long-term access allocations
Option 2- Email invitations :
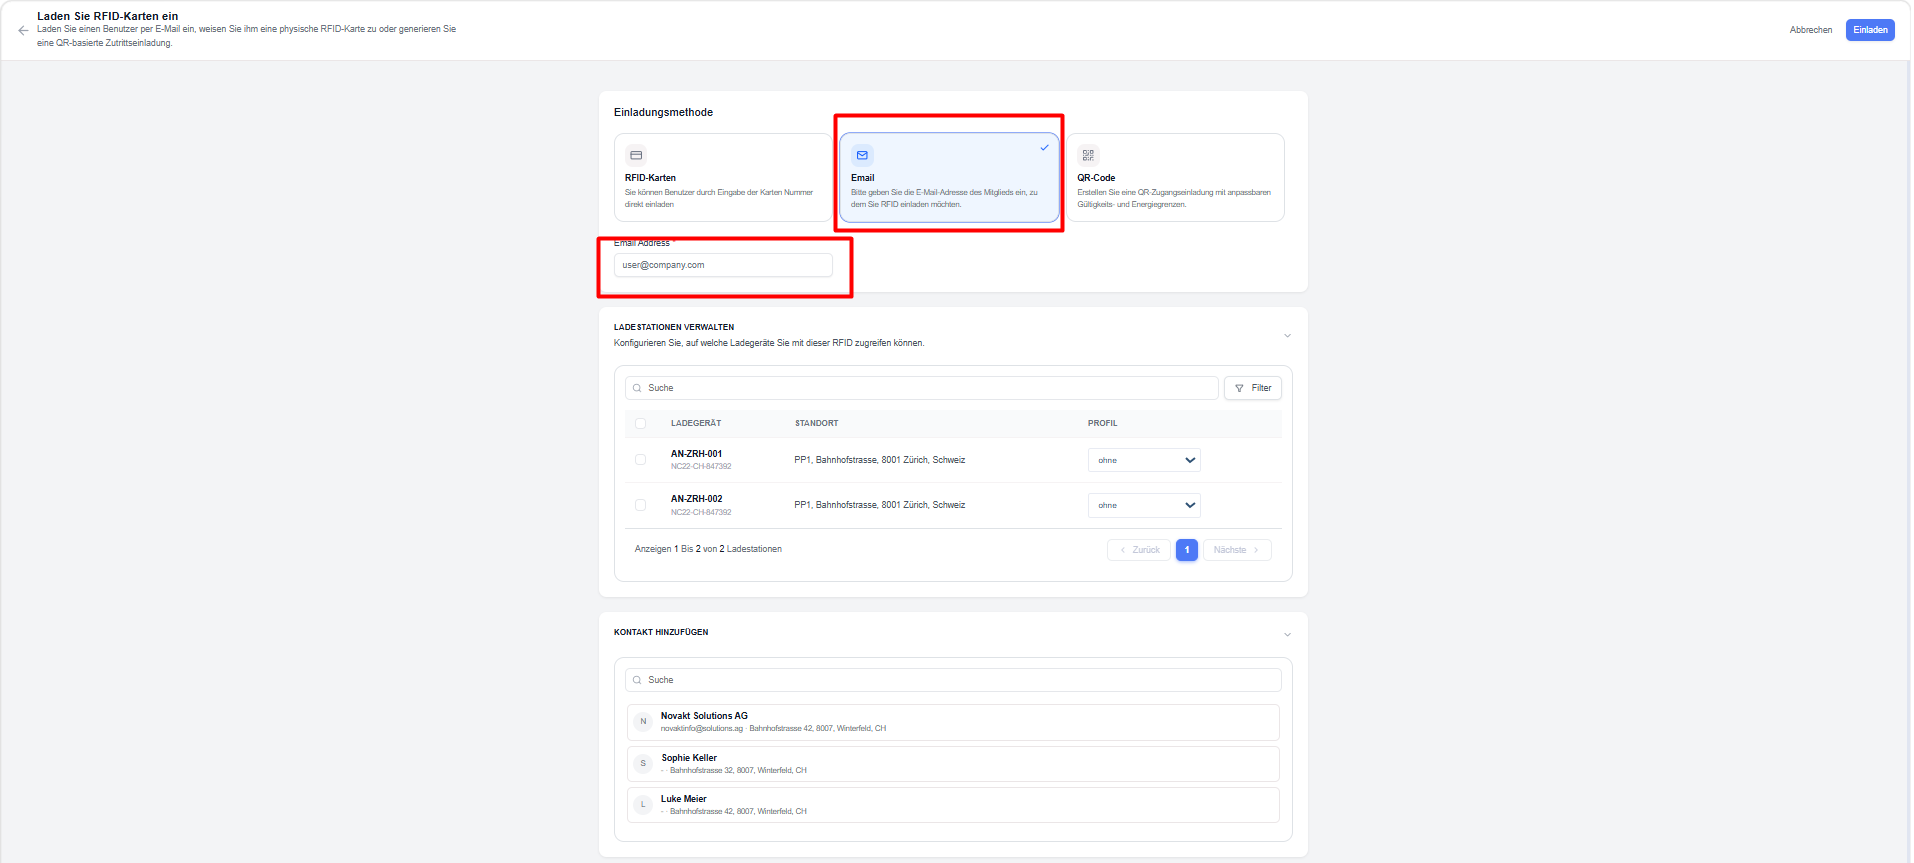
RFID access can be granted via an email invitation.
When creating an invitation, the user can configure the following:
- Recipient’s email address
- Accessible charging points
- Charging profiles assigned to the charging points
Once the invitation has been sent, the recipient will receive instructions on how to accept it in the portal’s notifications section.
Steps
- Select ‘Email’ as the invitation method.
- Enter the recipient’s email address.
- Configure the access permissions for the chargers.
- Assign charging profiles.
- Send the invitation.
The recipient will receive an email with instructions on how to accept the RFID invitation and activate access.
Benefits
- No physical RFID card is required initially
- Simple onboarding process
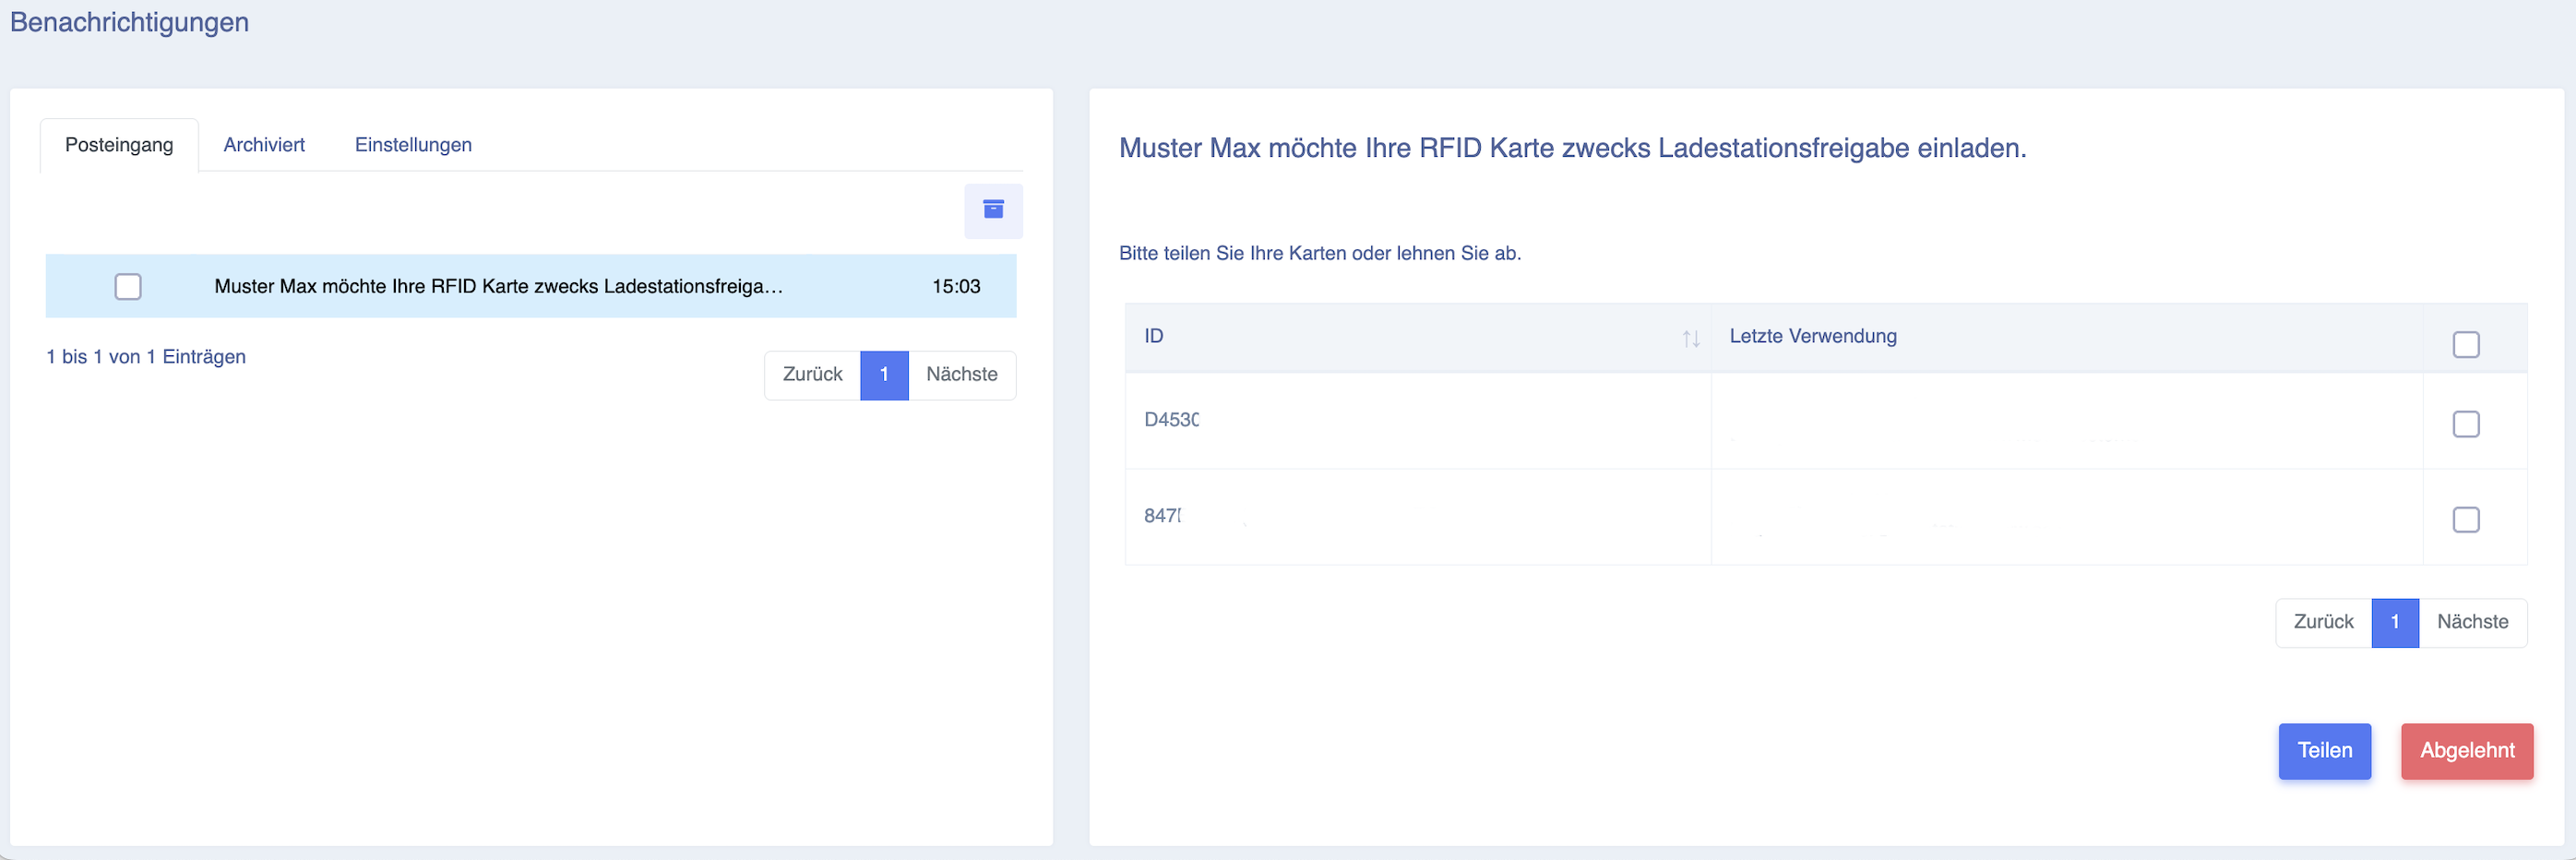
The invitee receives an email stating that they have a notification in their account; under "Notifications" in their account, they can view their invitation and share their desired RFID cards:
Information on inviting via email address:
If the invitation fails with the message: 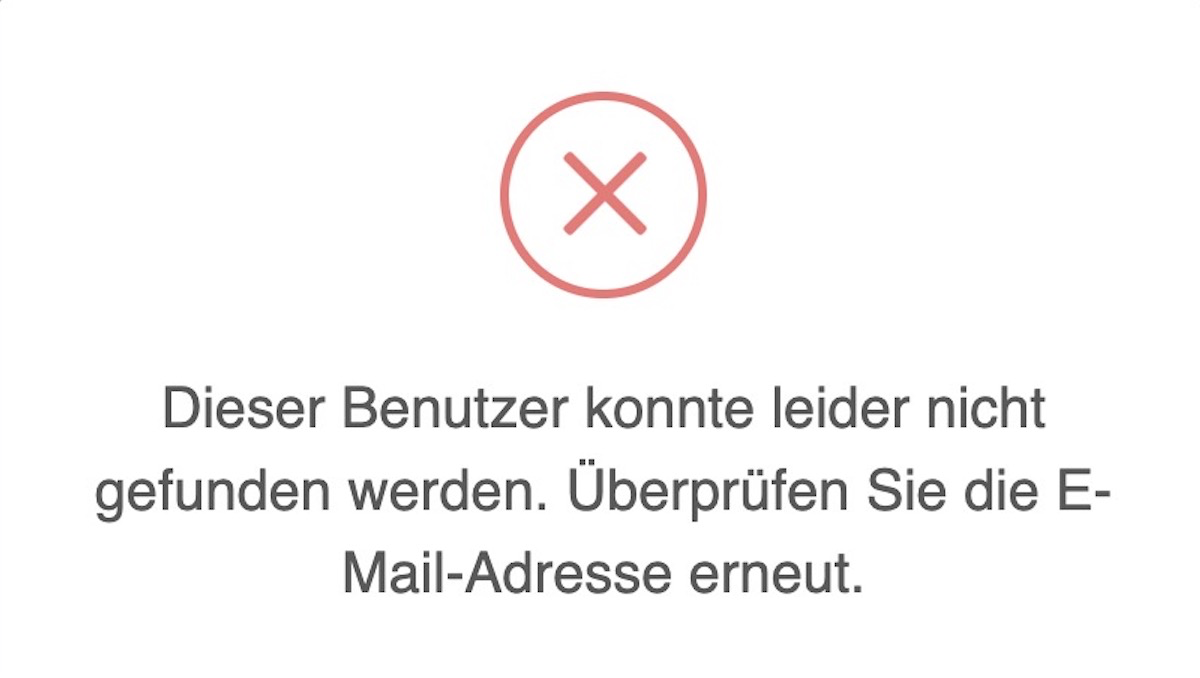
This is likely because the user has not yet created an Eponet account.
Consequently, they cannot yet be invited.
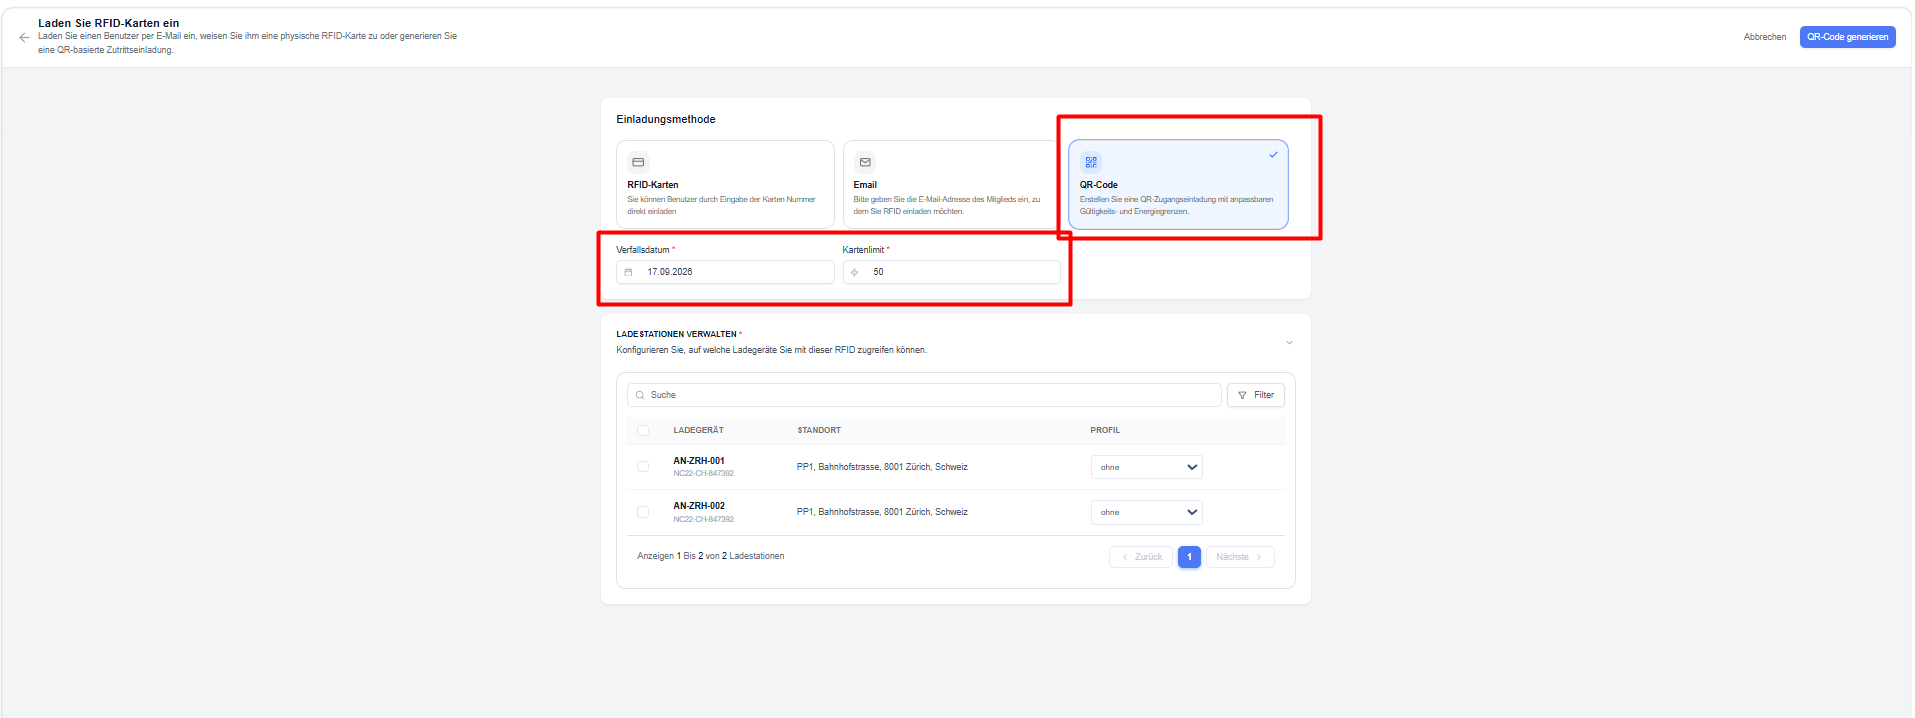
Option 3 - Access via QR code :
QR codes offer a simplified method of granting RFID access.
Users can:
- generate a QR code.
- Set the validity period.
- Set usage restrictions (number of cards that can be loaded via the QR code)
- Select charging stations and assign charging profiles
- Share the QR code with the intended users.
Users can scan the QR code and complete the registration process to gain access.
Steps
- Select ‘QR code’.
- Configure the invitation settings.
- Select the authorised charging points.
- Assign charging profiles.
- Generate the QR code.
- Share the QR code with the recipient.
The recipient can scan the QR code and complete the registration process to gain access to charging.
Benefits
- Easy to share
- No email address required
- Suitable for public or event-related access for multiple users
Please note:
If no profile is selected, i.e. if the user is invited with “none”, the tenant/STWE
can charge for free!
Access management using ‘Invited’ cards and charging profiles
The ‘Invited RFID Cards’ tab displays all RFID cards and invitations that have been created and issued to users.
Users can:
- Invite new RFID cards
- Send invitations by email
- Generate QR code-based invitations
- Assign RFID invitations to contacts
- Manage access permissions for chargers
- Apply charging profiles
- Monitor energy consumption and usage history
- Revoke access to charging stations as required
This enables users to maintain a clear overview of all activities relating to the shared use of RFID invitations.
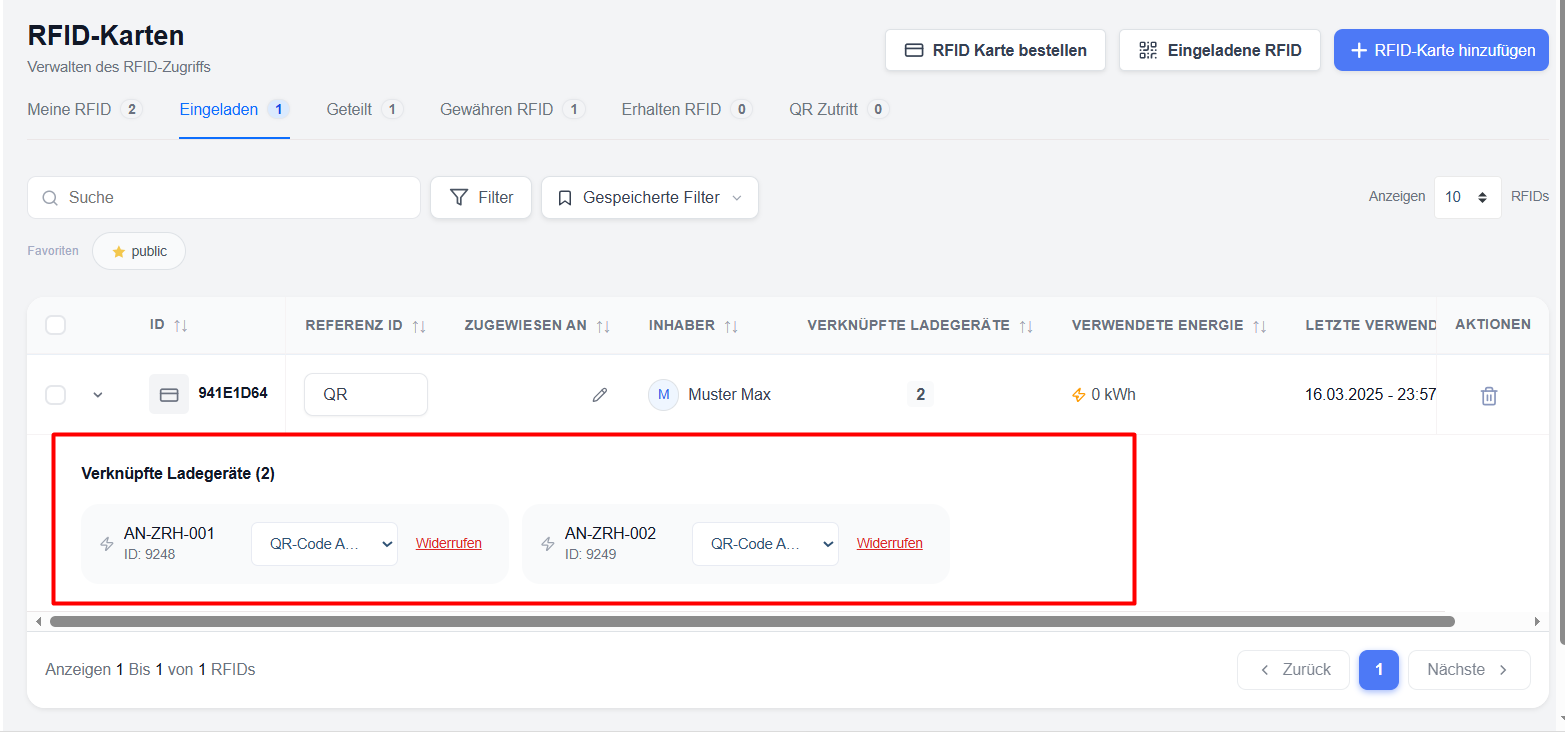
Understanding the RFID invitation list
The invitation list provides a complete overview of all invited RFID cards and the permissions assigned to them.
Available information
RFID ID – Unique identifier for the RFID invitation.
Reference ID – A user-defined reference number that can be assigned for internal tracking purposes.
Assigned to – Displays the contact to whom the RFID card is assigned (this is for filtering purposes only and does not determine the card’s allocation)
Owner – Displays the user or organisation that owns the RFID card.
Linked Charging Points – Displays the number of charging points currently assigned to the registered RFID card.
Energy consumption – Displays the total charging energy consumed using the RFID card.
Last Use – Displays the most recent charging activity.
Actions – Allows administrators to delete or manage RFID access or charging points
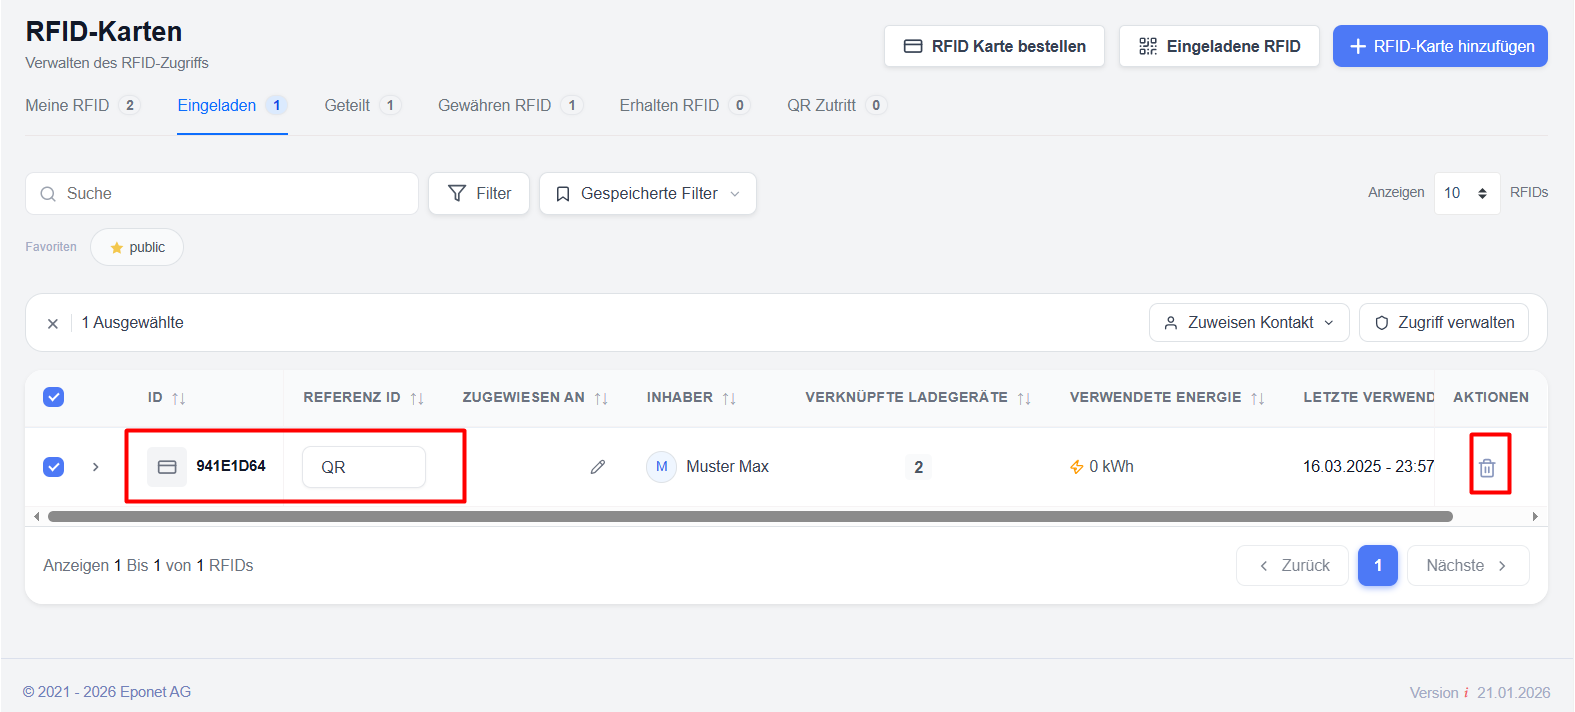
Managing charging point access
Each registered RFID card can be granted access to one or more charging points.
Access management options
Users can:
- Grant access to charging points
- revoke access to charging points
- Apply charging profiles
- Assign permissions in bulk
When assigning charging access, users can select individual charging points and specify how the RFID card behaves at each charging point.
Assigning charging profiles
A charging profile can be selected for each charging point assignment.
Examples of this include:
- Normal
- Free charging
- Business profiles
- Customised charging rules
Profiles define billing costs, restrictions and operational behaviour.
Bulk actions
The ‘Invited RFID’ module supports the bulk management of multiple RFID invitations simultaneously.
Available bulk actions
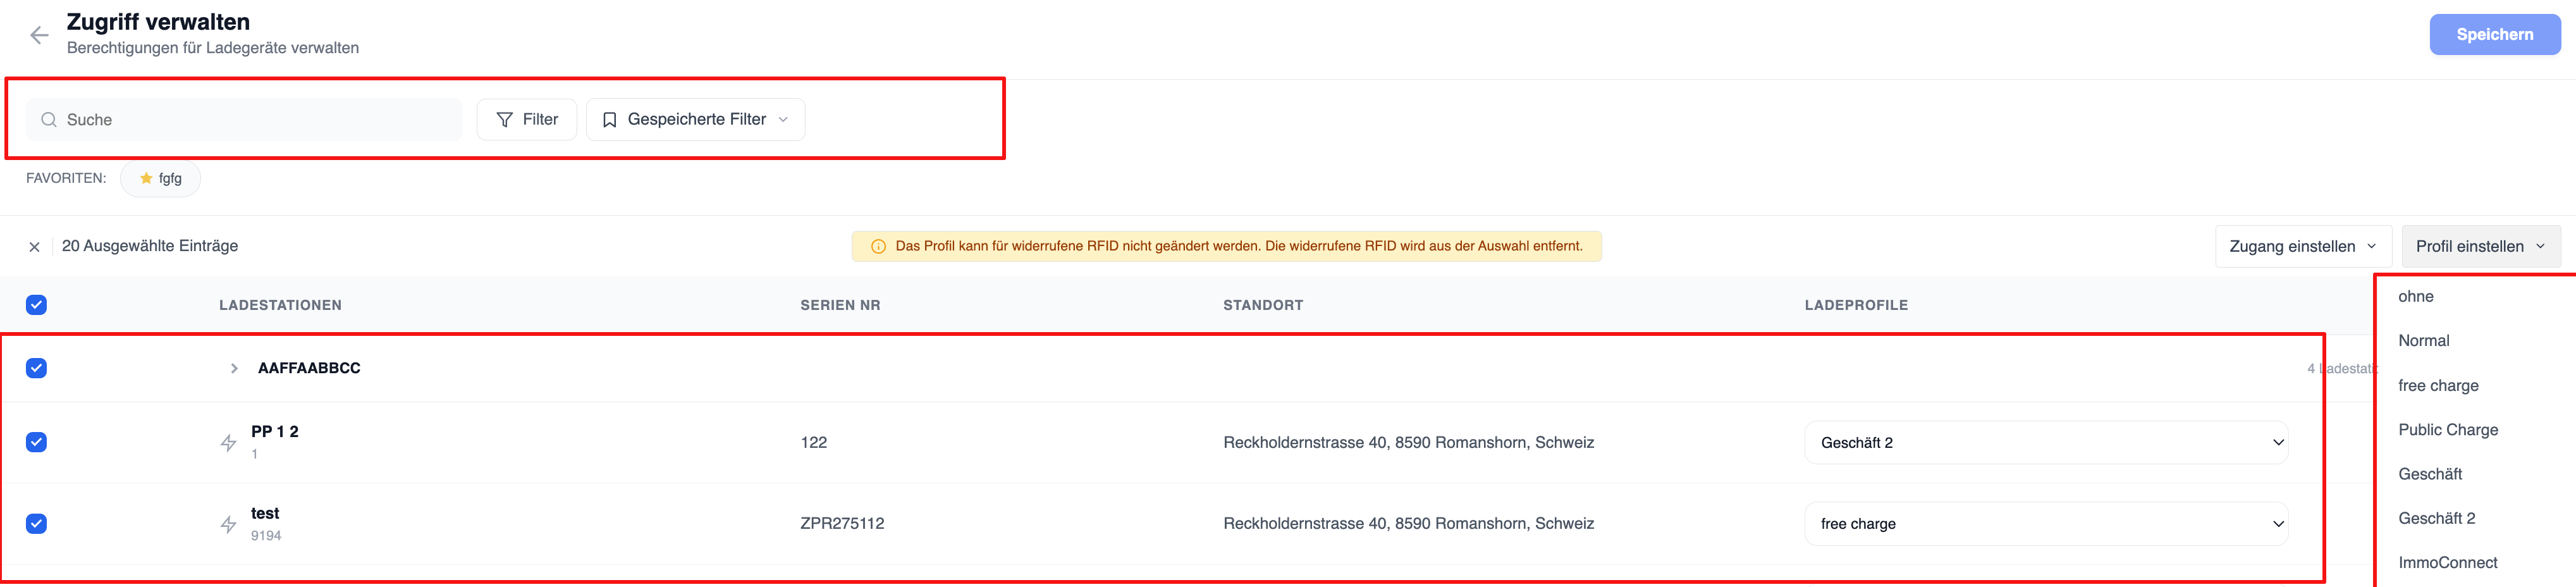
Assign contact – Assign the same contact to multiple RFID invitations.
Manage access – Grant or revoke charger access for multiple RFID cards at once.
Apply billing profiles – Configure billing profiles for multiple invitations at the same time.
Benefits
- Faster management
- Standardised configuration
- Reduced manual effort
- Improved operational efficiency
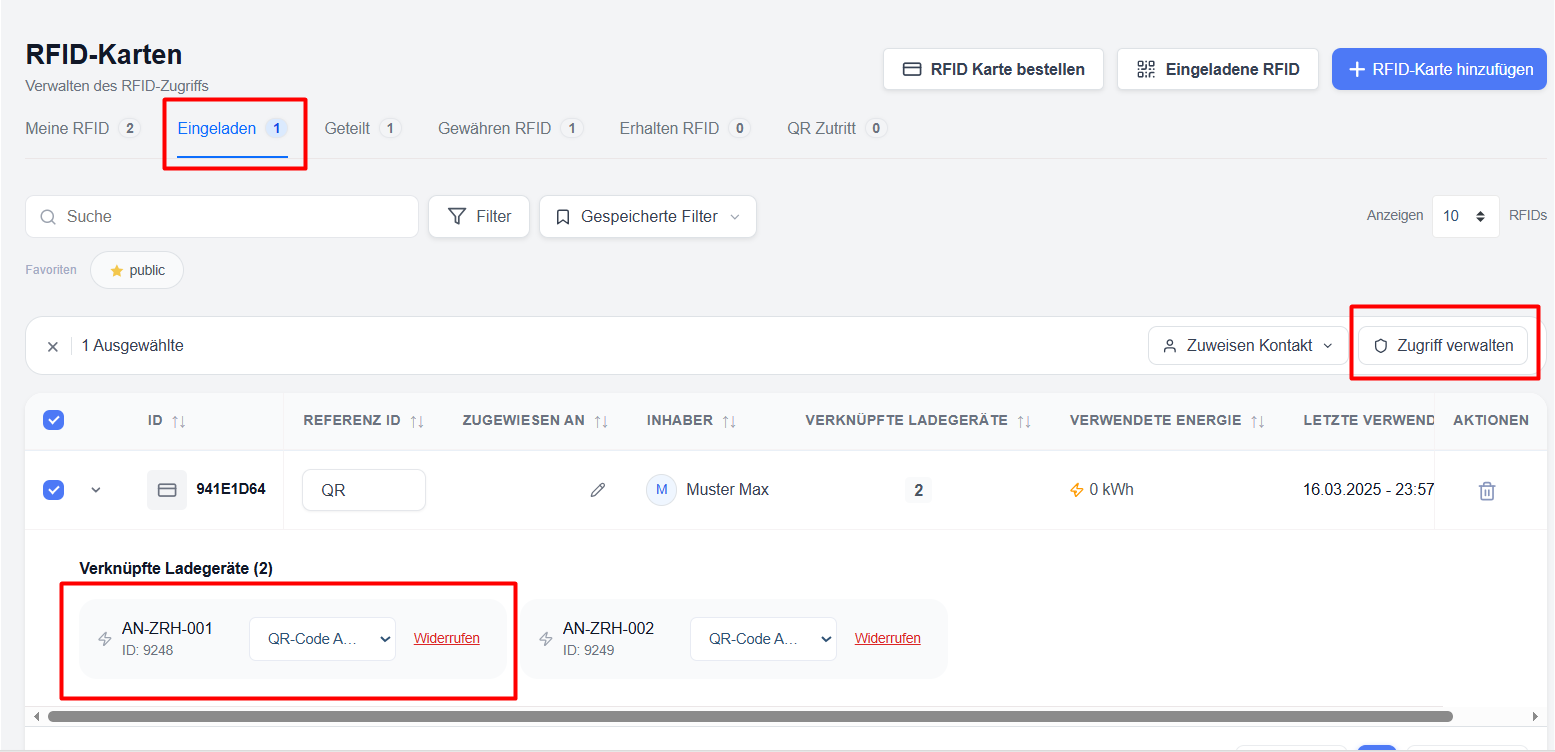
Management of existing charging point permissions
Users can view permissions for charging points directly in the invitation list.
View linked chargers
- Expand an RFID invitation using the arrow icon.
- View all linked charging stations.
- Check the assigned charging profiles.
- Check the access permissions.
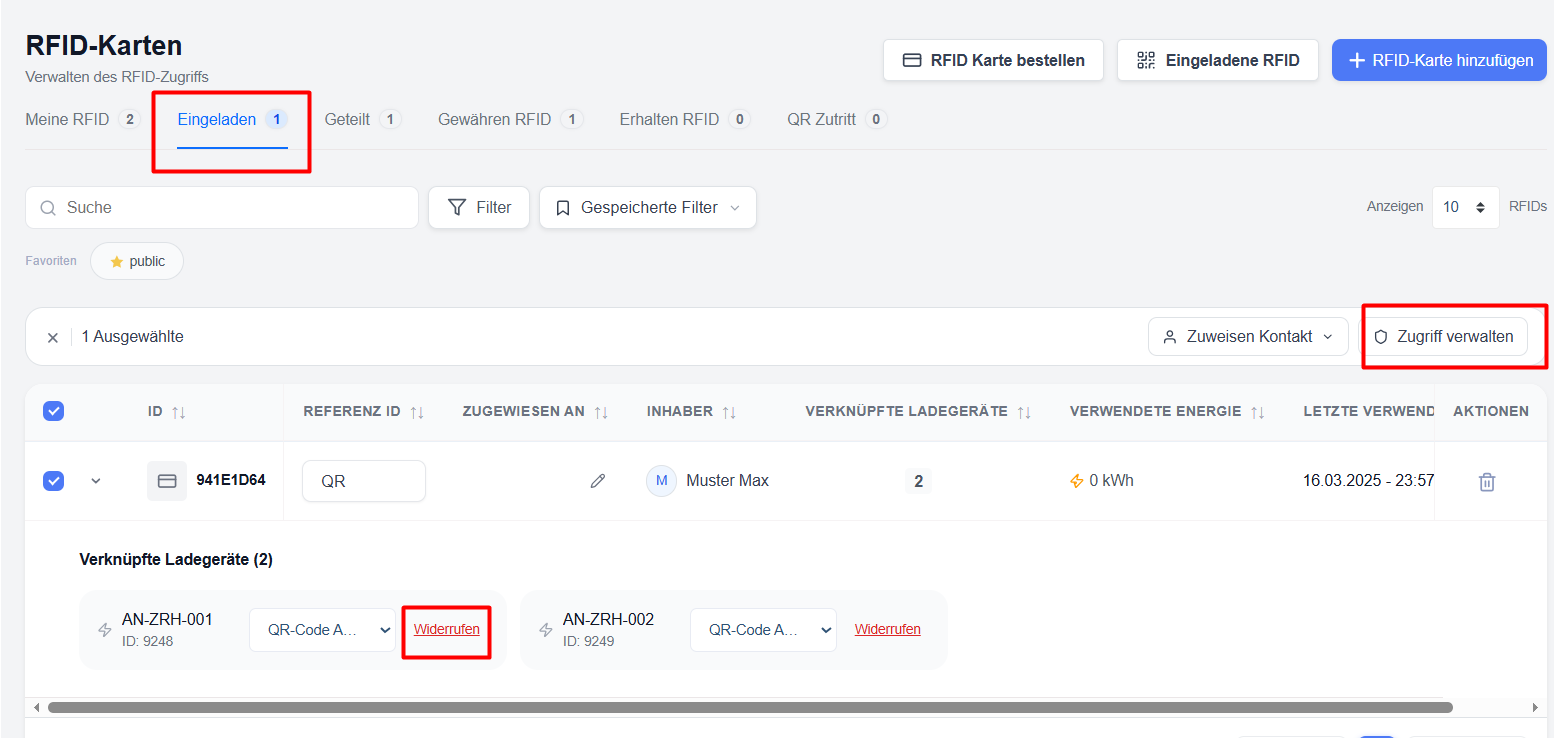
Revoke access
If a user should no longer have access to a charging point:
- Expand the RFID invitation.
- Search for the charging point.
- Click on ‘Revoke’.
- Confirm the action.
The charging station will immediately become inaccessible to this RFID invitation.
‘Access Management’ screen
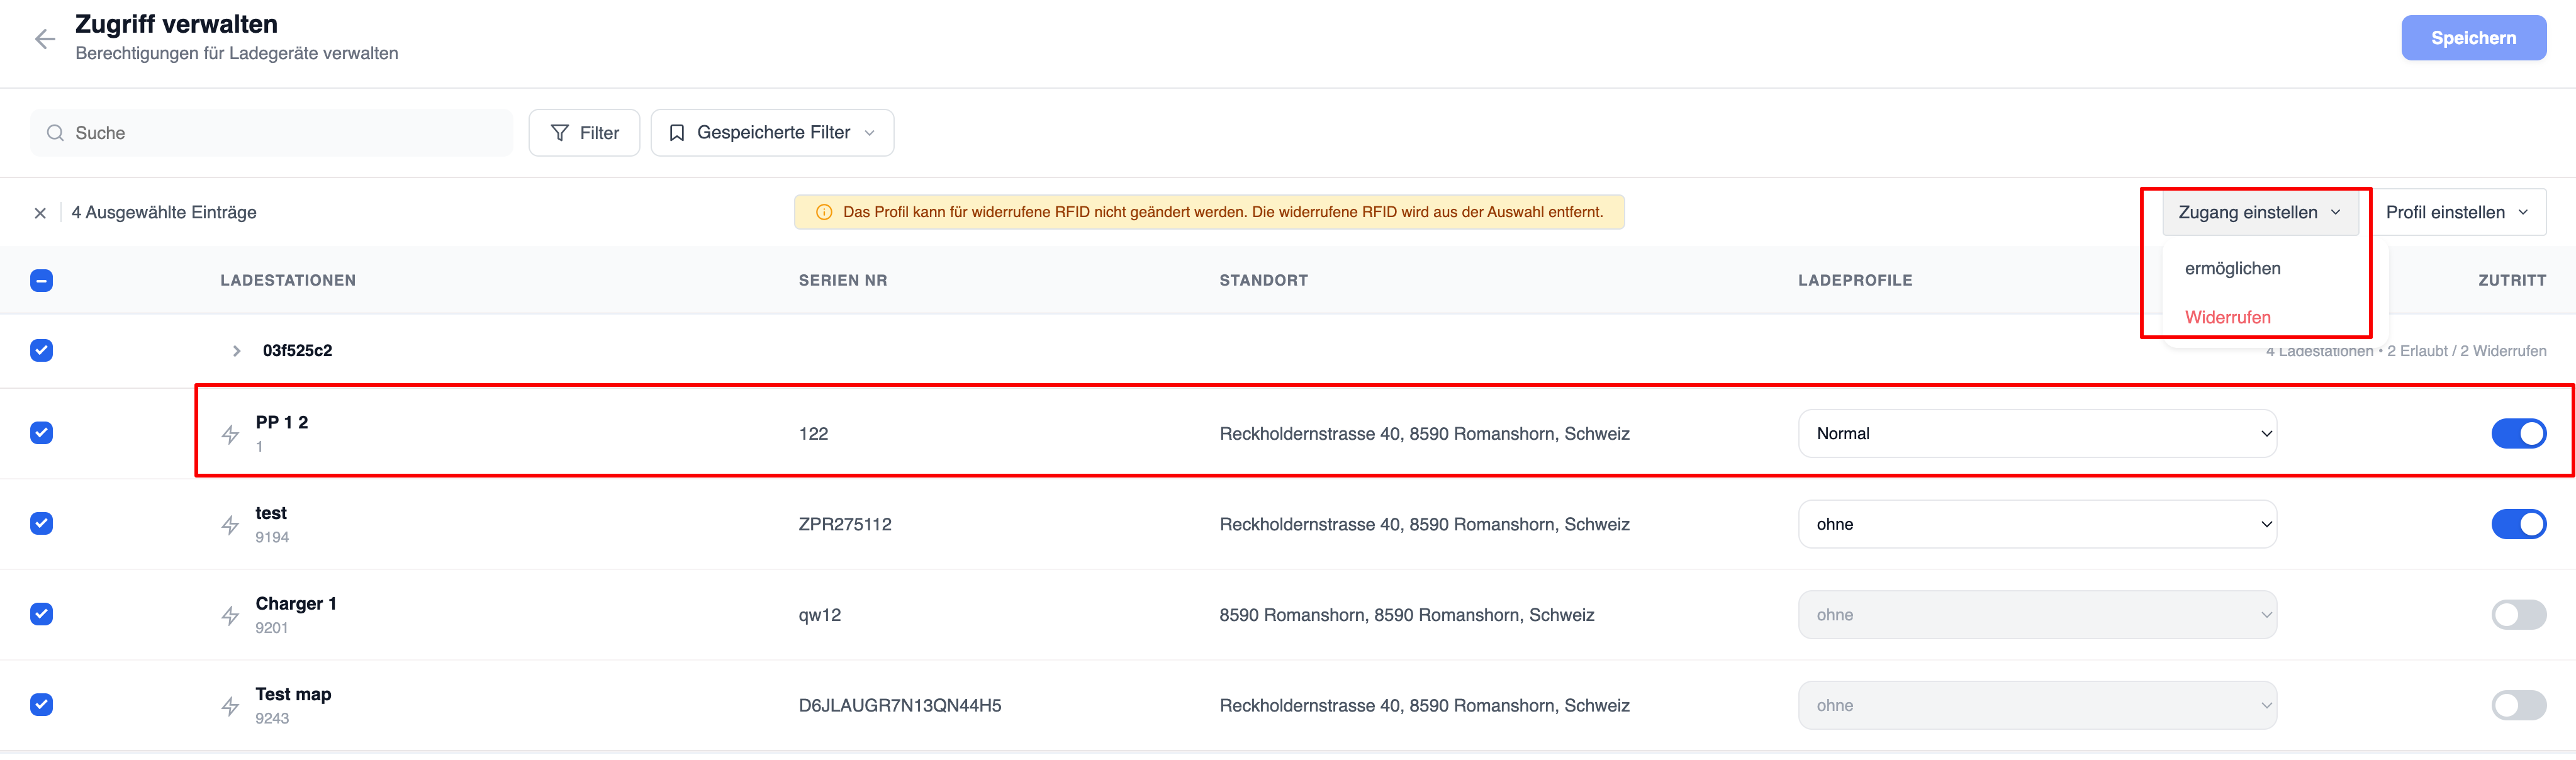
The ‘Manage Access’ screen provides a central interface for managing access rights for multiple charging stations.
Available controls
Access status
Users can:
- activate access to the charging point
- deactivate access to the charging point
- Apply changes to multiple chargers
Charger profiles
Profiles can be assigned individually to each charger.
Bulk update of permissions
Multiple chargers can be selected and updated simultaneously.
If a card is authorised for a specific charging point but no charging profile has been assigned, the charging sessions carried out are treated as free charging.
Shared cards
Description
This feature allows RFID cardholders to view all external users to whom they have granted access to their RFID cards and to see exactly which charging points and charging profiles are available under the respective sharing arrangements.
If an RFID card has been invited or shared by multiple users, the card can be expanded to display all associated holders. Selecting a holder displays the charging points, charging authorisations and RFID profiles assigned by that specific holder.
This provides complete transparency regarding who has granted access to your RFID cards and which charging privileges are available under the respective authorisation arrangement.
Overview of shared RFID cards
For each RFID card, users can:
- View details of the RFID card
- view all owners who have invited this card
- View all chargers linked to the card
- View assigned charging profiles
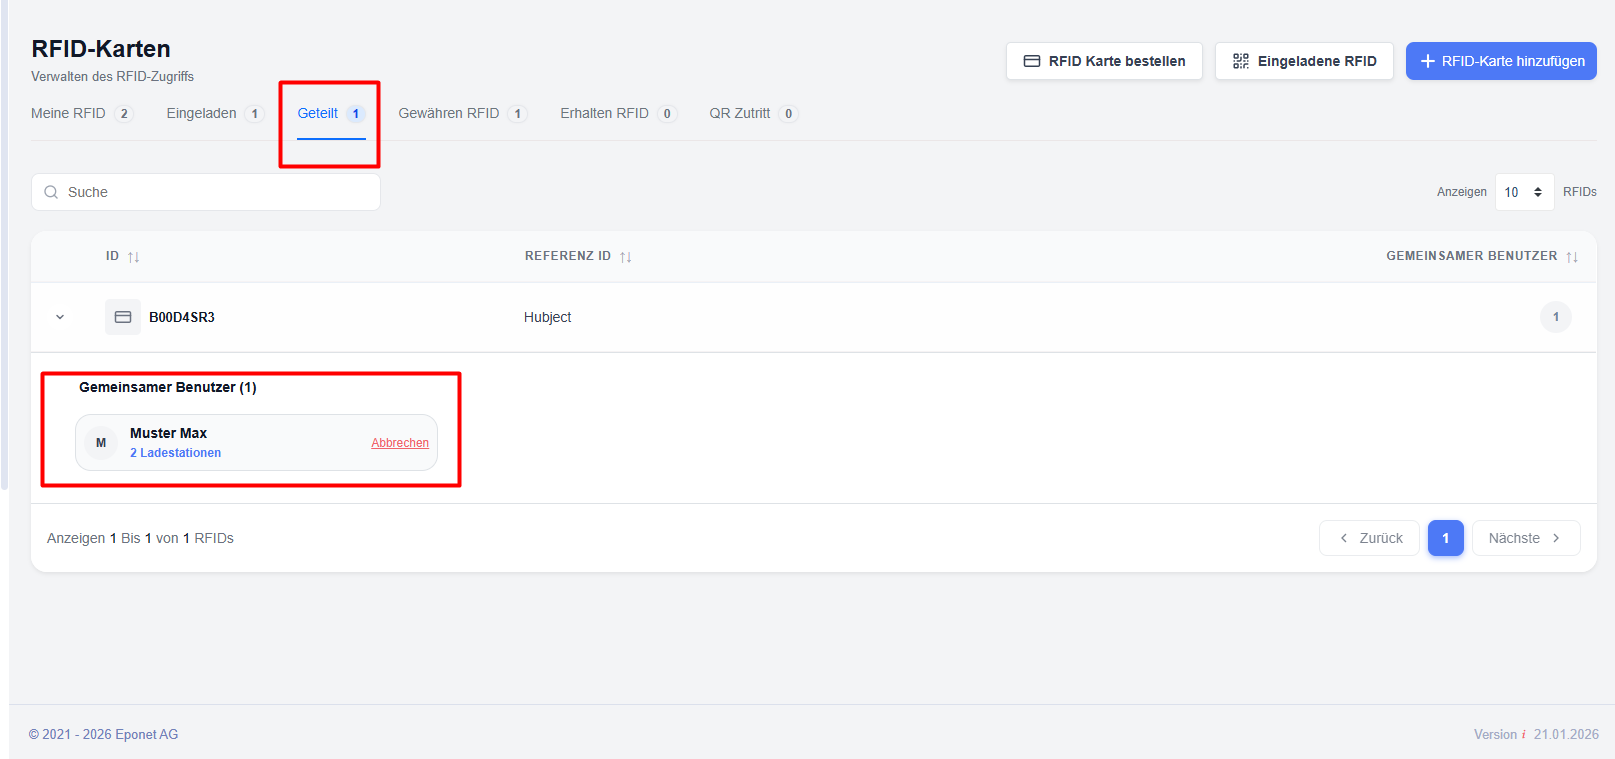
Explanation of the ‘Shared RFID Cards’ list
RFID card ID – Unique identifier for the RFID card.
Reference ID – An optional reference number assigned to the card.
View details of the shared RFID card
To view the sharing details for an RFID card:
This allows users to quickly view all active sharing relationships associated with the card.
Viewing owner-specific access
Each owner can grant access to different charging points and set different charging profiles.
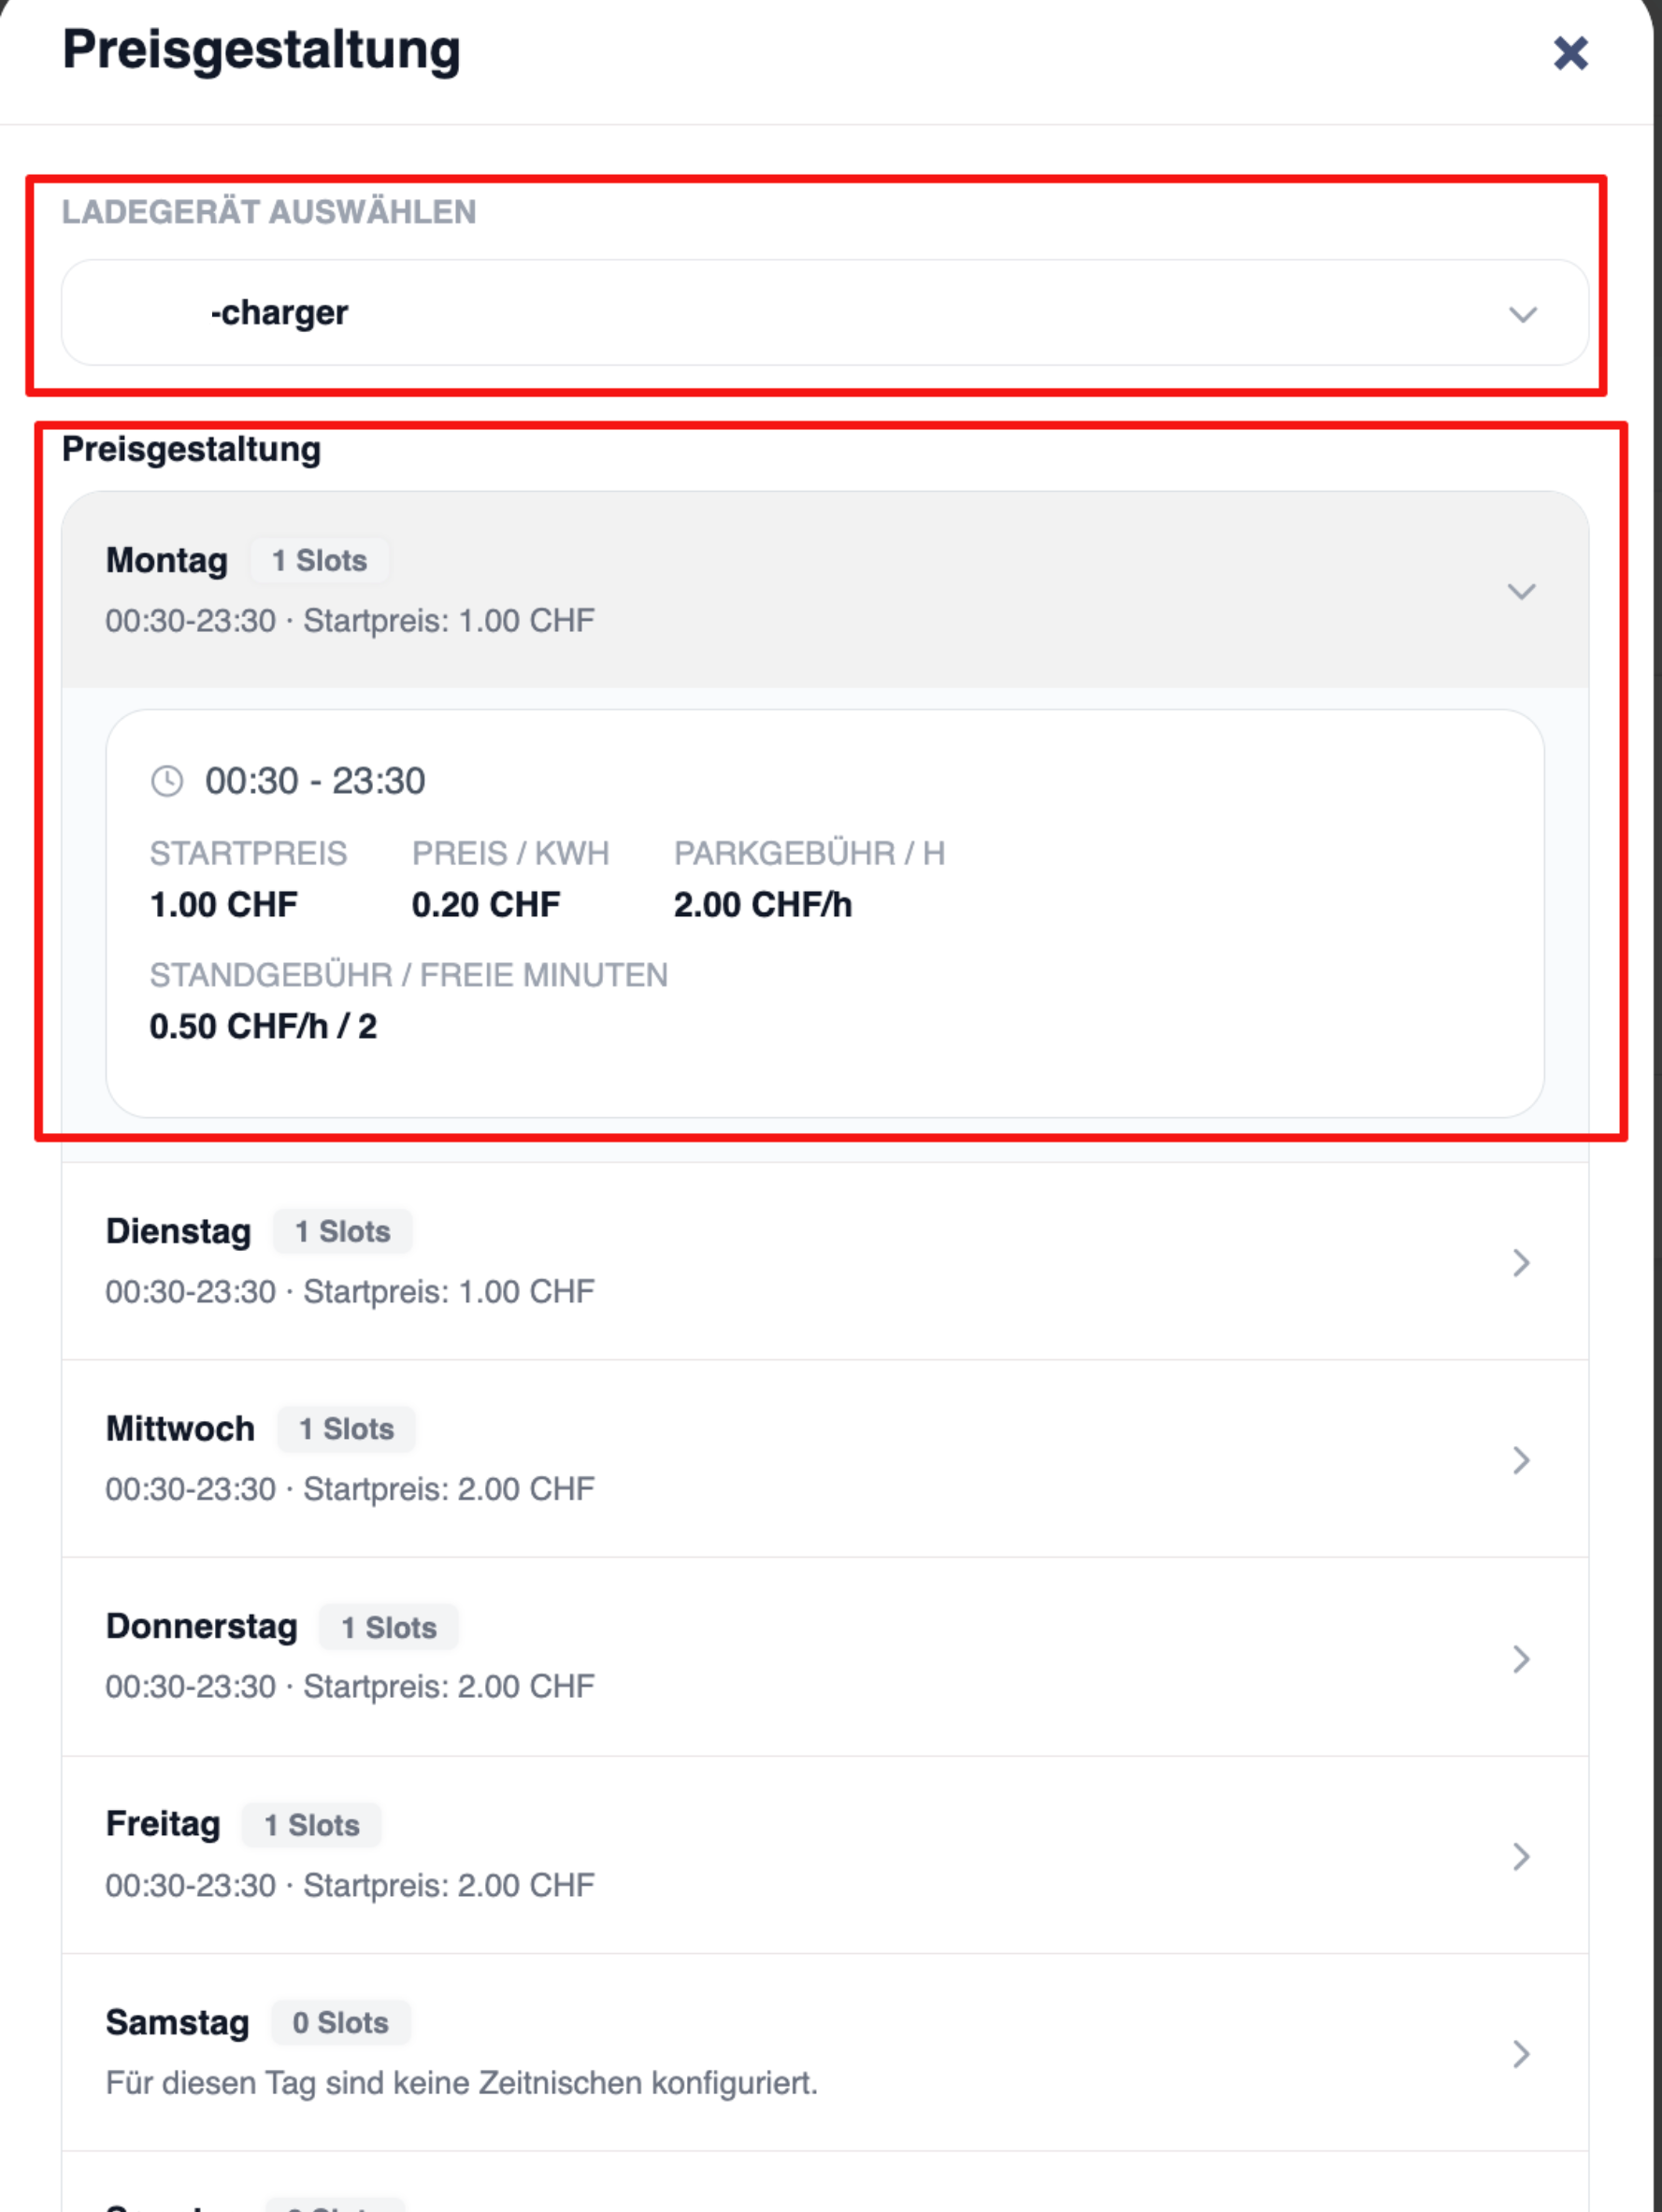
To view owner-specific permissions:
- Expand the row for the RFID card.
- Search for the desired owner.
- Click on the owner’s name.
The system displays all charging points that have been authorised for this owner.
Charging points
Lists all charging points available via this owner.
The information displayed may include:
- Name of the charger
- Charging profiles – Displays the profile assigned by the owner for each charger.
RFID profiles
Description
Find out how RFID profiles are used to standardise loading authorisations, restrictions and usage rules.
Note : RFID profile setting applied on a card is only applicable if the card is granted to any user, if the card is not yet granted the RFID profile won't be applied.
Contents
What are RFID profiles?
RFID profiles are reusable policy templates that define how RFID cards can be used when assigned to other users.
Profiles help to ensure consistent charging behaviour – for example, whether a card may be used at invited charging points, within charging networks, within Hubject networks or at public charging points – and also enable rules to be set for maximum usage.
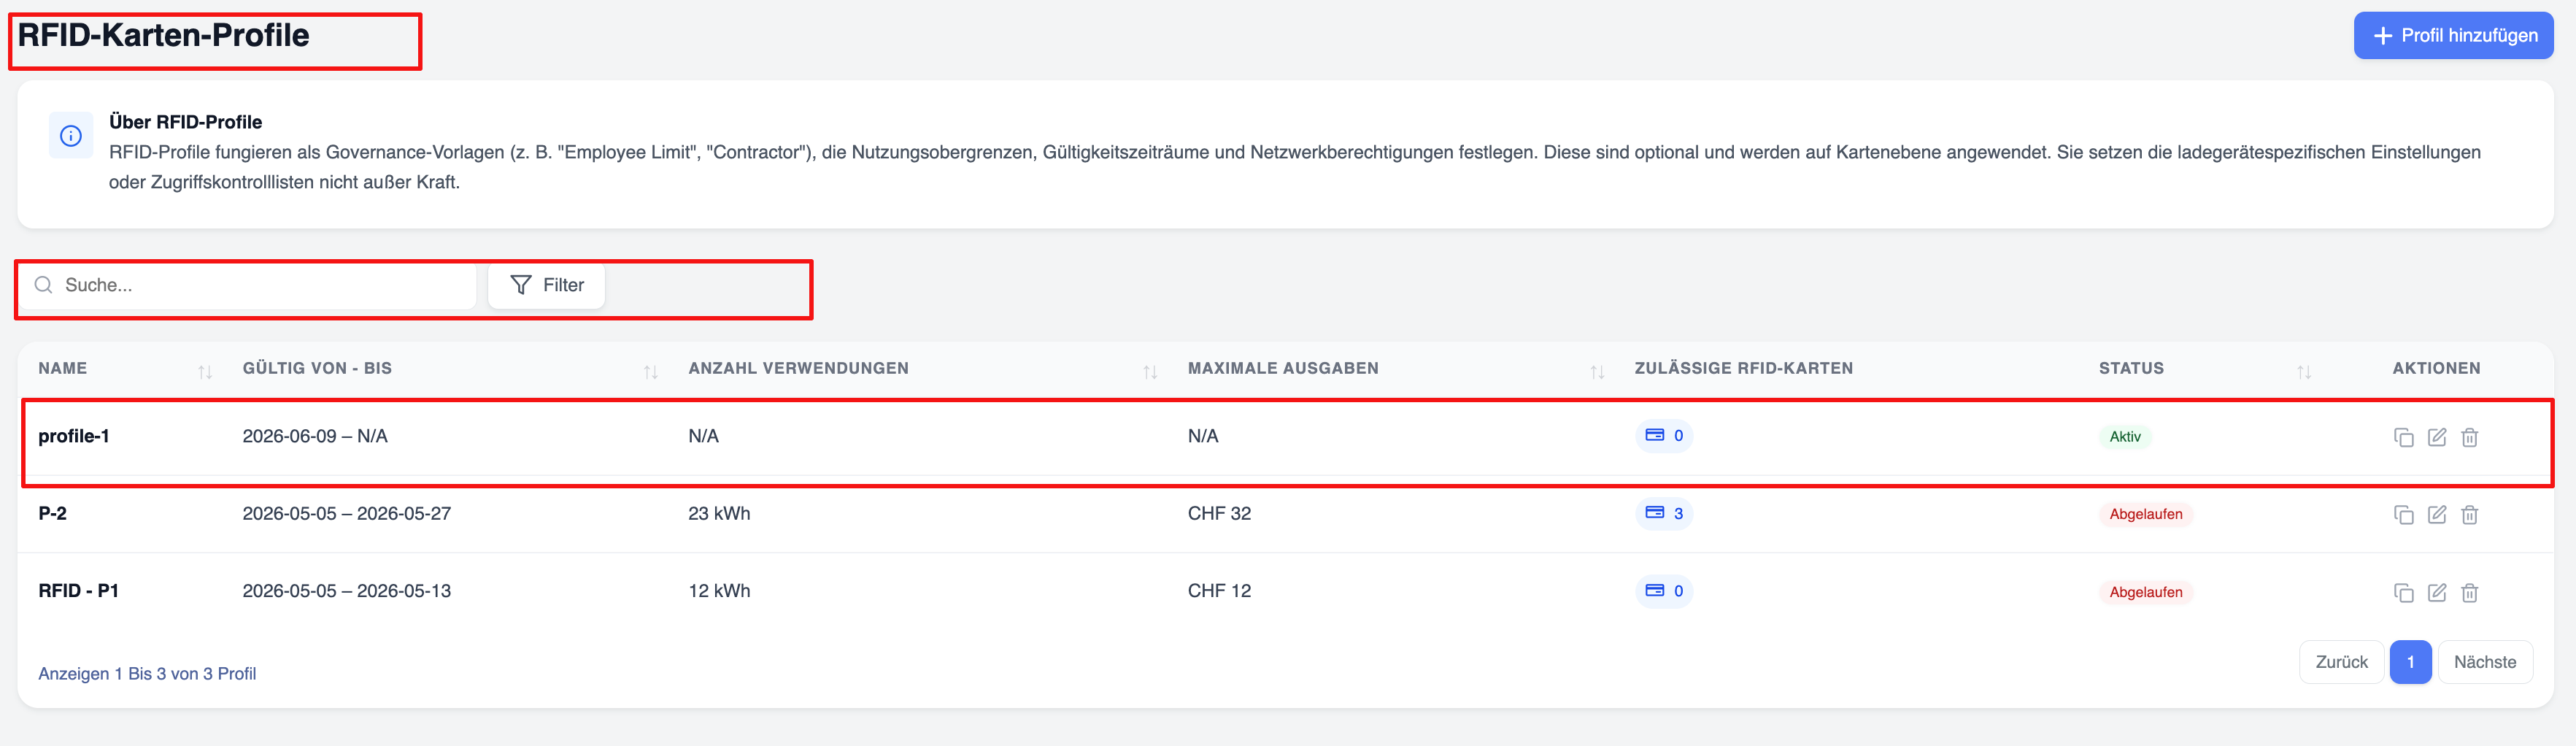
Configuration options for profiles
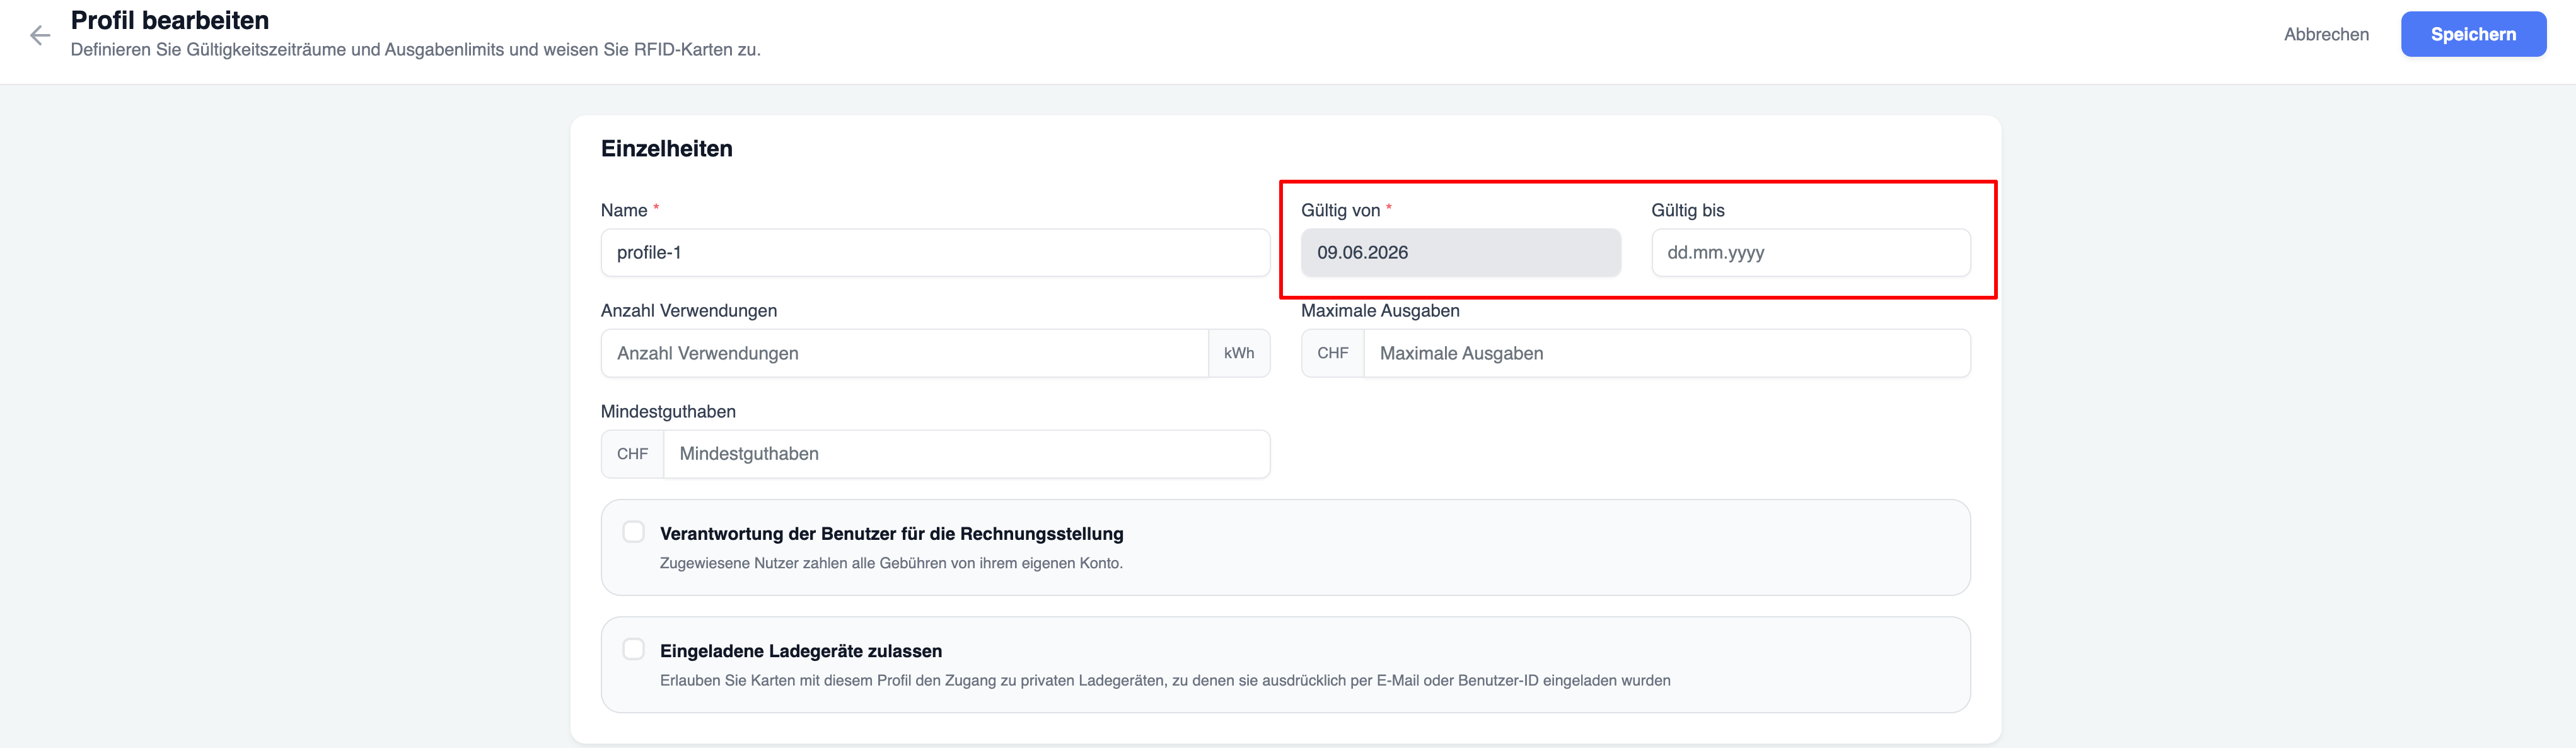
Profiles can include the following:
- Validity periods – The periods during which use of the card is permitted

- Usage limits – The maximum amount of kWh that the authorised user is permitted to consume when charging at various charging points using the card (total of all charging sessions)
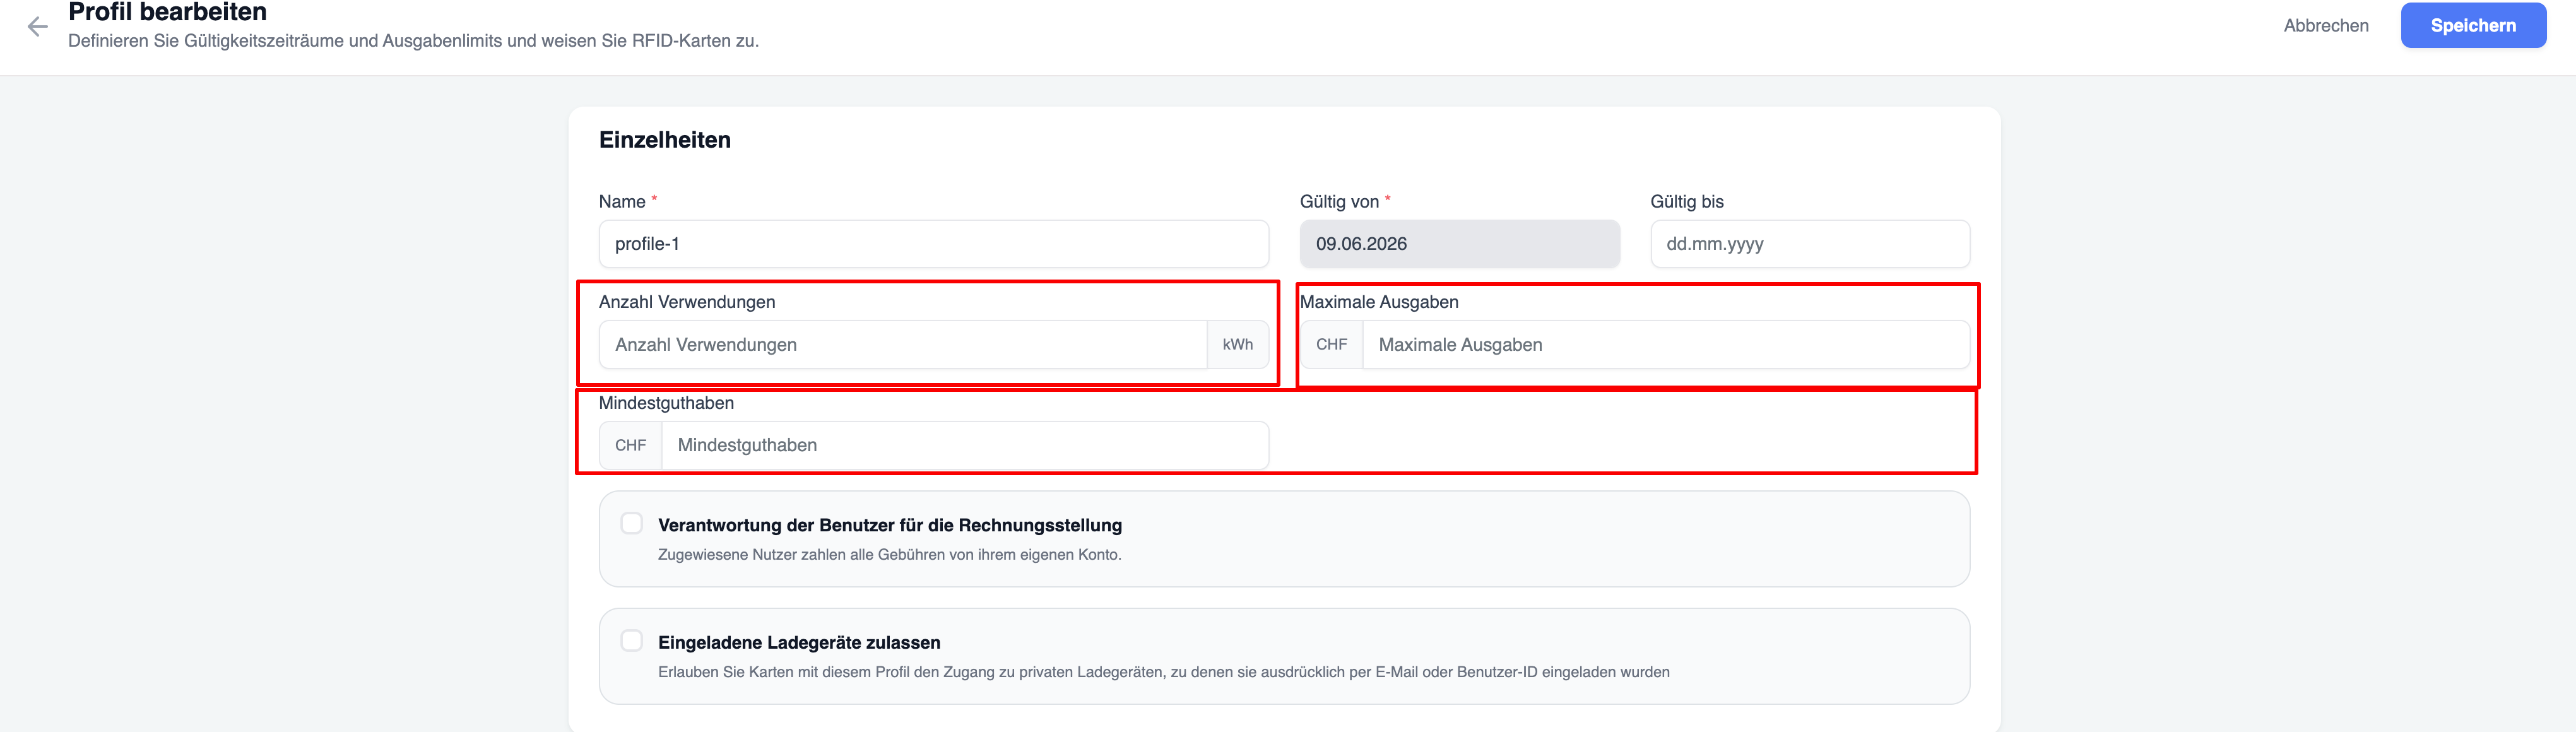
- Maximum spending limits – This limit applies to the total amount spent on charging sessions that the user can carry out using the card assigned to them.
- Charging cost liability settings – This setting determines which user (the cardholder or the user to whom the card has been issued) bears the charging costs for the charging session.
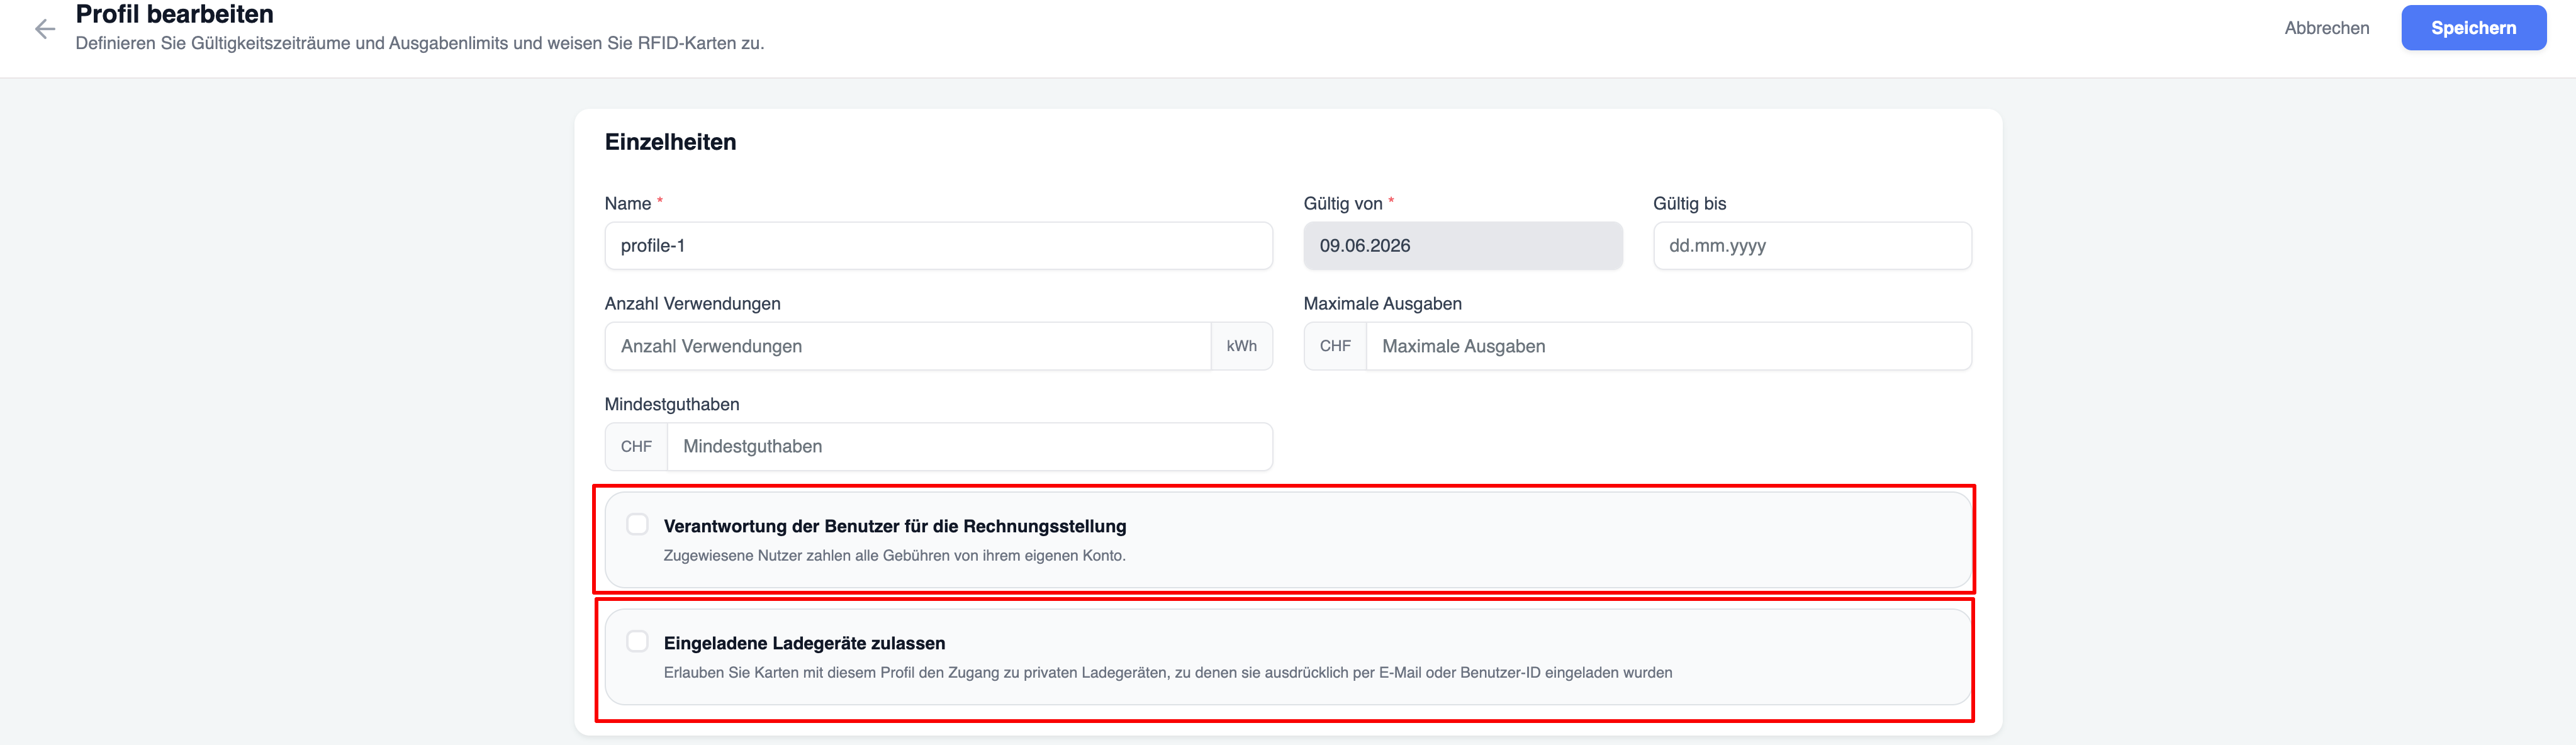
Allow Connected Chargers
Enable Allow Connected Chargers if users assigned to this RFID Profile should be allowed to charge on private charging stations where they have been explicitly invited.
When enabled:
- Users can use the cards with profile on invited private chargers for charging.
- The invitation must already exist.
Network Assignment (Profil Netzwerken zuweisen)
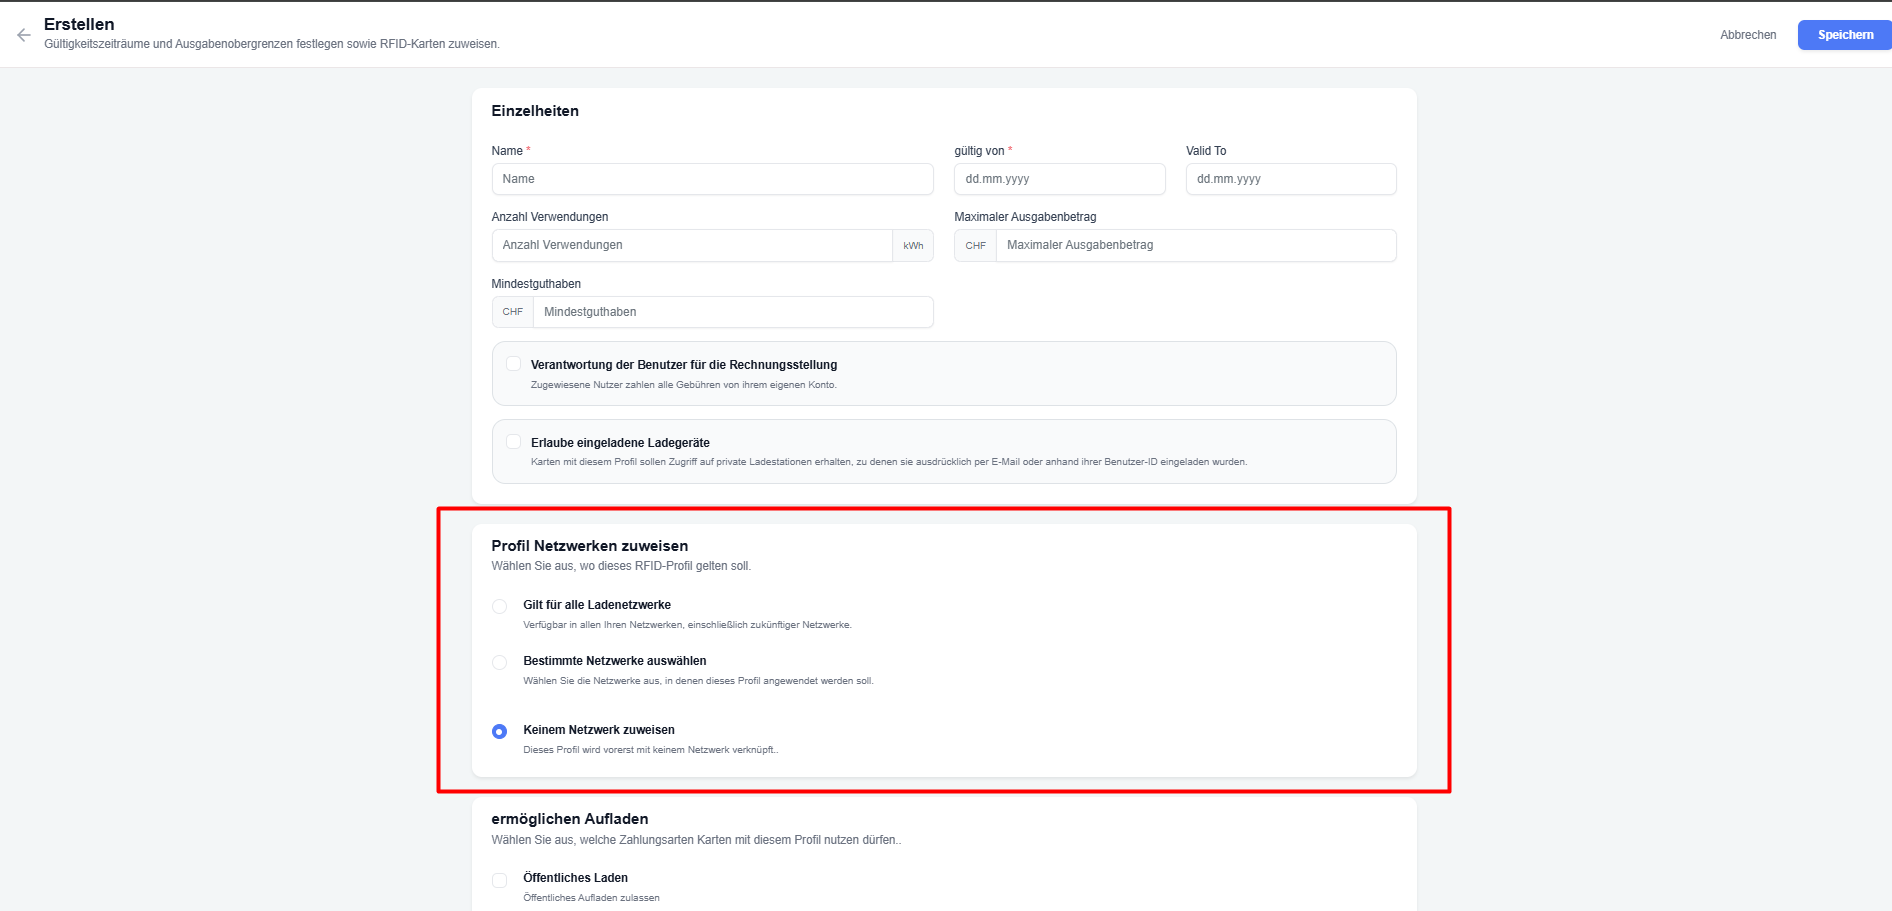
This section controls on which charging networks cards with this profile are allowed to charge.
Choose one of the three options:
| Option | Description |
|---|---|
| Gilt für alle Ladenetzwerke | The profile works on all your networks, including any networks you add in the future. |
| Bestimmte Netzwerke auswählen | The profile works only on the specific networks you select. |
| Keinem Netzwerk zuweisen | The profile is not linked to any network. Cards with this profile cannot charge on network chargers (they can still use other allowed charging types if configured). |
Allow Charging Types (ermöglichen Aufladen)
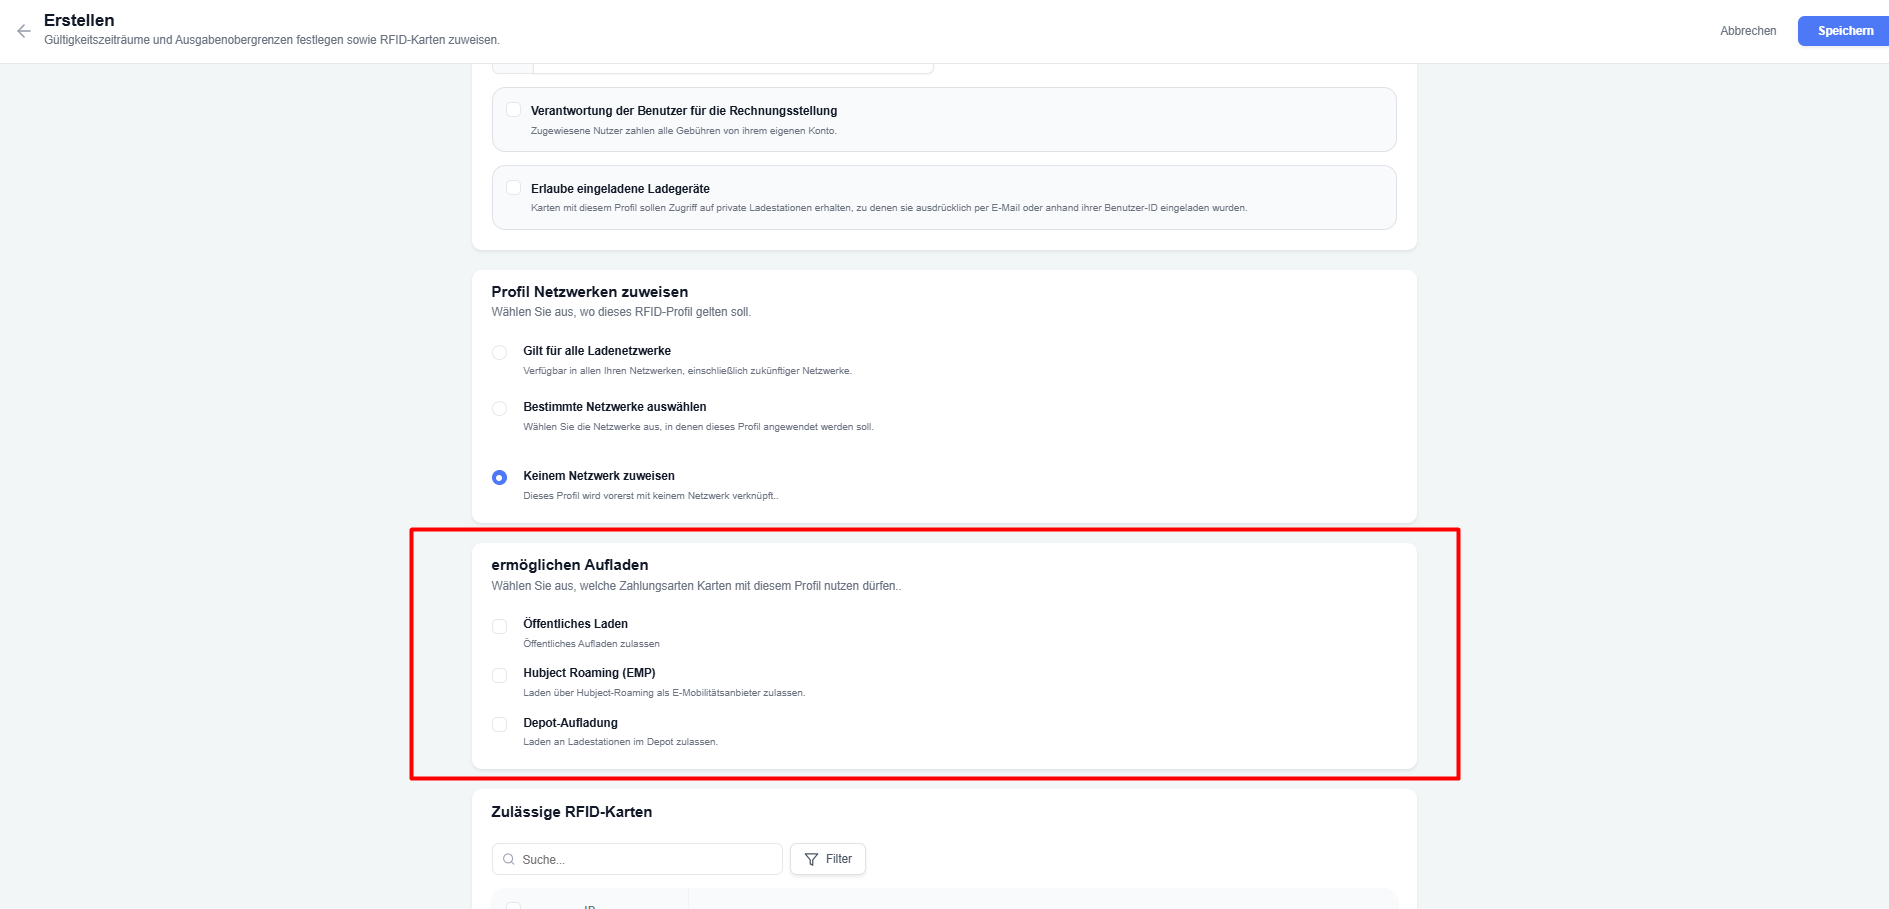
Here you decide which kinds of charging sessions cards with this profile are allowed to start.
Select any combination of the following checkboxes:
| Option | Description |
|---|---|
| Öffentliches Laden / Public Charging | Allows the card to start charging at public chargers. |
| Hubject Roaming (EMP) | Allows the card to start charging via Hubject roaming as an e-mobility provider (EMP). |
| Depot-Aufladung / Depot charging | Allows the card to start charging at depot chargers. |
Important: If a charger is Public, Hubject, or Depot, the user can start a charging session with a card that has this profile only if the corresponding checkbox is enabled.
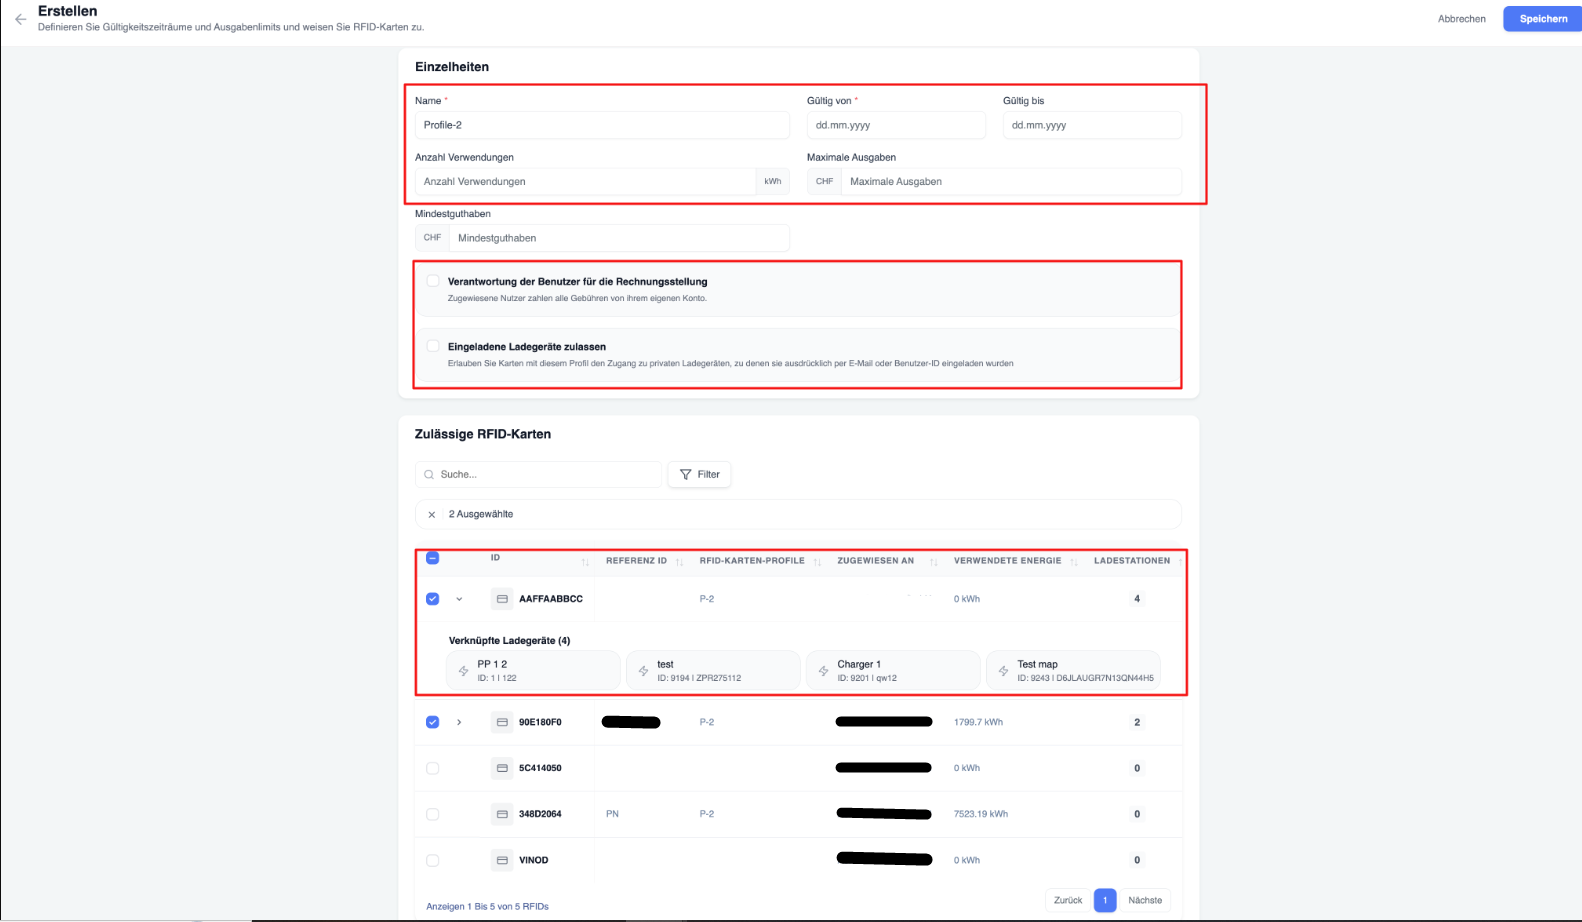
Create a profile
To create a new RFID profile:
Assign profiles
Profiles can be assigned individually or in bulk.
Once assigned, the profile rules automatically apply to all selected RFID cards.
- On the ‘My RFID’ tab:
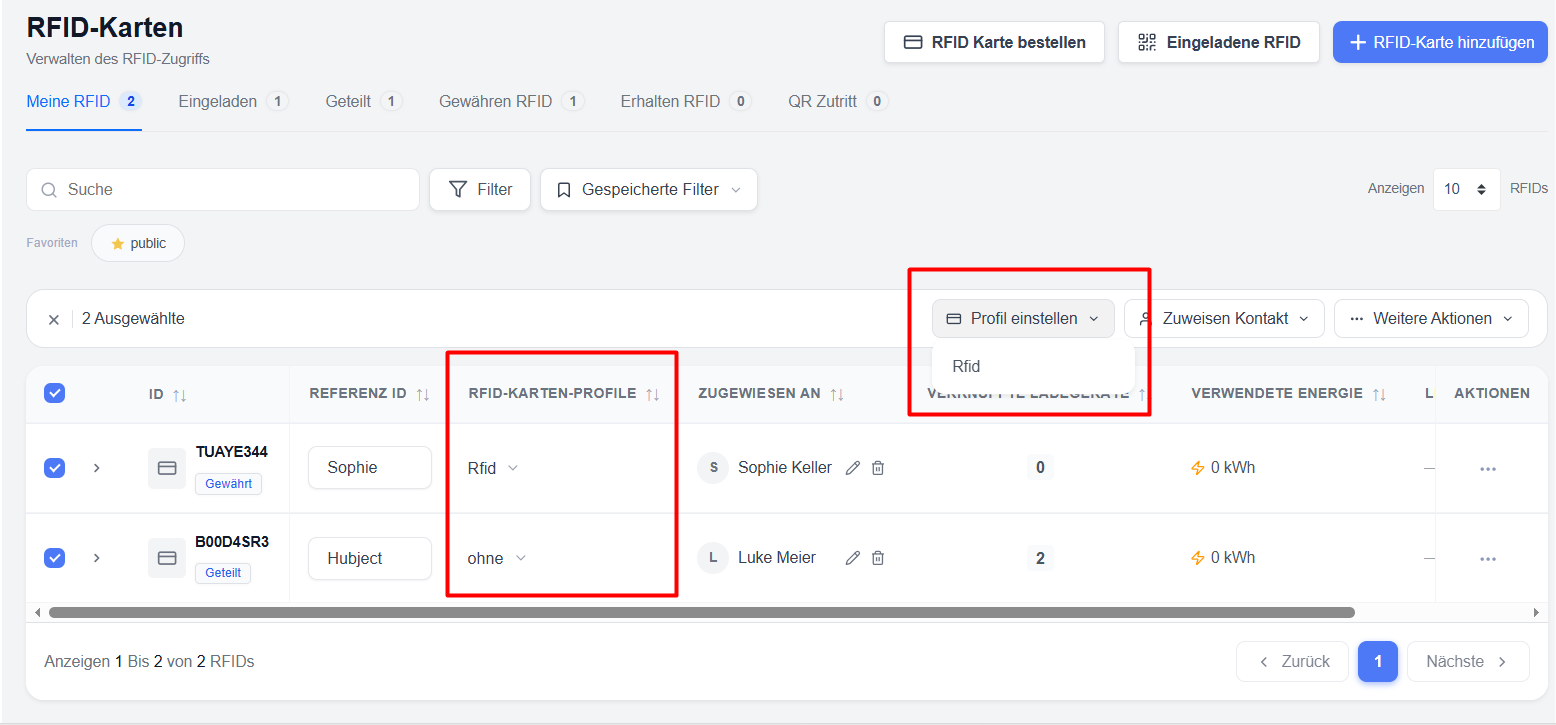
- Via the ‘Edit/Add’ option in the RFID profile
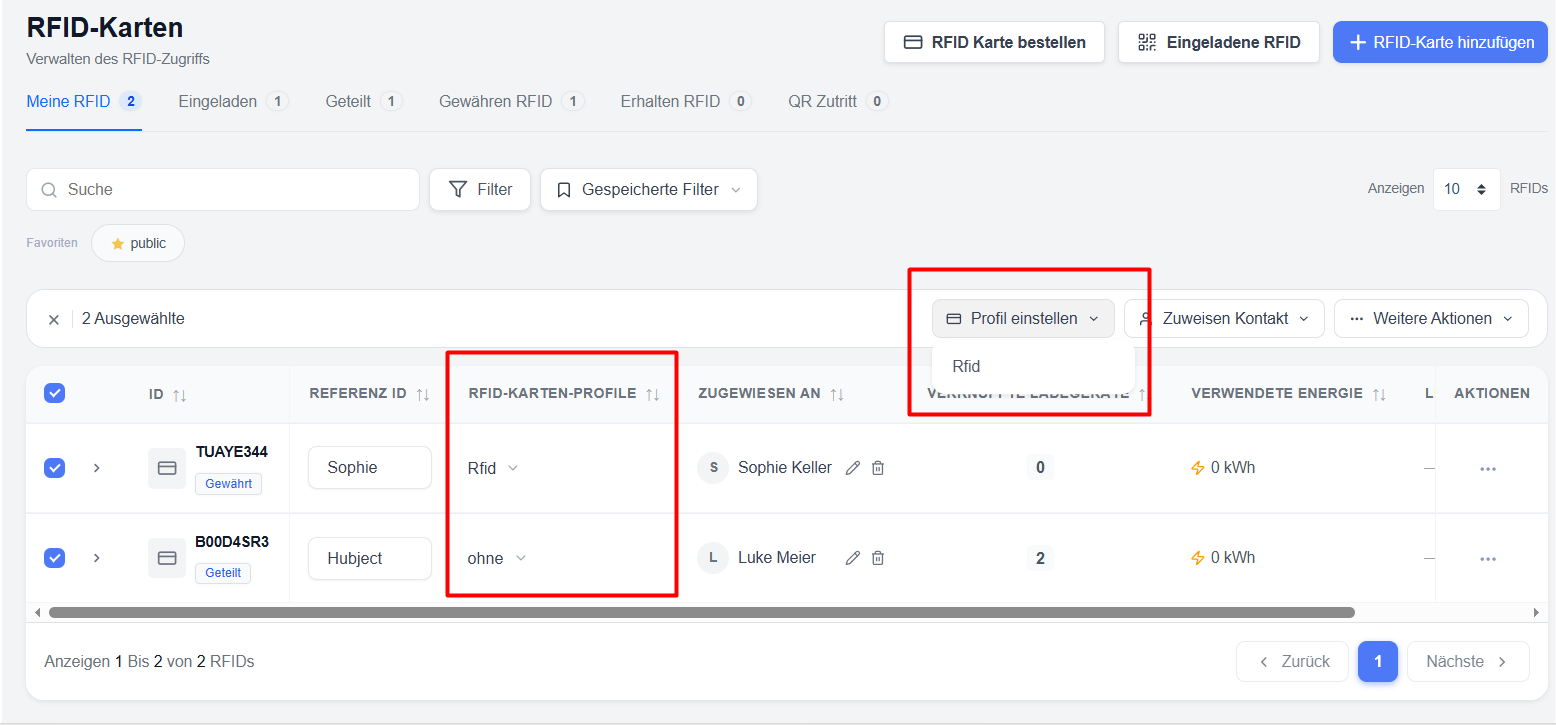
Note: RFID profiles cannot be assigned to cards in public mode or garage mode.
Re-assigning and Changing Profiles on Cards – Rules & Limitations
The system applies clear rules when you assign a profile to a card or change the profile of an existing card. These rules mainly depend on who pays for the charging (User billing responsibility) and how many users the card is granted to.
Key Rules:
| Situation | What is allowed / not allowed |
|---|---|
| Profile has “User billing responsibility” enabled | The card owner can still change or reassign the profile on that card. The new profile can have user billing responsibility enabled or disabled. |
| Card is granted to multiple users | The “User billing responsibility” option cannot be changed. It always stays unchecked. This means the card owner always pays the charging costs. |
| Card is granted to multiple users | You cannot reassign or change the profile to one that has “User billing responsibility” checked. Only profiles where the owner pays are allowed. |
| Owner pays the charging costs (User billing responsibility = unchecked) | The same card can be granted to one or more users at the same time. |
| Granted user pays the charging costs (User billing responsibility = checked) | The card can be granted to only one user. |
Simple summary for everyday use
- If the card owner pays → you can freely share the card with multiple users and change profiles as needed.
- If the granted user pays → the card can only be given to one person, and you cannot switch to a multi-user setup while that billing setting is active.
- You can always change a profile that has user billing responsibility enabled back to a profile where the owner pays.
Deleting an RFID Profile
You cannot delete a profile if it is currently assigned to any card that has been granted to a user.
What you must do first:
- Change the profile on all cards that currently use this profile, or
- Revoke the grants on those cards.
Only after no granted card is using the profile can you delete it.
Benefits of using profiles
- Standardised access management
- Reduced administrative workload
- Standardised billing policies
- Easier compliance with internal company billing rules
Quick Reference – What the Profile Controls
| Setting | Effect on cards with this profile |
|---|---|
| Network assignment | Determines on which networks the cards can charge |
| Public Charging | Cards can / cannot start sessions on public chargers |
| Hubject Roaming (EMP) | Cards can / cannot start sessions via Hubject |
| Depot Charging | Cards can / cannot start sessions at depot chargers |
| Invited chargers | Cards can / cannot access private chargers they were invited to |
| User billing responsibility | Decides whether the card owner or the granted user pays for charging |
Grant RFID cards
Description
The ‘Grant RFID Access’ function enables RFID card holders to securely grant other users within the platform access to their RFID cards. This allows authorised users to top up vehicles using the granted RFID card without needing to be in possession of the physical card itself.
The authorised user is granted access based on the permissions and restrictions set by the RFID card holder. Charging behaviour, session limits, validity periods, spending limits and access rights are governed by the RFID profile assigned to the RFID card.
This feature is ideal for businesses that need to share charging access with employees, contractors, fleet drivers, family members, tenants or partner organisations, whilst retaining full control over charging authorisations and usage policies.
Overview of ‘Grant RFID’
The ‘Grant RFID Access’ section displays RFID cards that have been shared with other users.
With this feature, RFID cardholders can:
- grant charging access to other users
- select which RFID card to share
- assign RFID profiles that control charging behaviour
- manage and revoke the access granted at any time
- monitor usage based on records of charging sessions
- Centralised control over charging point authorisations
The authorised user can start charging immediately, utilising the permissions assigned by the RFID cardholder.
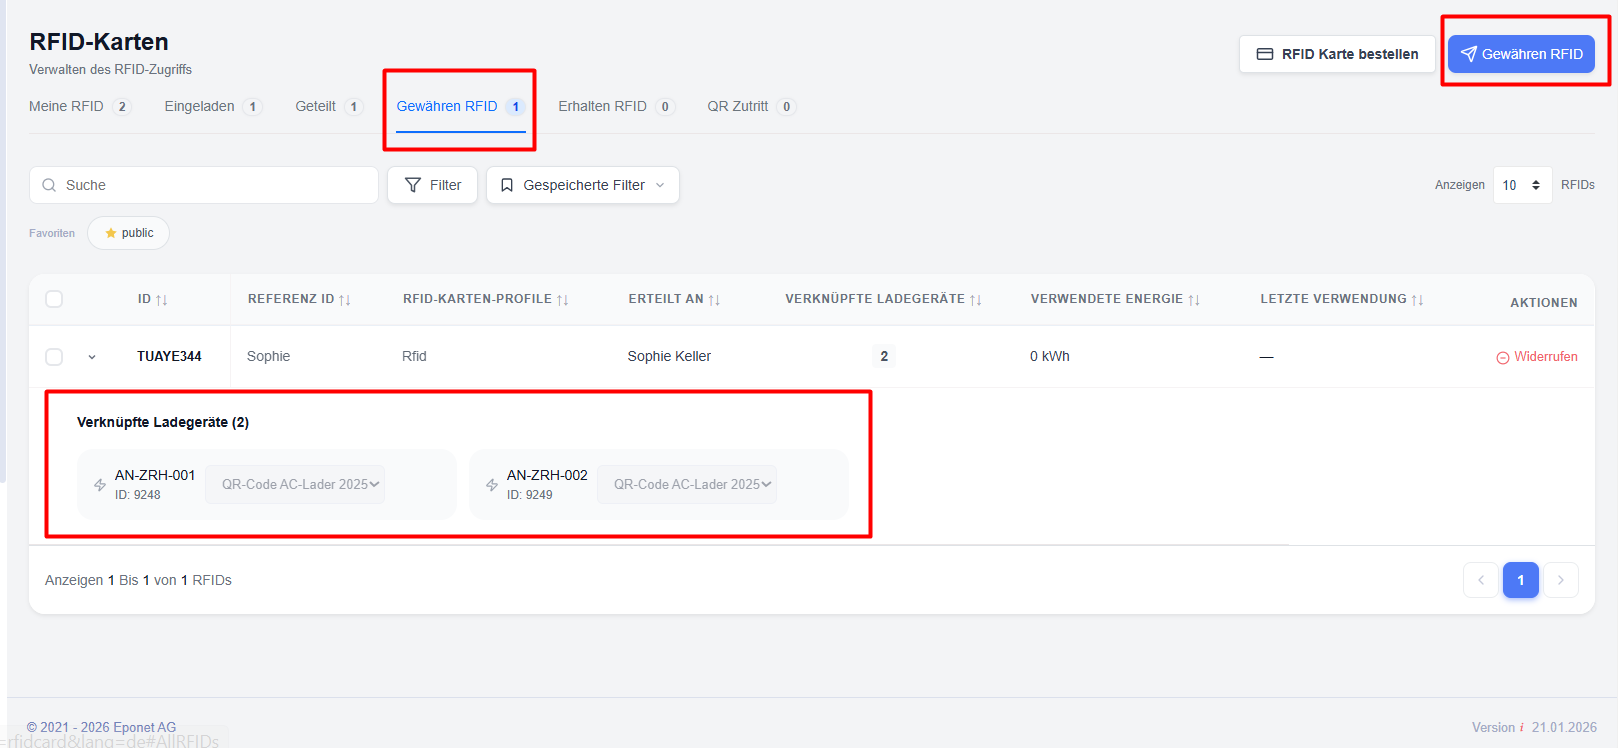
How RFID access authorisation works
The process of granting RFID authorisation comprises three components:
RFID cardholder – The user who owns and manages the RFID card.
Authorised user – The recipient who is granted authorisation to use the RFID card.
RFID profile – The policy framework that defines how the RFID card may be used.
When authorisation is granted:
- The RFID holder selects an RFID card.
- The holder selects the recipient from their contacts.
- An RFID profile is assigned.
- Access is granted.
- The recipient can use the RFID card in accordance with the rules of the assigned profile.
The RFID owner retains full control and can revoke access at any time if necessary.
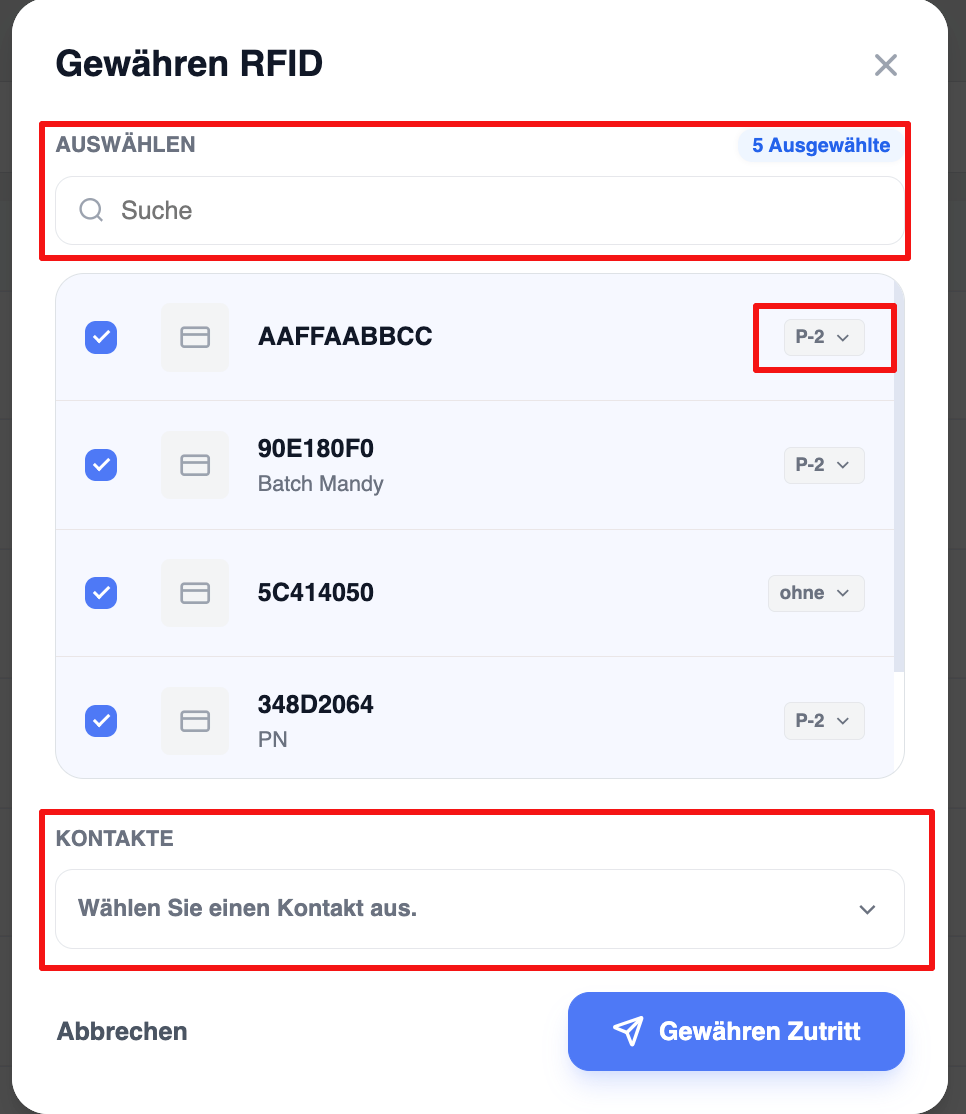
Assigning an RFID card
To issue an RFID card to another user:
Step 1: Open the RFID management section
or
In the ‘My RFID Cards’ section, select the RFID cards and choose ‘Assign RFID Card’ from the available actions.
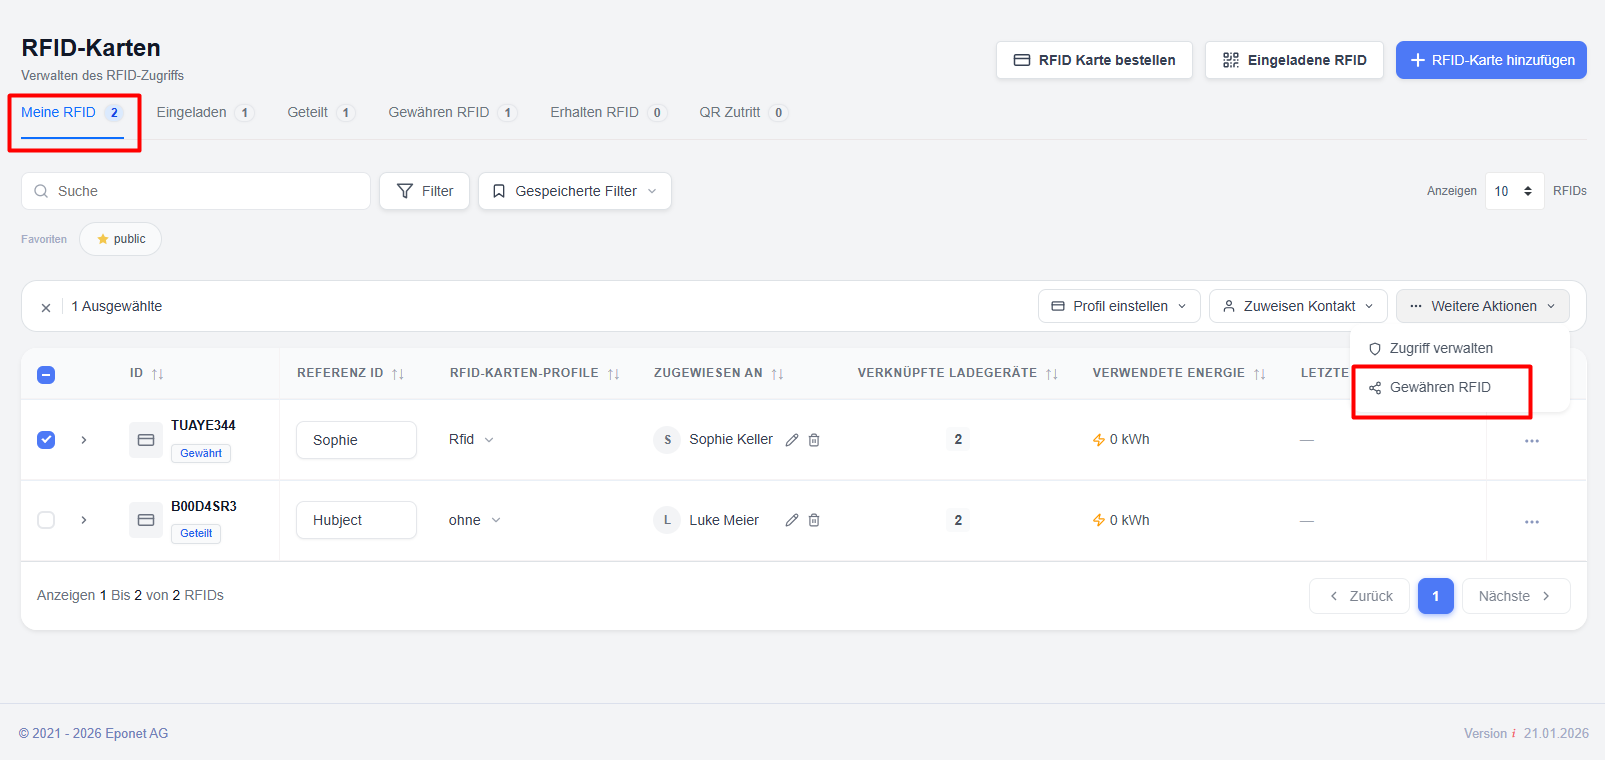
Step 2: Select RFID card(s) – Select one or more RFID cards to be assigned.
Step 3: Select recipient – Select the user or contact who is to be granted loading access.
Step 4: Assign an RFID profile
Select the RFID profile that is to govern the access granted.
The profile defines the following:
- Charging authorisations
- Usage restrictions
- Session limits
- Spending limits
- Validity periods
- Access rules for the charger
Step 5: Confirm granting of access
Click on ‘Grant access’ to complete the process.
The selected user will immediately be granted access to the RFID card.
Managing granted RFID access rights
Once access has been granted, administrators and RFID card holders can view and manage existing permissions.
Available actions
‘View granted RFID cards’ – Displays all RFID cards currently shared with other users.
Edit RFID profiles – Update the assigned RFID profile if the permissions need to be changed.
Check access assignments – Check which users currently have access to specific RFID cards.
Revoke access – Immediately withdraws a authorised user’s authorisation to top up.
Revoking granted access
Access can be revoked at any time.
To revoke access
- Open the ‘Granted RFID Access’ section.
- Find the assigned RFID allocation.
- Select the user or the RFID card.
- Click on ‘Revoke access’.
- Confirm the action.
After revocation:
- The authorised user can no longer use the RFID card.
- New top-ups will be blocked.
- Historical top-up records will remain available for analysis purposes.
Top-ups for authorised users
When an authorised user initiates a top-up using a shared RFID card:
- The system checks the validity of the RFID card.
- The assigned RFID profile is evaluated.
- Access permissions for the charging station are checked.
- The charging process begins once all validation checks have been successfully completed.
This ensures that the RFID cardholder retains control over how the card is used.
Viewing authorised RFID usage
Charging transactions generated by authorised RFID cards are recorded and can be monitored by the RFID holder.
The holder can view the following:
- Charging transactions
- Energy consumption
- Usage history
- Assigned users
- Charging locations
- Timestamps of charging sessions
This ensures transparency and traceability when sharing access to charging points.
RFID cards issued
When a user is issued with an RFID card, the allocated card is displayed in the following section:
‘RFID Management → RFID Cards Received’ section.
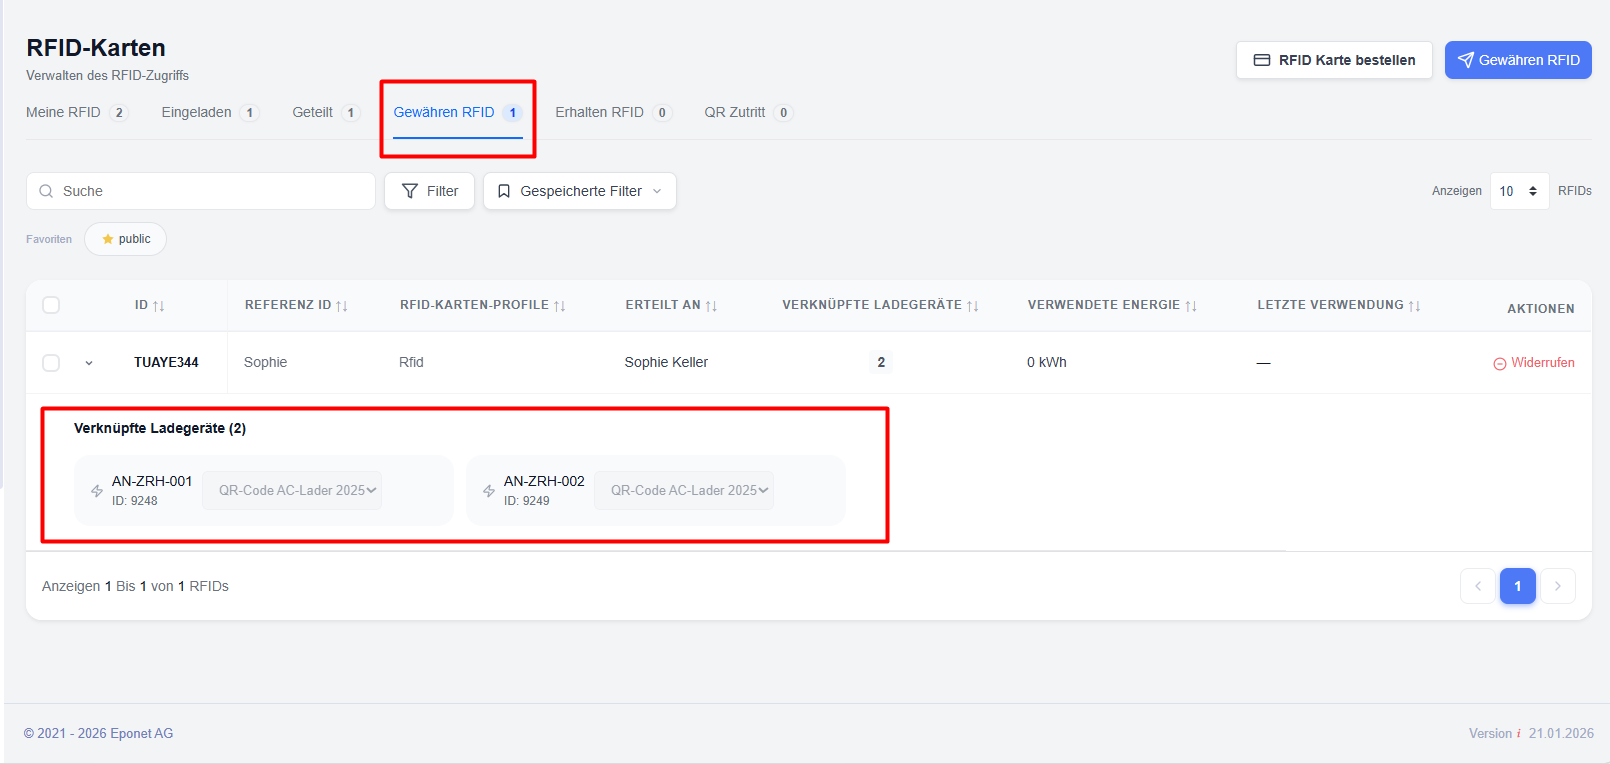
The ‘RFID cards received’ tab provides a read-only view of the RFID cards granted by other users.
Recipients can view the following:
RFID information
- RFID ID
- RFID owner
- Assigned profile
- Status
Order RFID cards
Description –
This page explains how users can order RFID charging cards or RFID badges via the Eponet platform. Users can place orders, select quantities, specify delivery details, choose a payment method and track the order status directly via the portal.
RFID cards and RFID badges can be used for authentication at charging stations and for quick access to charging sessions.
To charge at an Eponet charging station, you will need an Eponet RFID card or an Eponet RFID badge.

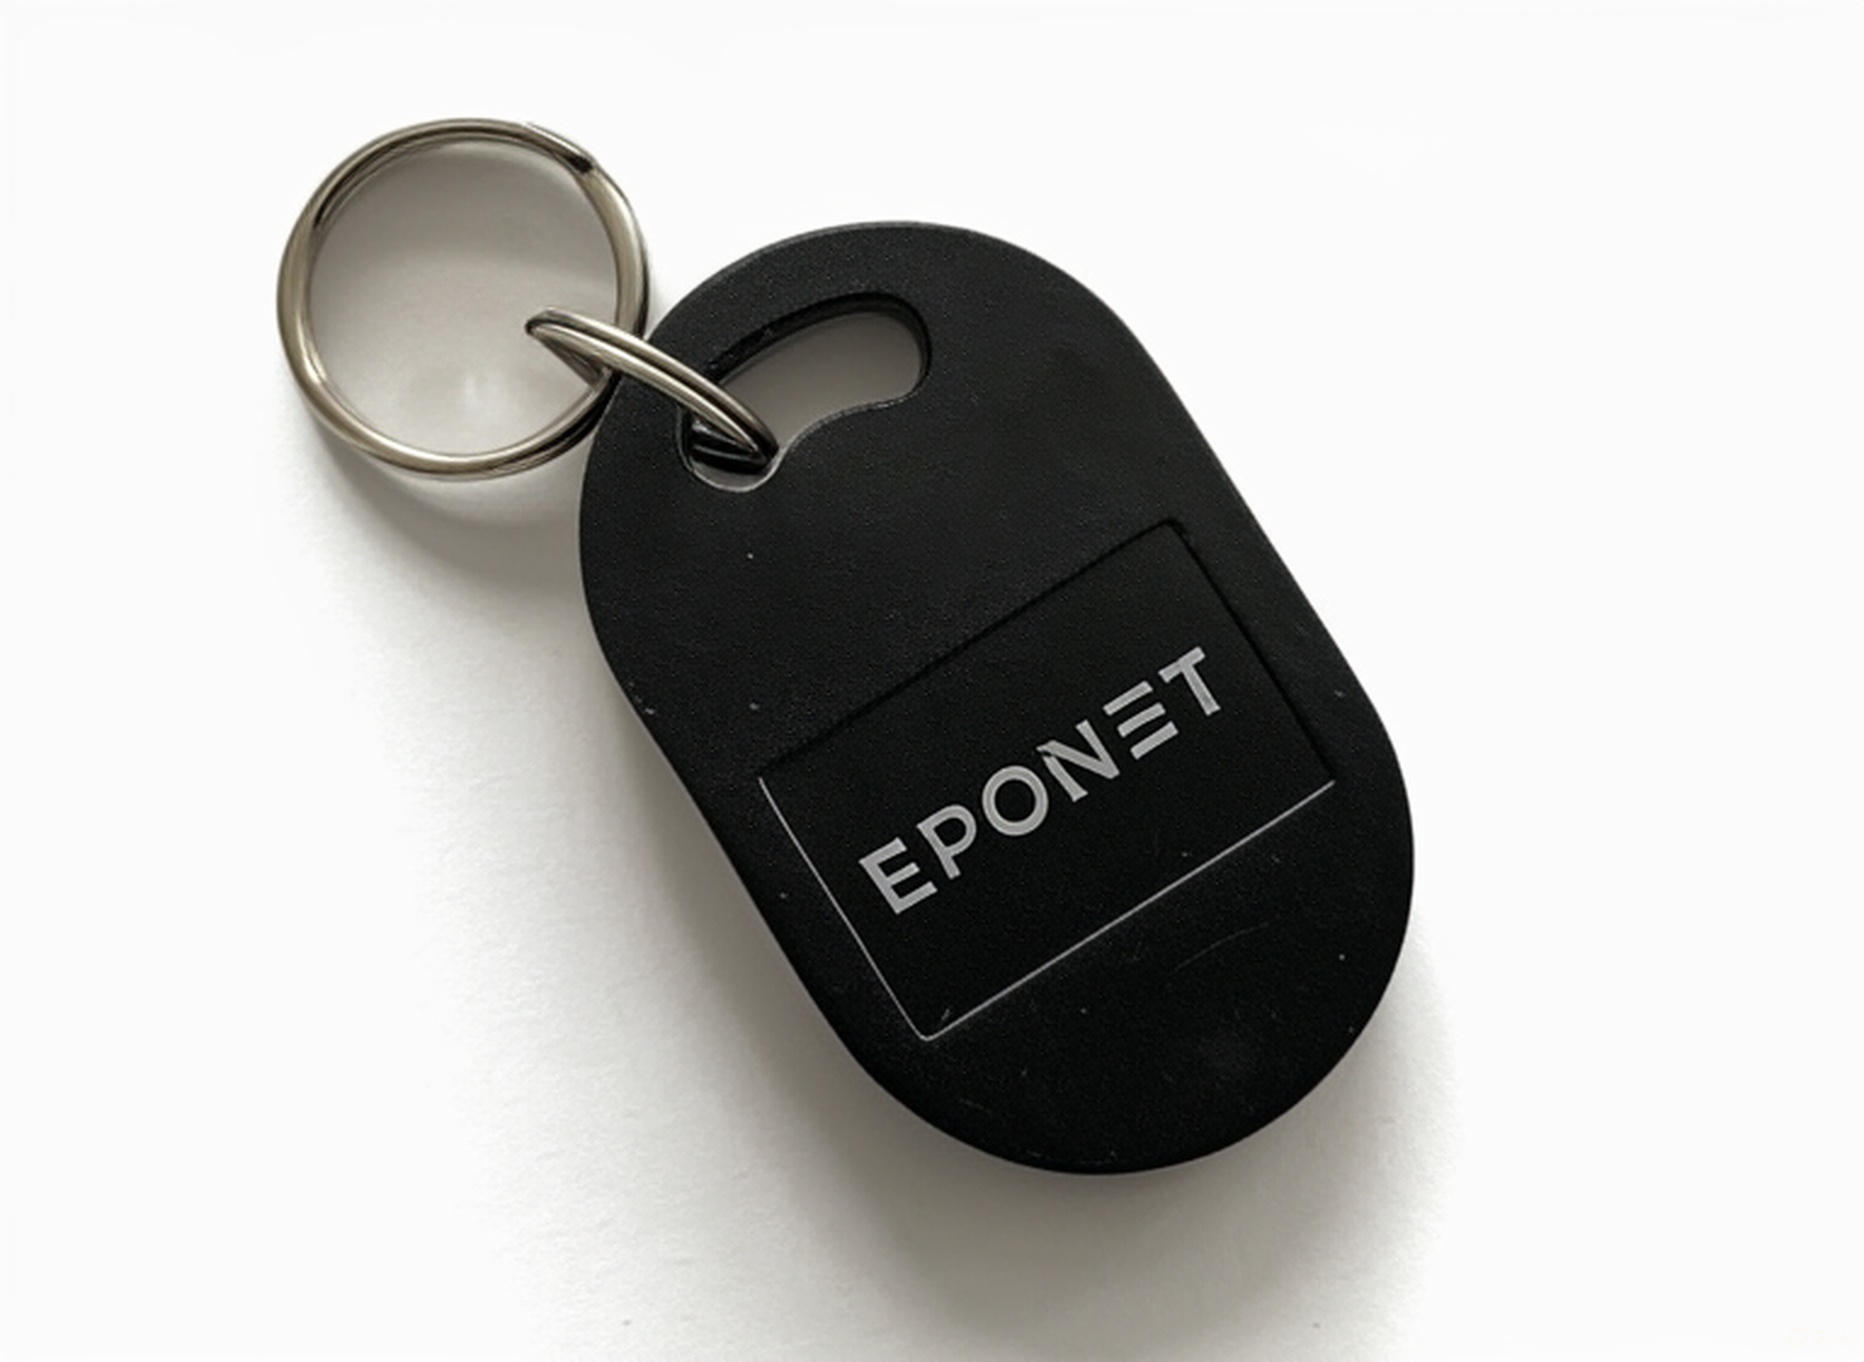
RFID cards from other providers may also work.
Please note:
should Eponet offer support for third-party RFID cards, we reserve the right to charge for this support via your account. For this reason, we recommend the tested Eponet RFID cards.
You can order RFID cards and badges directly from Eponet
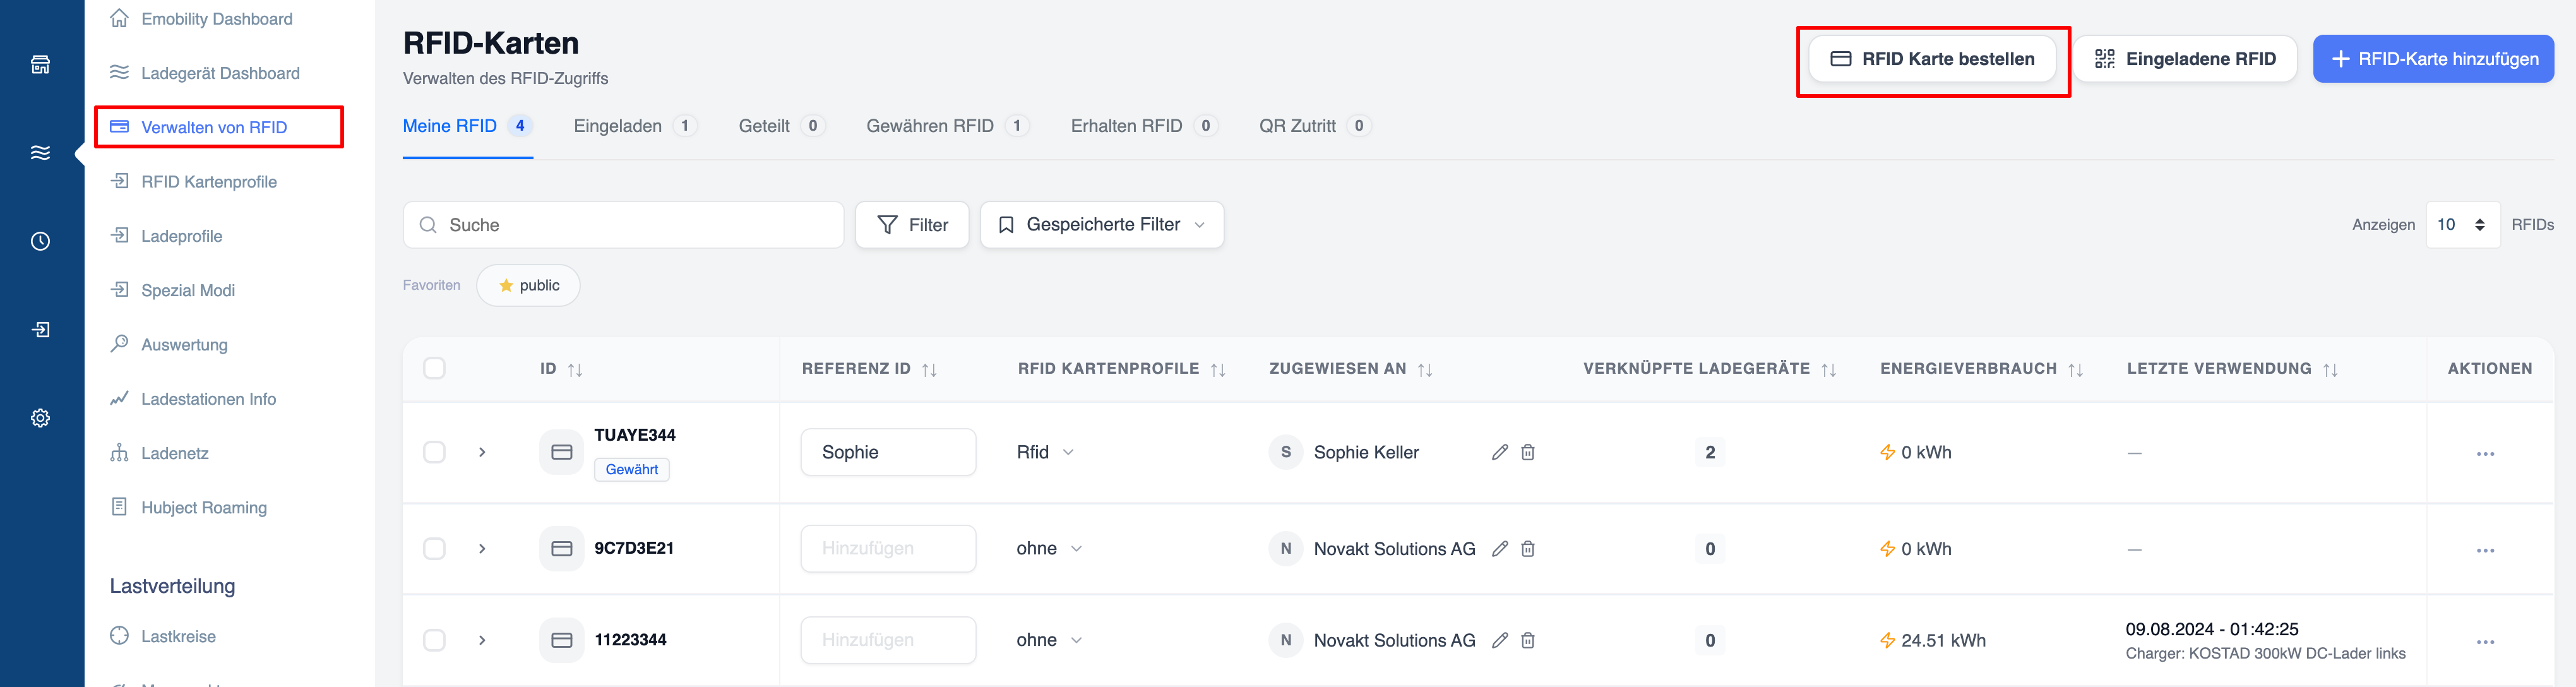
You can order Eponet RFID cards or badges on 3 different pages:
- Log in to the Eponet web portal
- Navigate to:
-
‘RFID Card’ page in the ‘E-Mobility’ section:

-
-
-
Overview of RFID cards

-
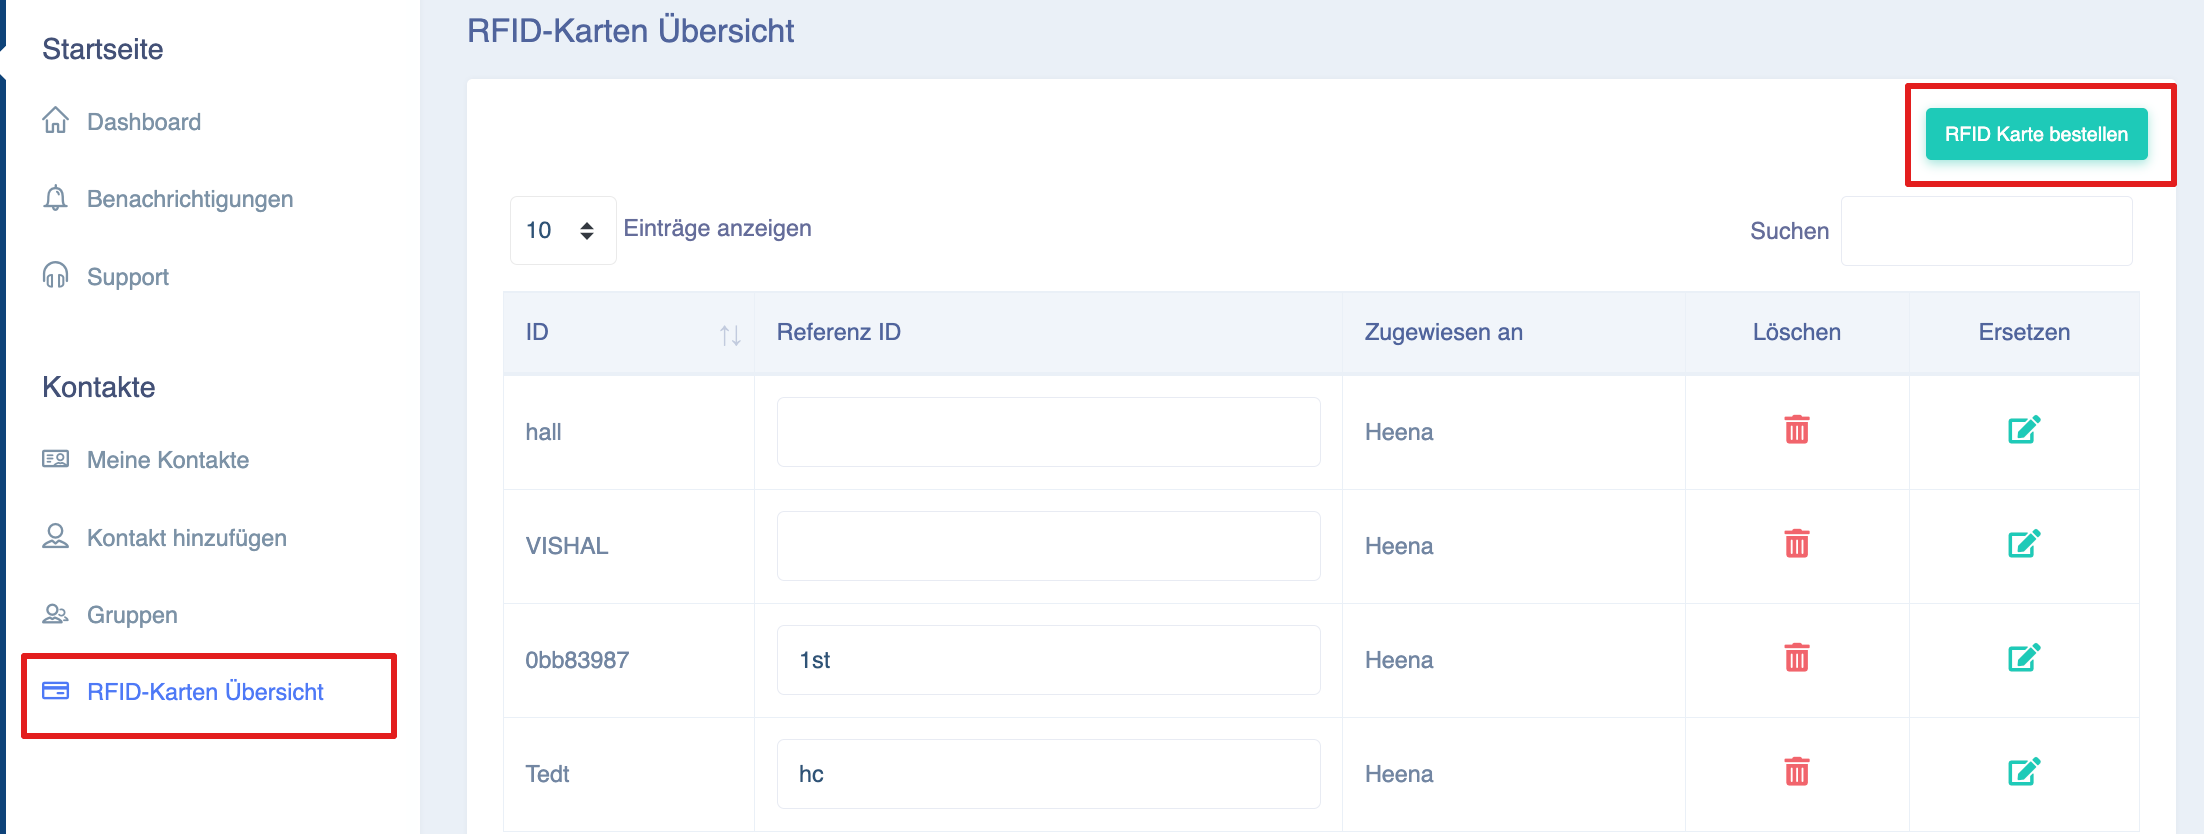
-
-
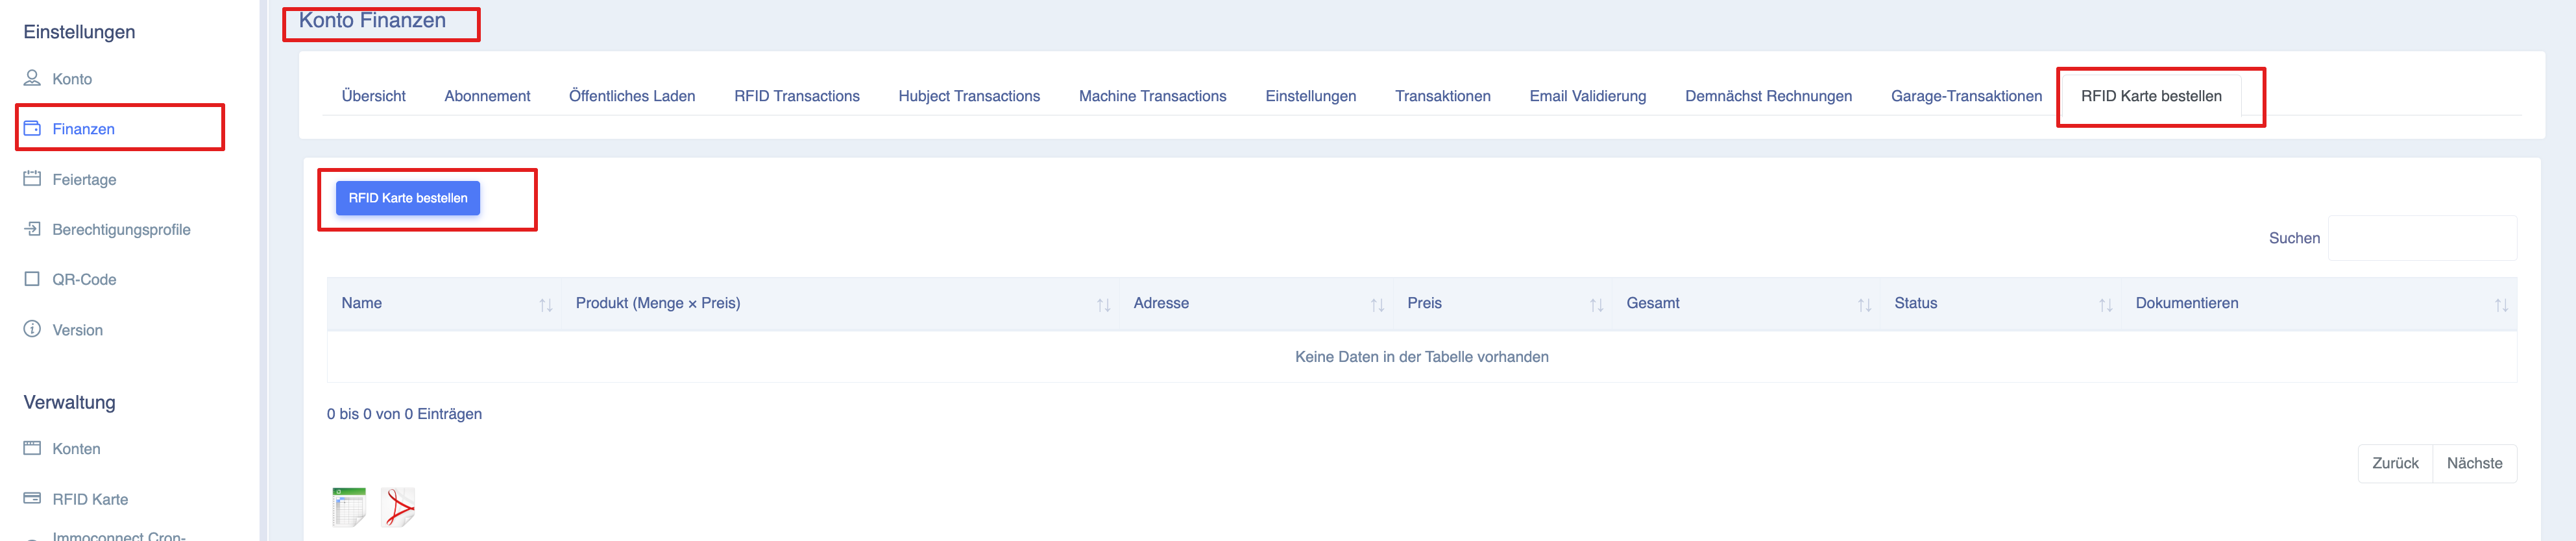
Order RFID cards in the ‘Finance’ section

-
-
Click on the ‘Order RFID cards’ button
-
Create an RFID order
Users can choose between:
- RFID card
- RFID badge

-
Select quantity
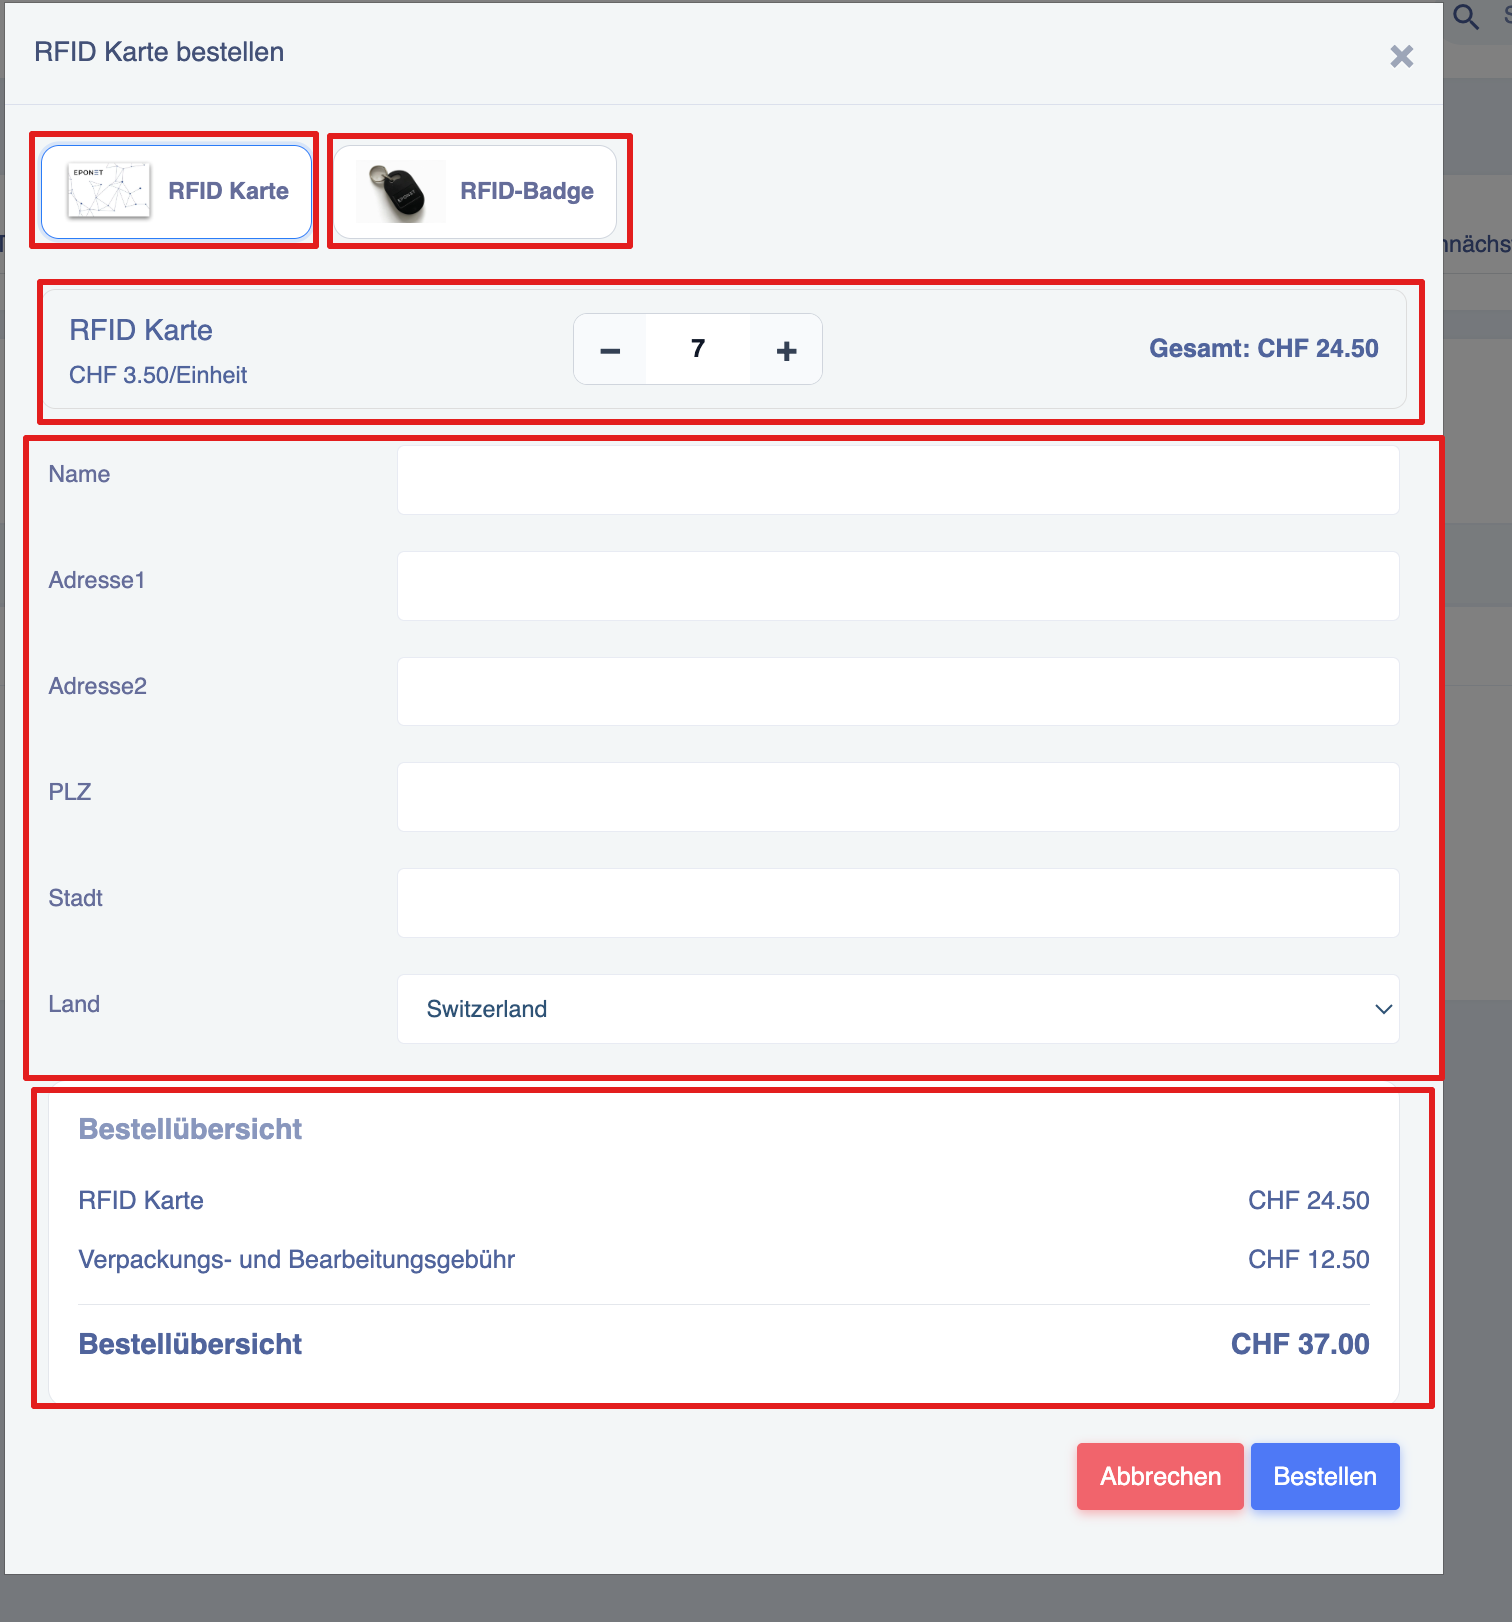
- Use the:
- ➖ Minus button
- ➕ Plus button
- Select the desired quantity
- The total amount is updated automatically
Prices for Eponet RFID cards/ID cards
| Product | Quantity | Price per item in CHF (flat rate) | Postage costs CHF (flat rate) |
| RFID cards/ID cards | 1 to 5 items | 4.0 | 9 |
| RFID cards/ID cards | More than 5 items | 3.5 | 12.5 |
Enter delivery details
Please enter the required delivery details:
| Field | Description |
|---|---|
| Name | Recipient’s name |
| Address 1 | Main address |
| Address 2 | Second address (optional) |
| Postcode | Postcode |
| Town | Town |
| Country | Country |
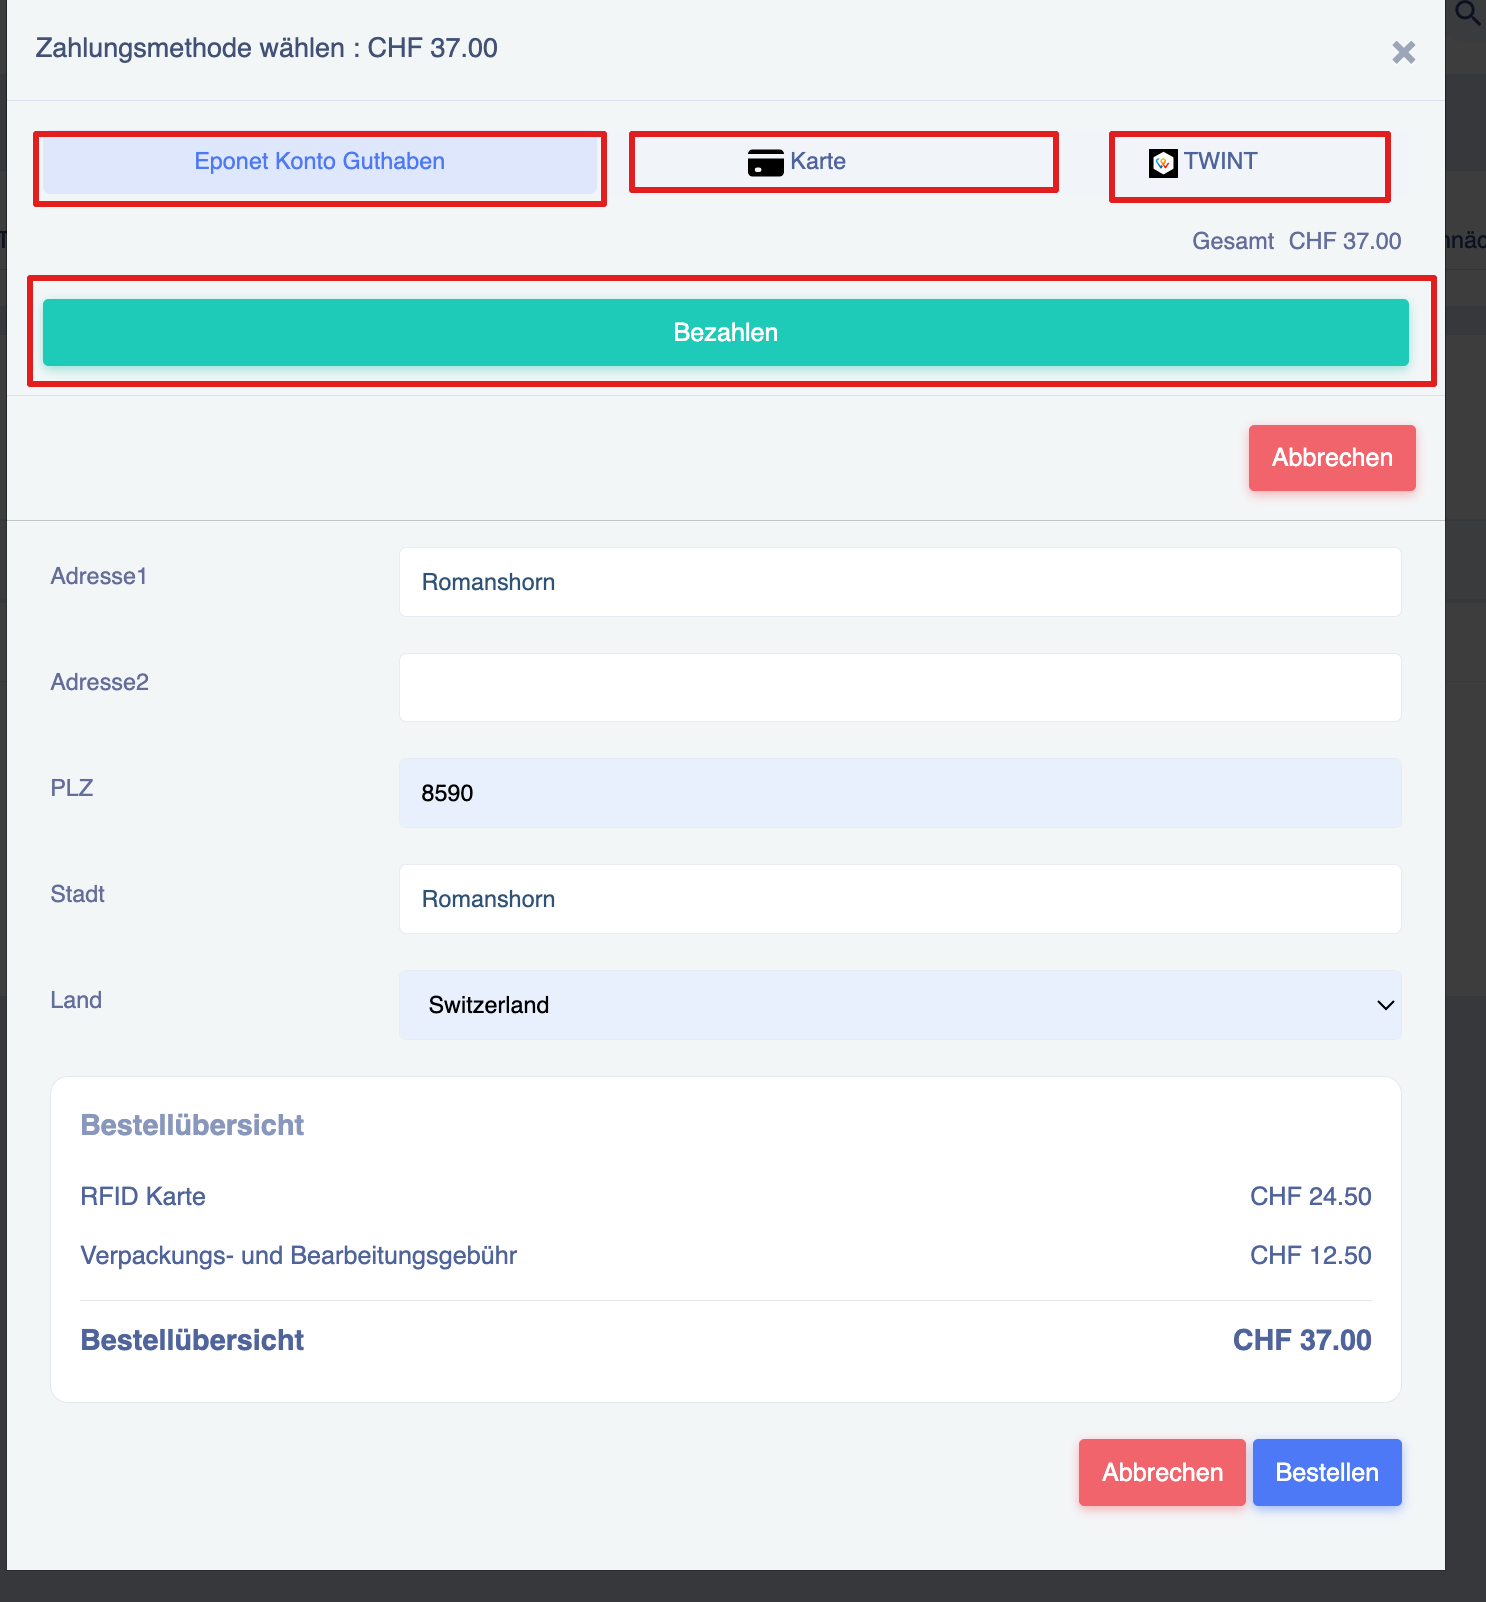
Select payment method
Users can pay using one of the available payment methods:
- Eponet account balance
- Credit/debit card
- TWINT
RFID View orders and order status
Order tracking
Users can view all RFID orders in the ‘Finance’ section.
Navigation:
- Open “Finance”
- Click on “Order RFID cards”
- View all existing orders
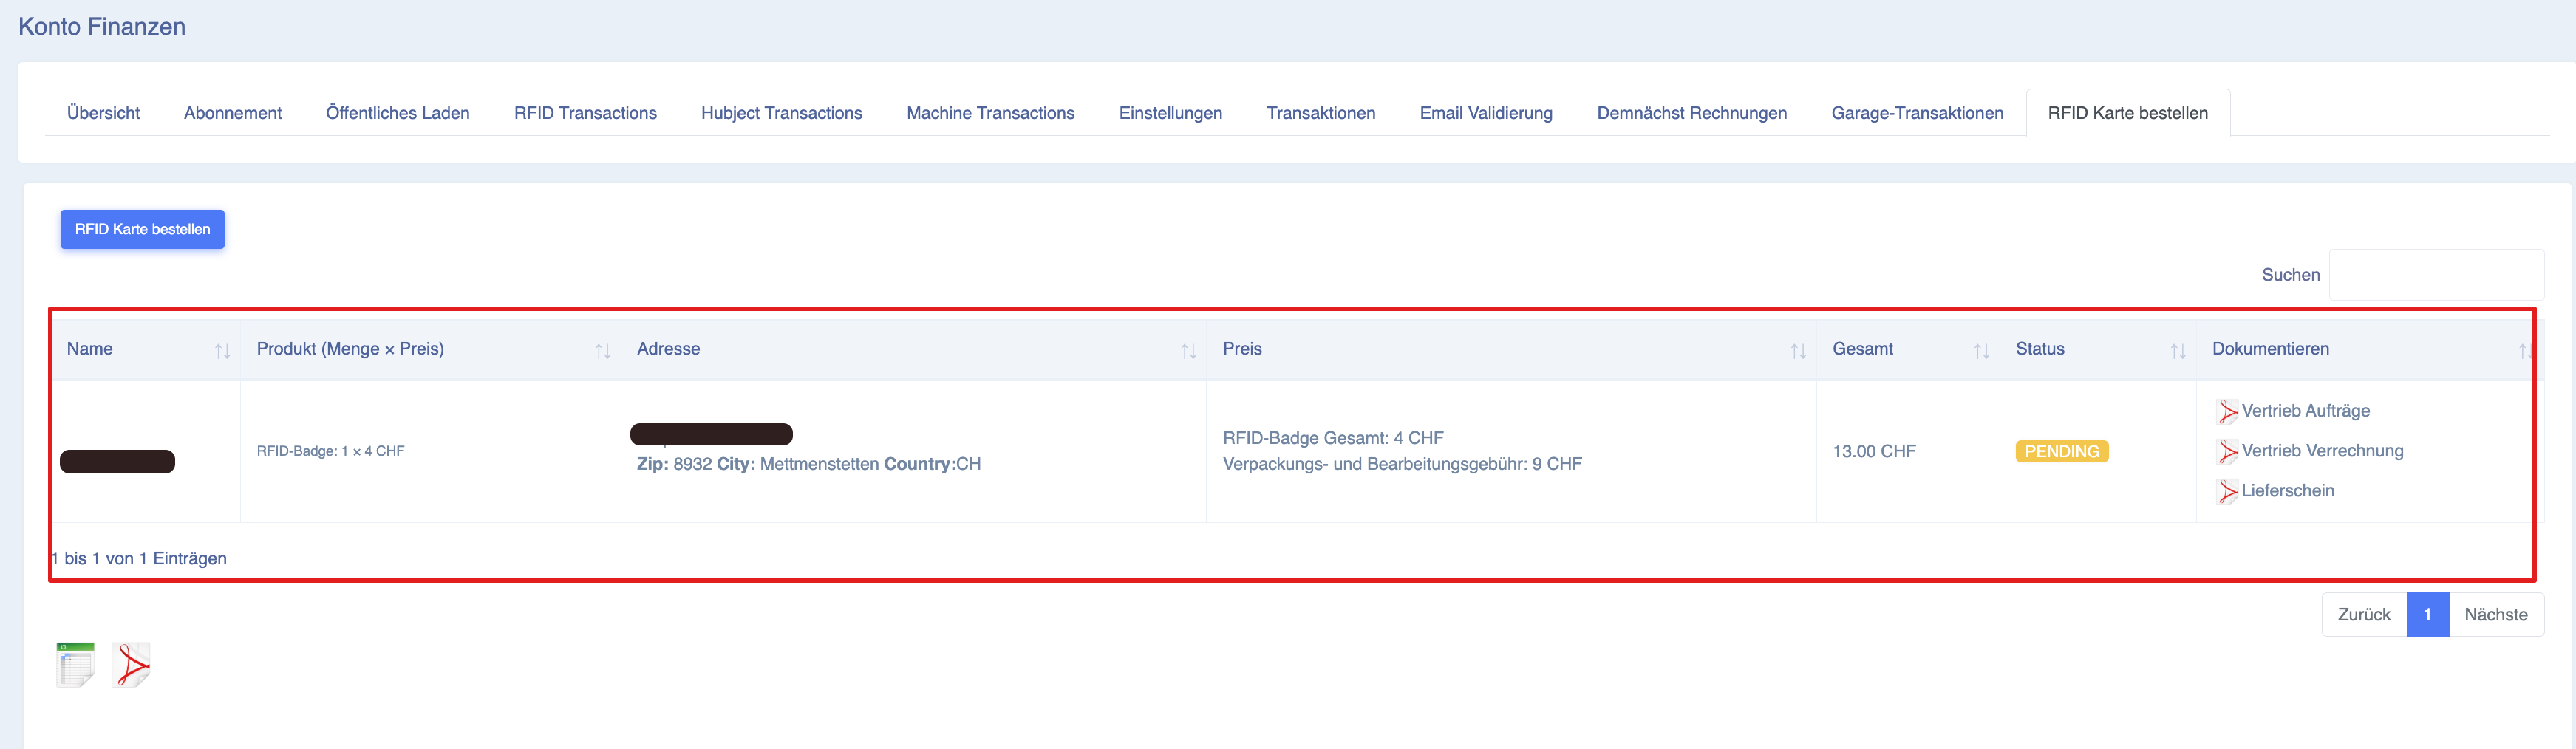
Add card/ID to Eponet account:
Once you have created your account, you can add your RFID card(s) yourself under the “RFID Card” tab. Every Eponet RFID card or Eponet RFID ID card is printed with a unique number. You can enter this number in the “CARD ID” field.
You can find all the steps on the following page: https://wiki.eponet.ch/books/das-eponet-portal/page/rfid-karten-verwaltung-startseite
Read RFID card / VID vehicle number via charging station
An owner/administrator of a charging infrastructure can also read an RFID card or the VID number (Vehicle Identification Number) of a vehicle via a charging station.
The VID number (Vehicle Identification Number) is a unique identifier for each electric vehicle. It is used to identify and distinguish the vehicle. Reading the VID number is mainly used for Autocharge and ISO15118.
The PlugandCharge/Autocharge or ISO15118 function described only works with DC charging stations.
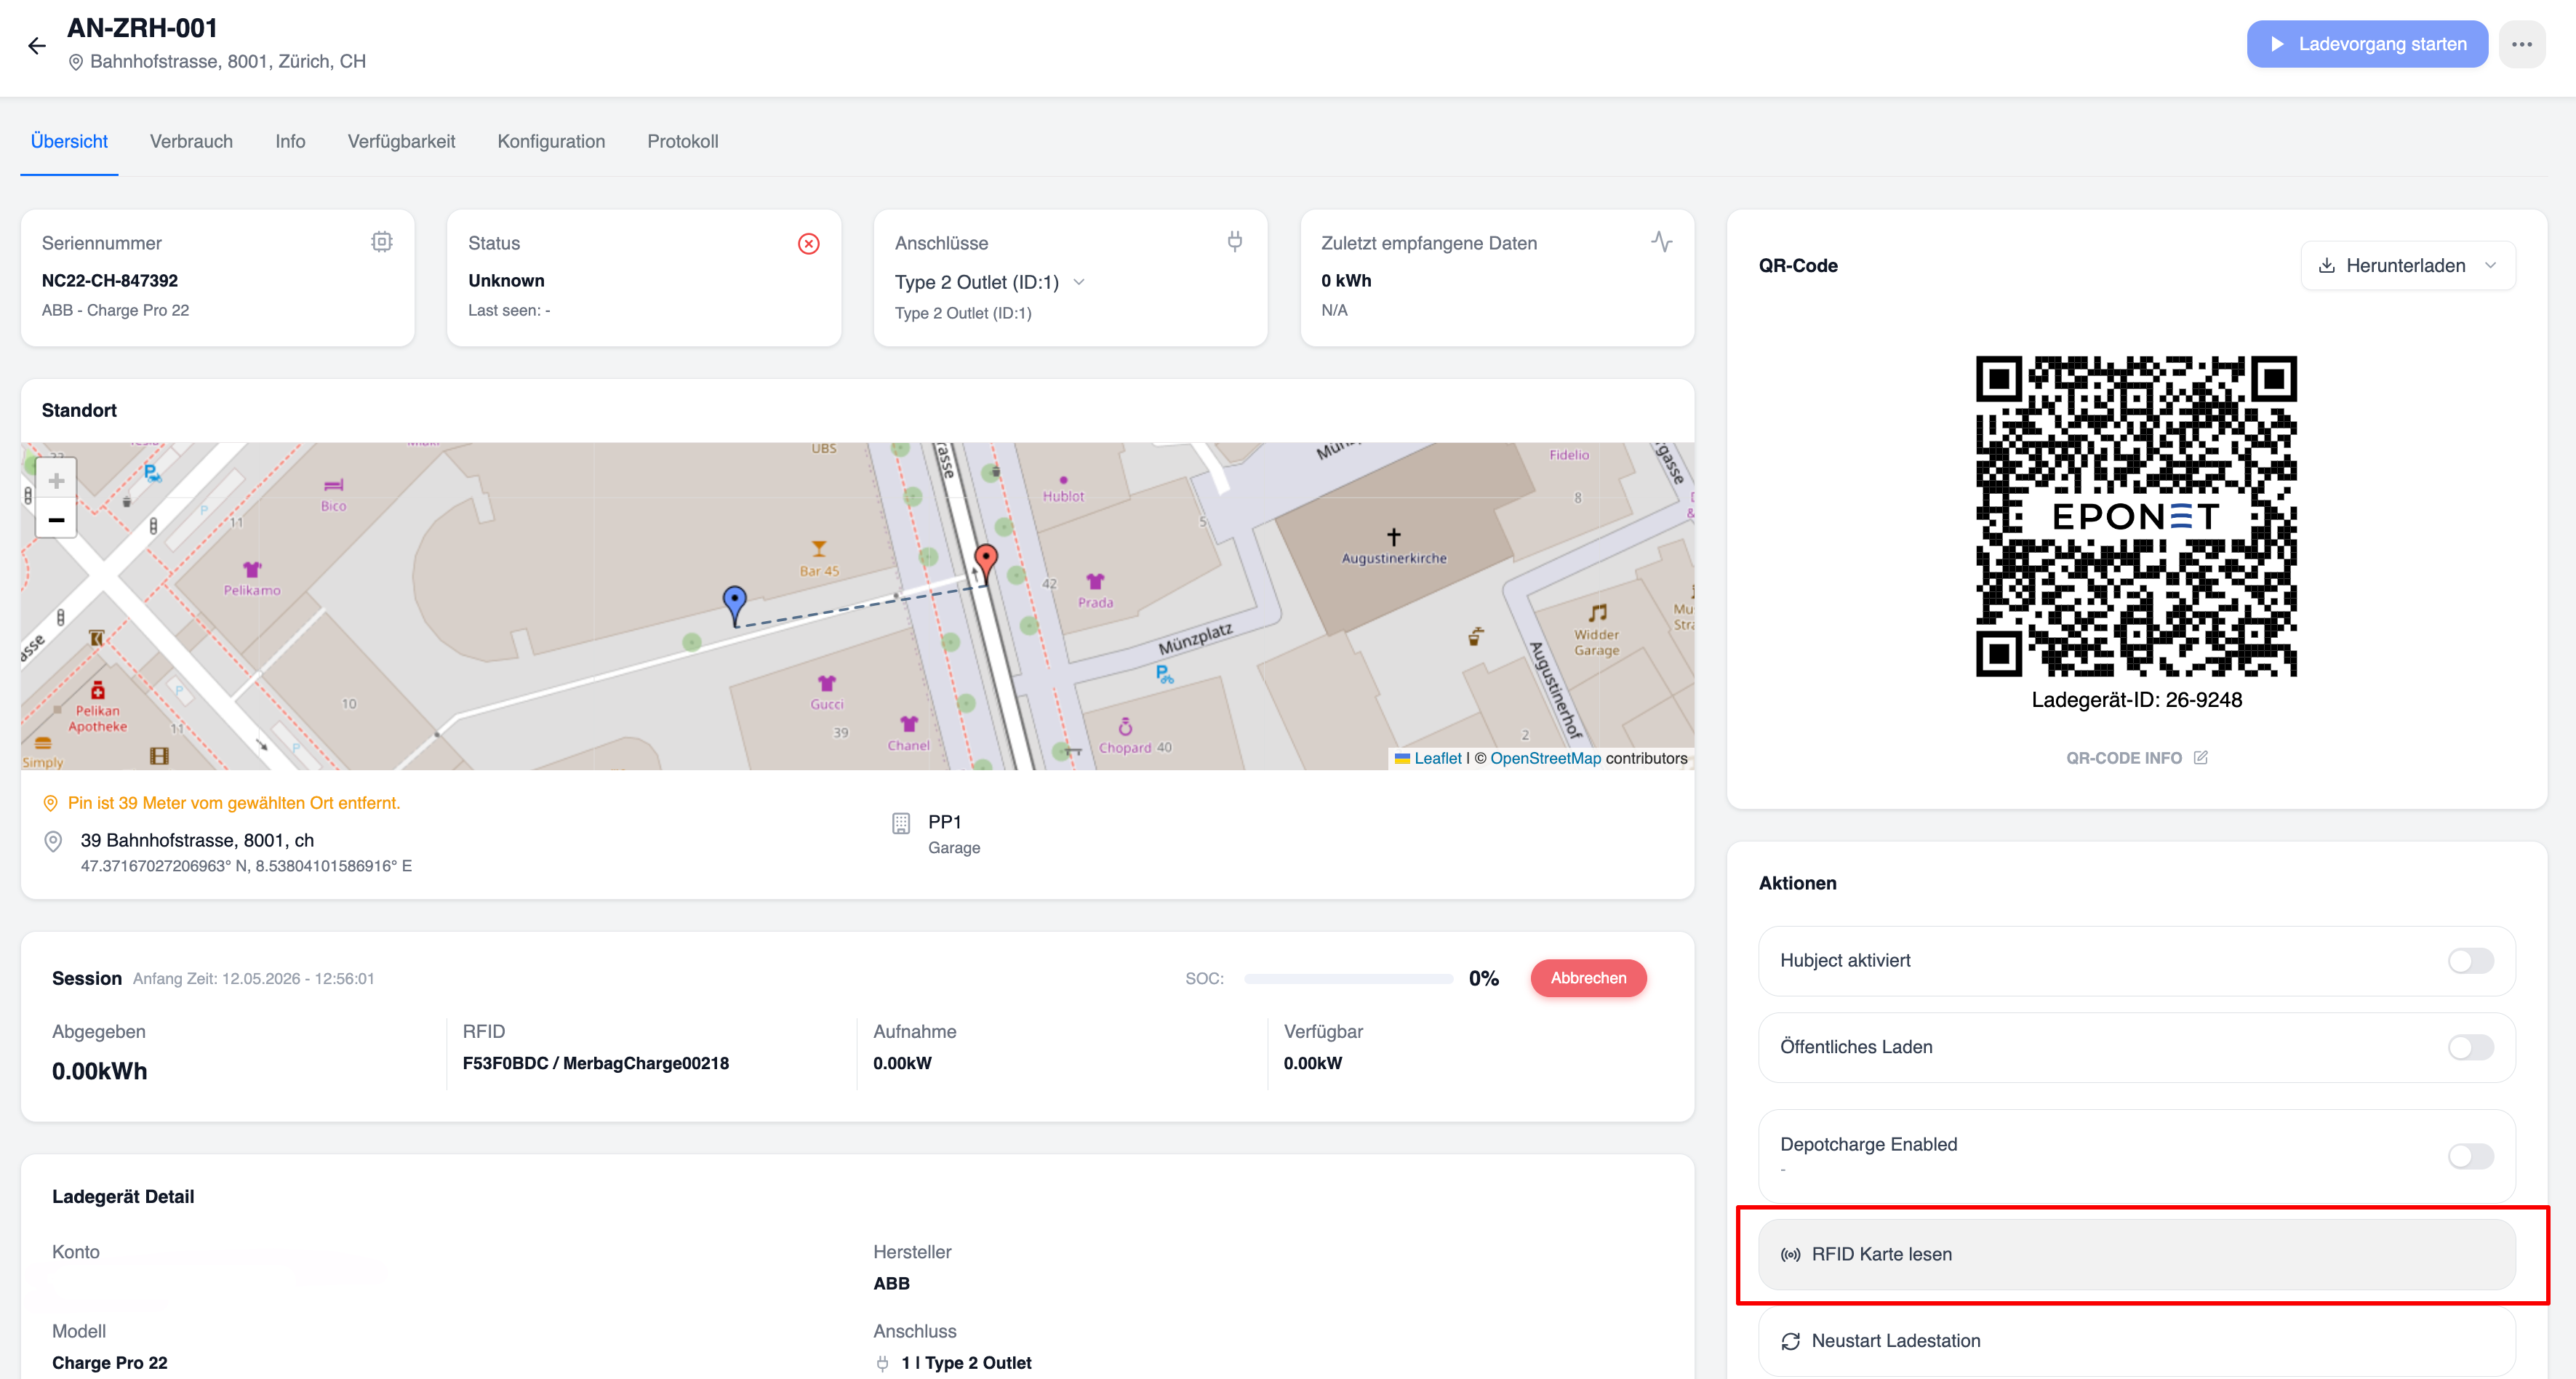
To do this, go to the charging station you want to use for reading and press the "Read RFID card" button to start a reading process, which takes 30 seconds.
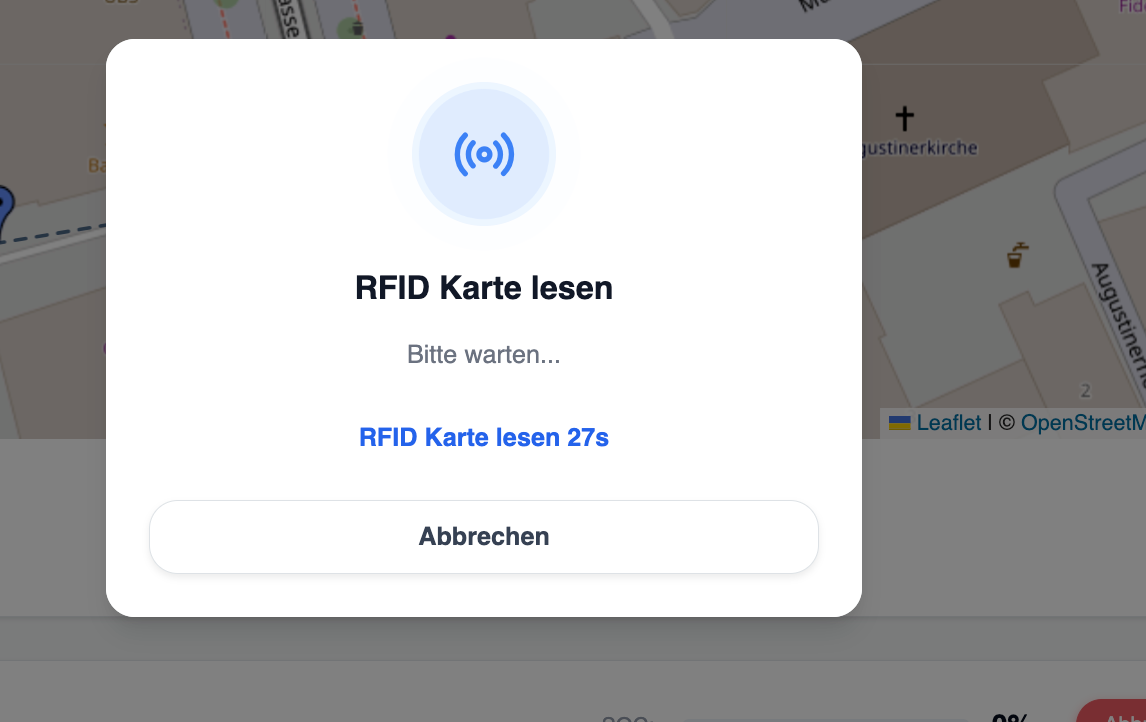
After pressing the button, a pop-up window opens with a timer counting down 30 seconds. During these 30 seconds, an RFID card can be held up to the charging station and it will then appear in this pop-up window. The system now offers the option of copying the card number to the clipboard or, if it is a new, unused number, saving it immediately as a new RFID card.
Instead of an RFID card, a vehicle can also be plugged in during the 30 seconds and the system will then read the VID number (Vehicle Identification Number) of a vehicle. This function is intended for charging stations without RFID readers, where charging is to be started and the charging data evaluated via the VID number (Autocharge or Plug'n Charge ISO 15118 function).
Whether this function is available depends on the charging station or the vehicle. Not all charging stations support this function, or it must be activated by the manufacturer/installation partner. The same applies to vehicles. Not all vehicles support this function or comply with the standards. Eponet is therefore unable to offer any support in this regard.
At some DC charging stations, the function is only available when a vehicle is plugged in.
Replace RFID cards
Replace RFID card
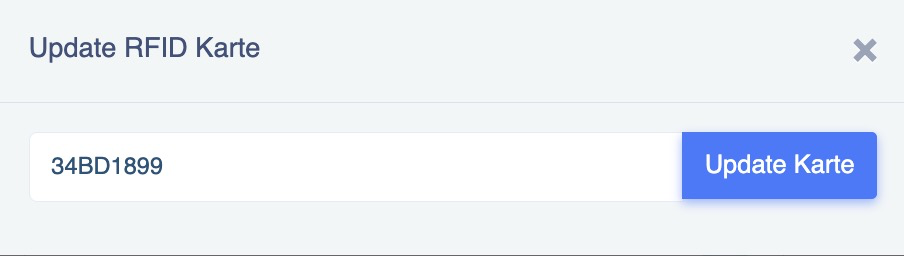
If you have lost your RFID card or entered it incorrectly, you can use the "Replace" function to enter the new RFID card number and retain all authorisations for which the card is approved. Please use this function with caution – it may affect evaluations and history:
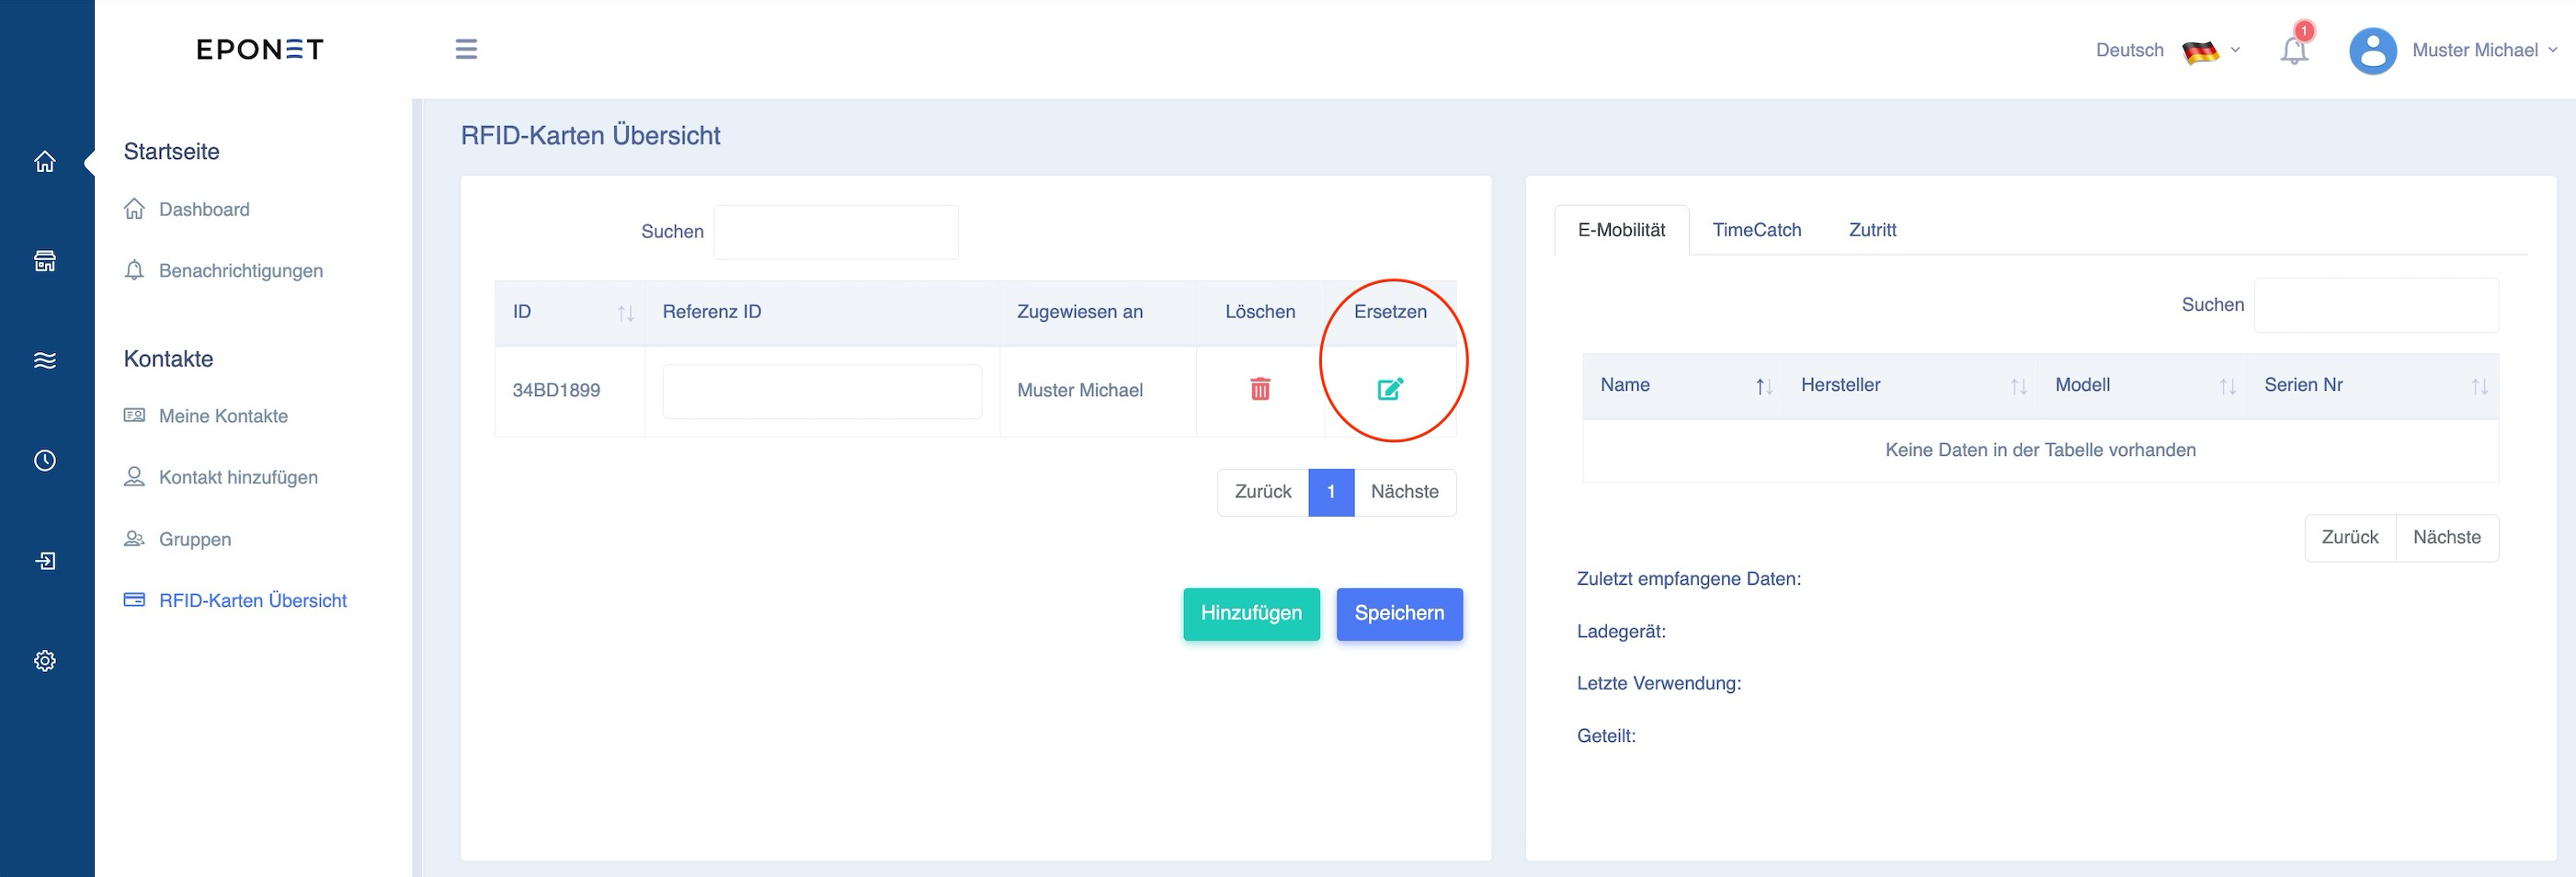
To "Replace", click on the green edit icon and the following window will open. Here you can enter the new or correct RFID number and activate it with Update Card:
Advantages of the replace function
Replacing the card means that all RFID invitations remain valid. This means that if you are invited to charge at certain locations, these invitations remain valid.
RFID card management - machines
RFID cards can be managed in various locations.
On the home page in the RFID card overview, under E-mobility or under Machines.
This chapter describes the function in machine control.
Here you can see the RFID card(s) on this account in connection with machines.
An RFID card can have different functions depending on the configuration. For example, for charging authorisation at charging stations, for starting a machine (washing machine, tumble dryer, etc.) or for access control (opening doors).
Inviting RFID cards
If you want to load an RFID card that has been added to a tenant's account, you can do so using the "Load an RFID card" button. Click on the button (marked in red below) and a new window will open.
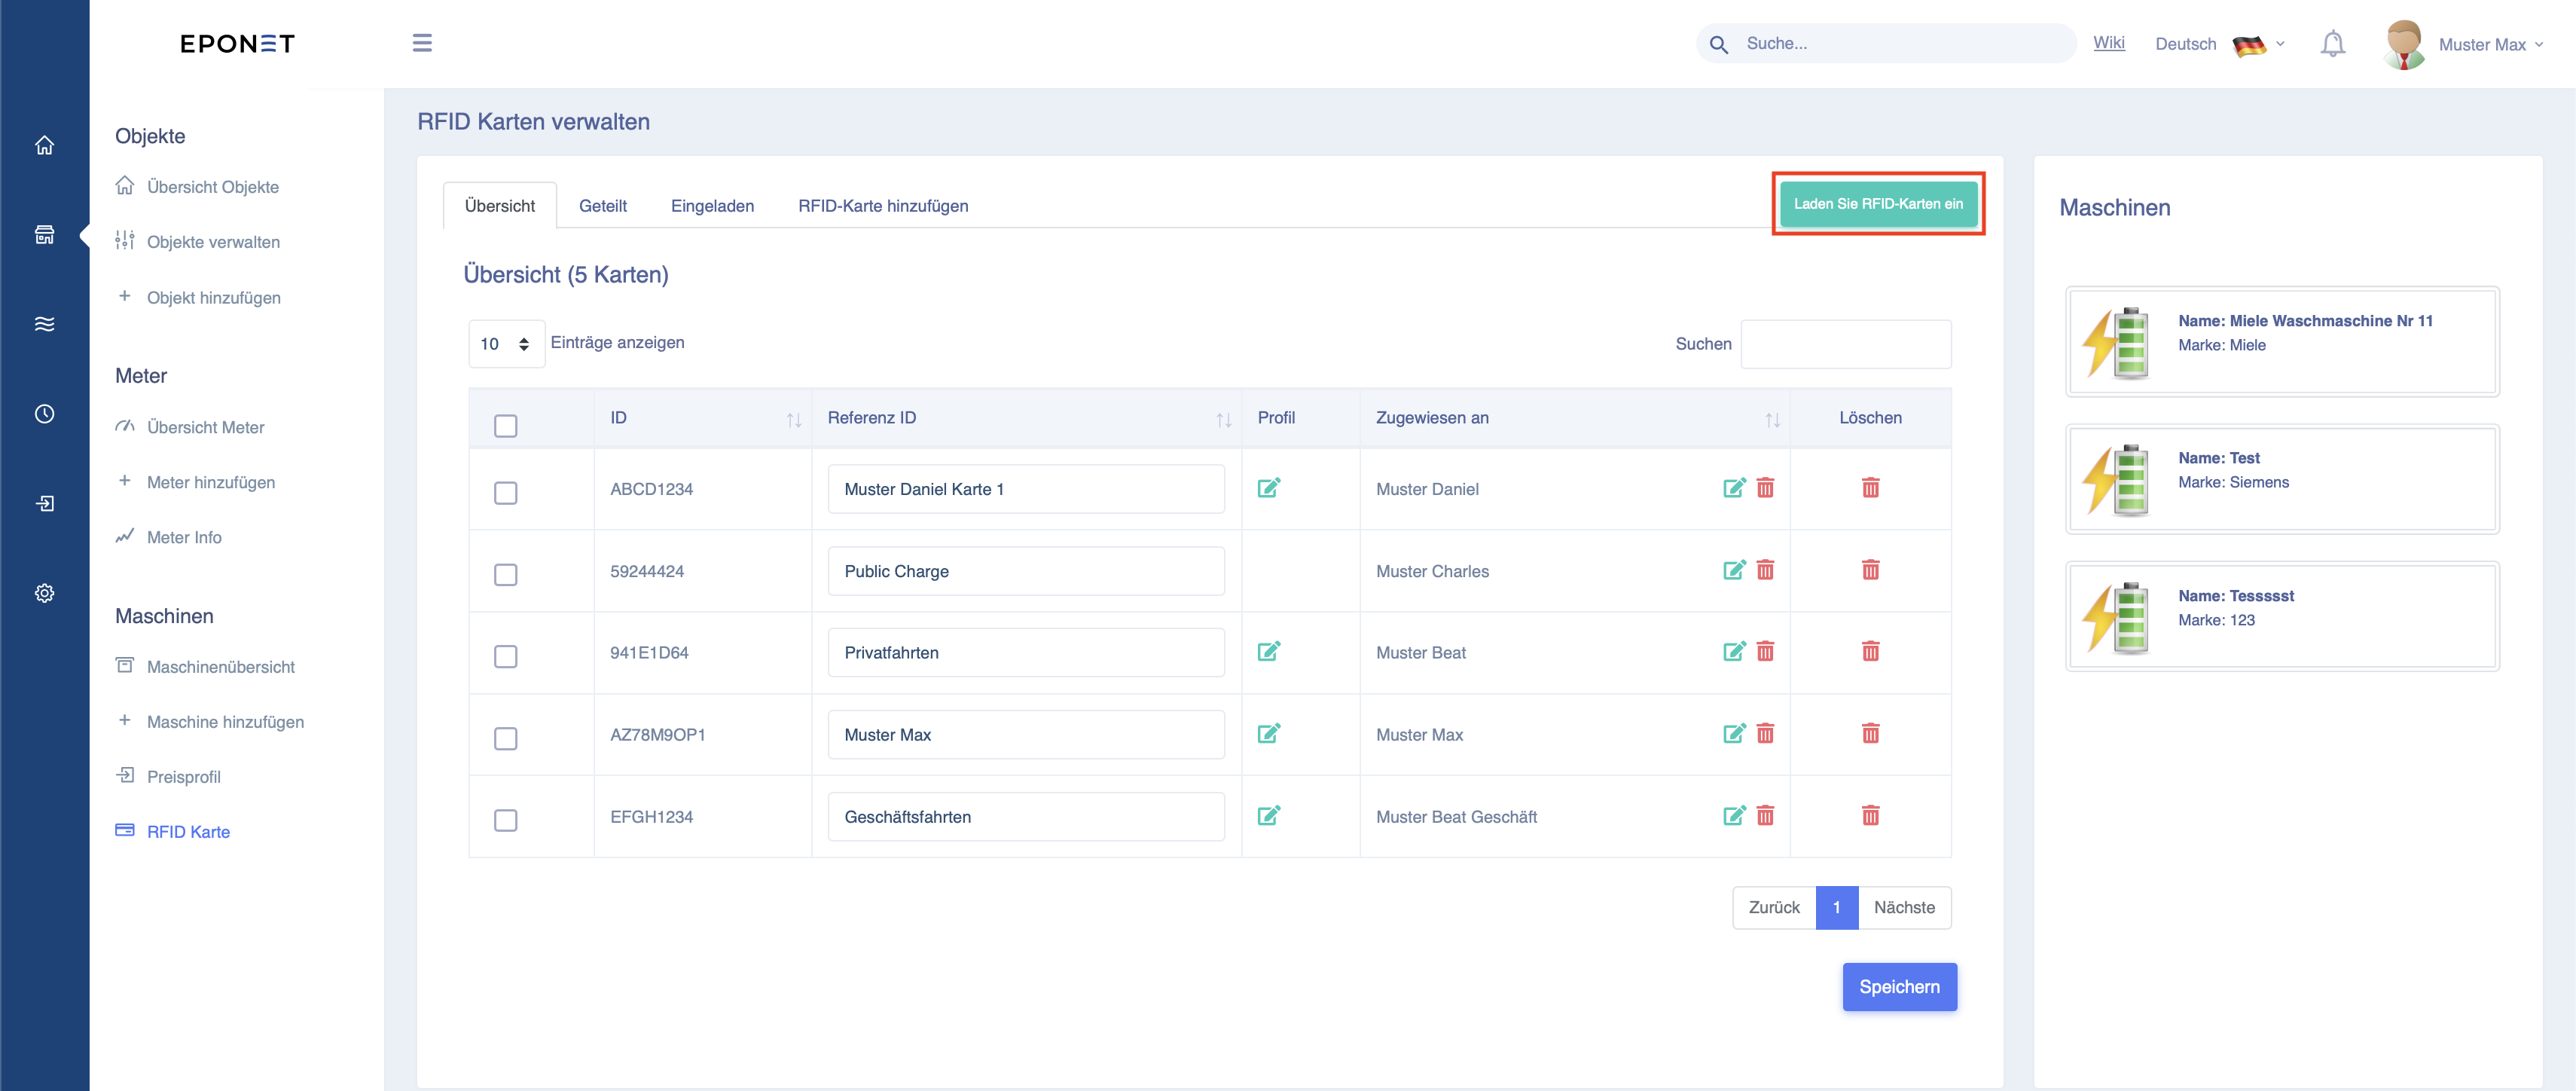
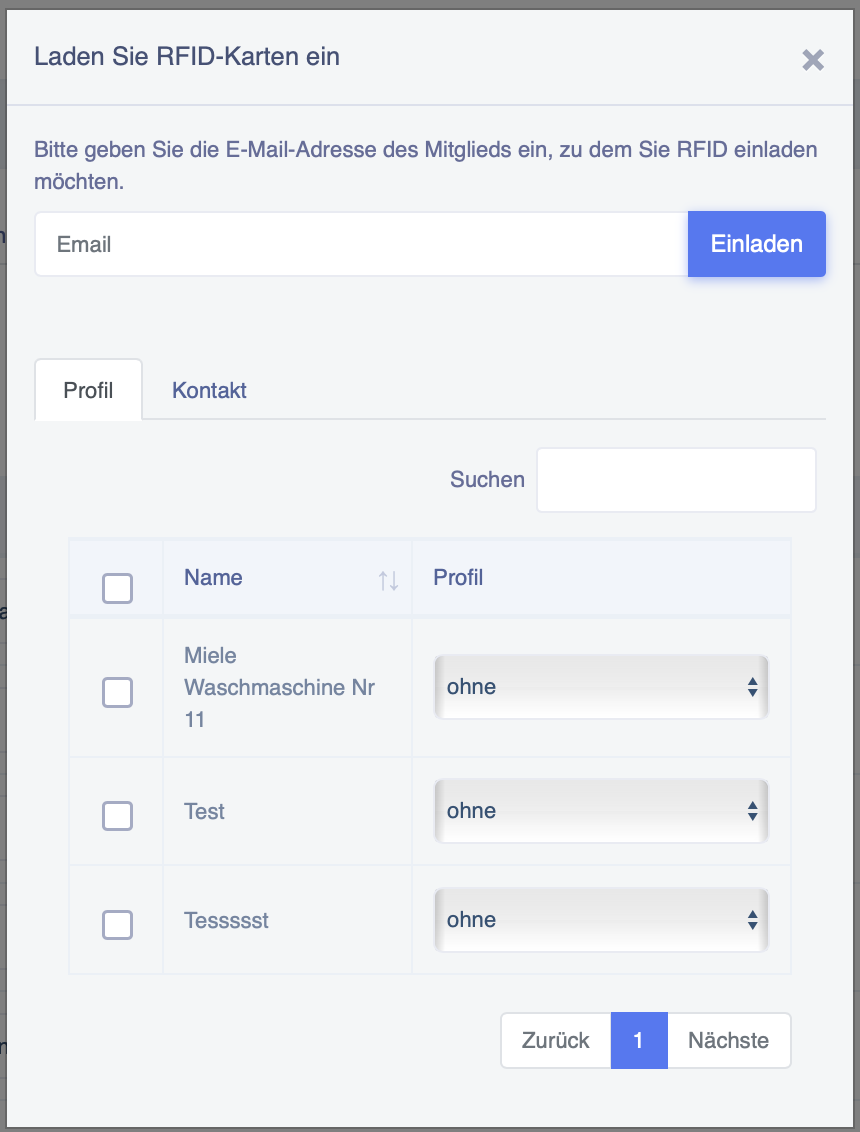
Now enter the tenant's email address and tick the devices that the tenant is allowed to use, for example, for washing. You must also select the appropriate profile so that billing can take place. Then
click on "Invite".
After inviting the tenant, they will receive a notification and can share their RFID card. The machine can then be used.
Add RFID cards
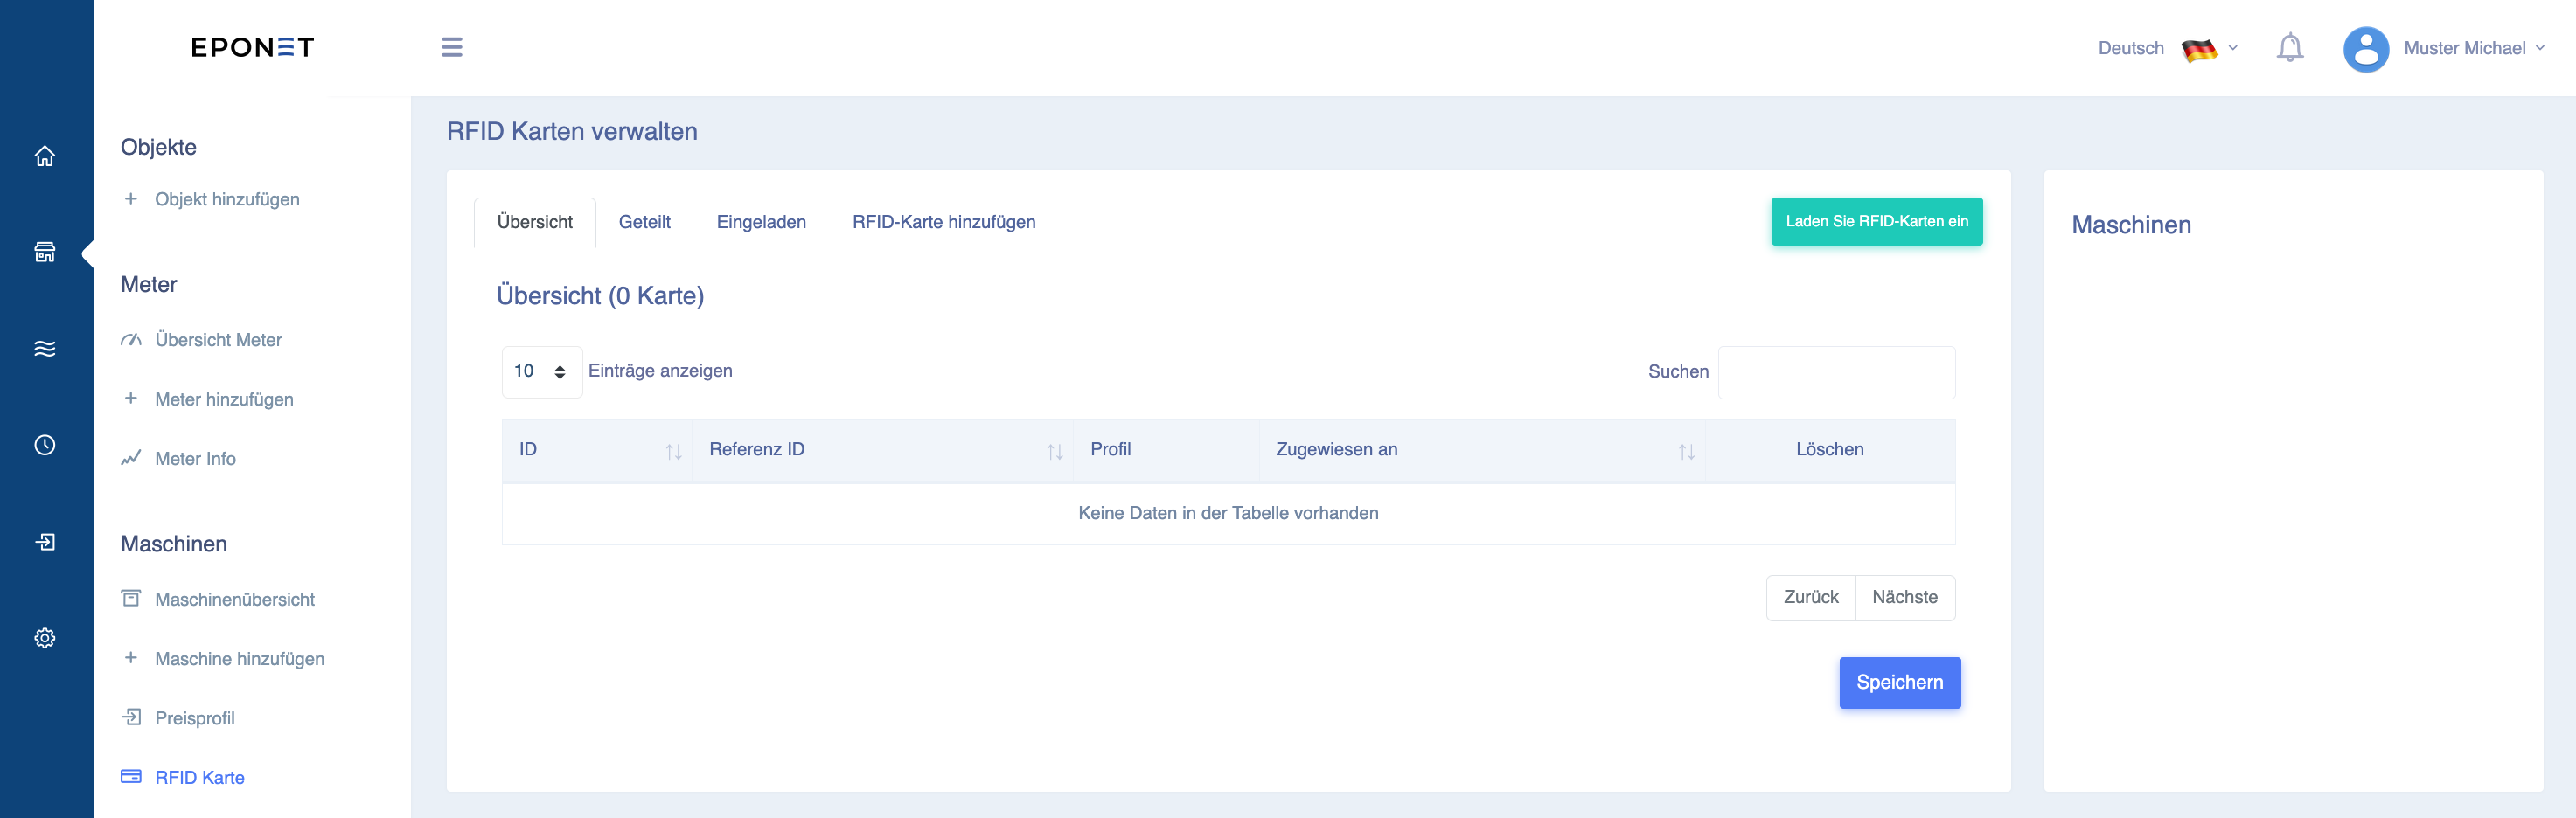
Here you will see the four tabs: Overview, Shared, Invited and Add RFID card.
Under Add RFID card, you can register your card: Enter the number on your Eponet RFID card and confirm with "Add card":
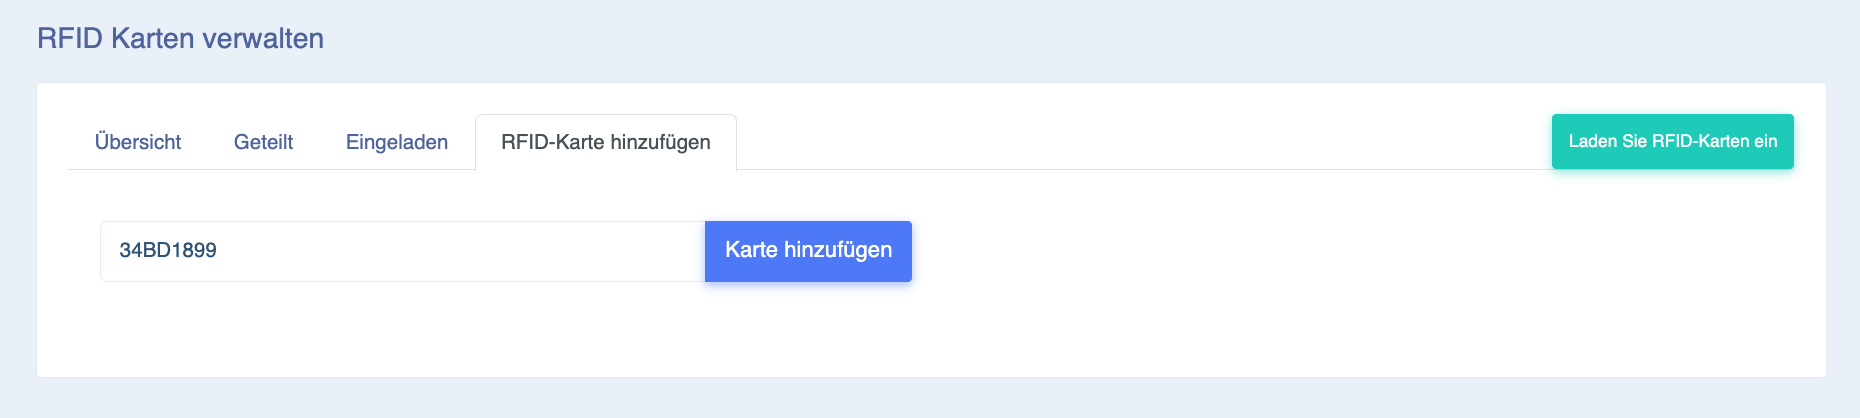
RFID numbers are entered in Eponet without spaces or colons. If your RFID card has a number printed on it, e.g. 12:34:56:78, this must be entered without spaces or dots, i.e. 12345678
The card will then appear in the table (under the Overview tab). In the Reference ID field, you can save your own details for your information (e.g. name of a family member). A card can also be removed again by clicking Delete.
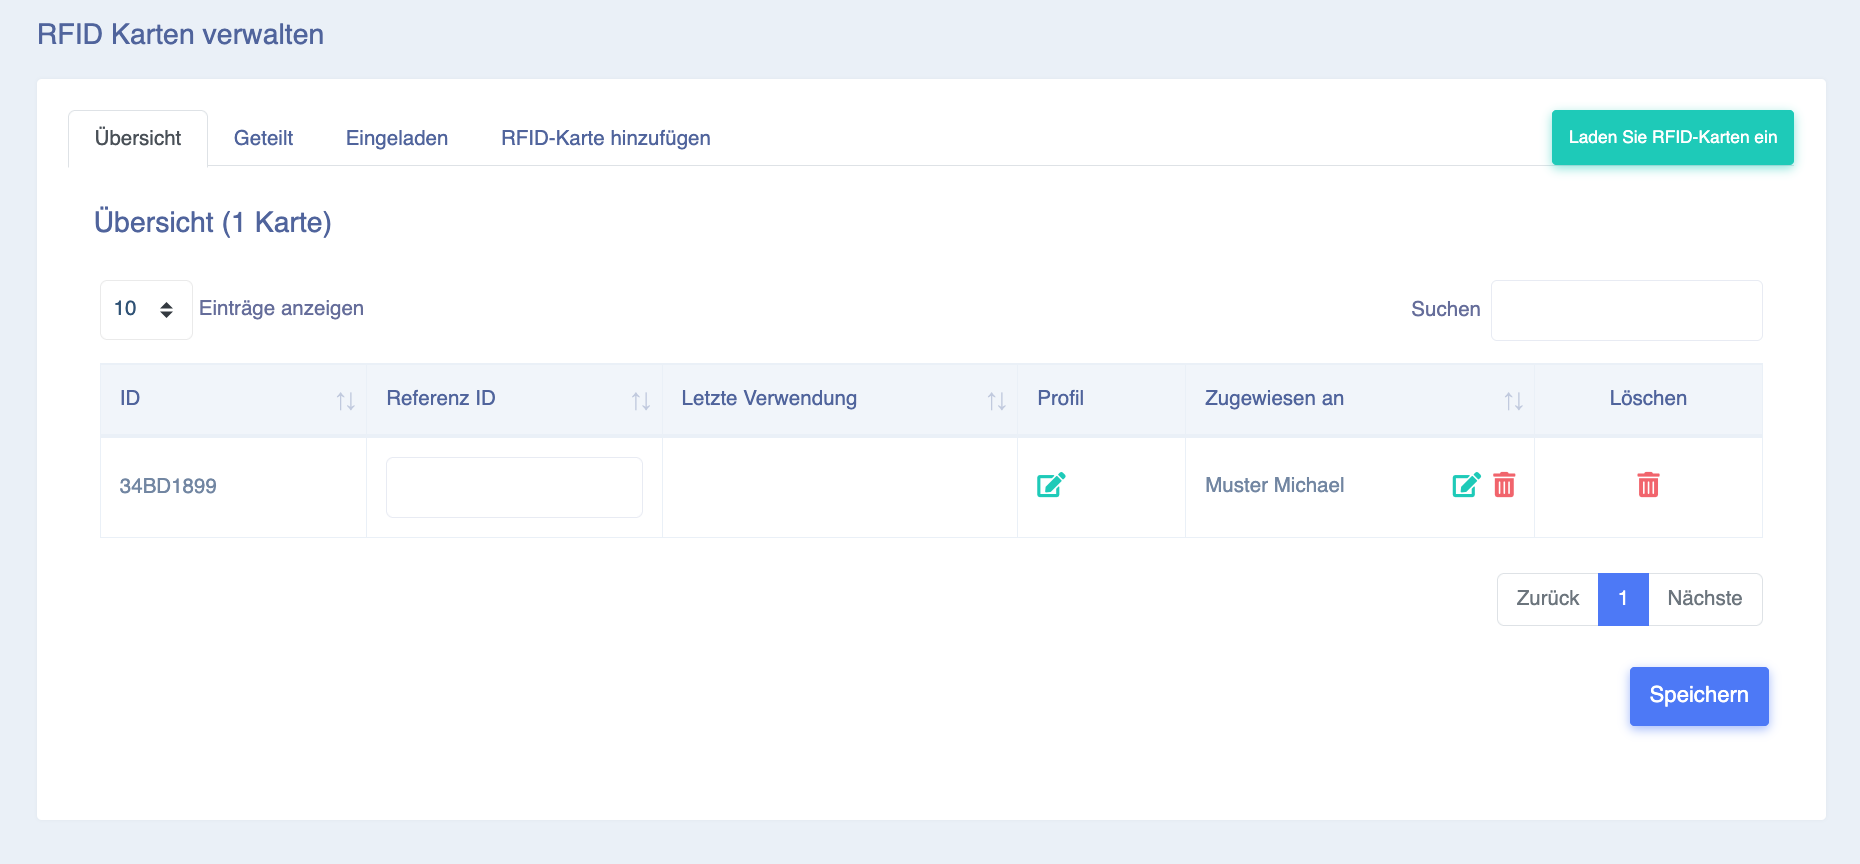
Shared tab
Under the Shared tab, you can see where you have shared your RFID card(s) or where and at what price you can start a machine with an RFID card. Click on your RFID card here and you will see in this example that this RFID card can be used to wash on the "Miele washing machine no. 11" (and at what price):
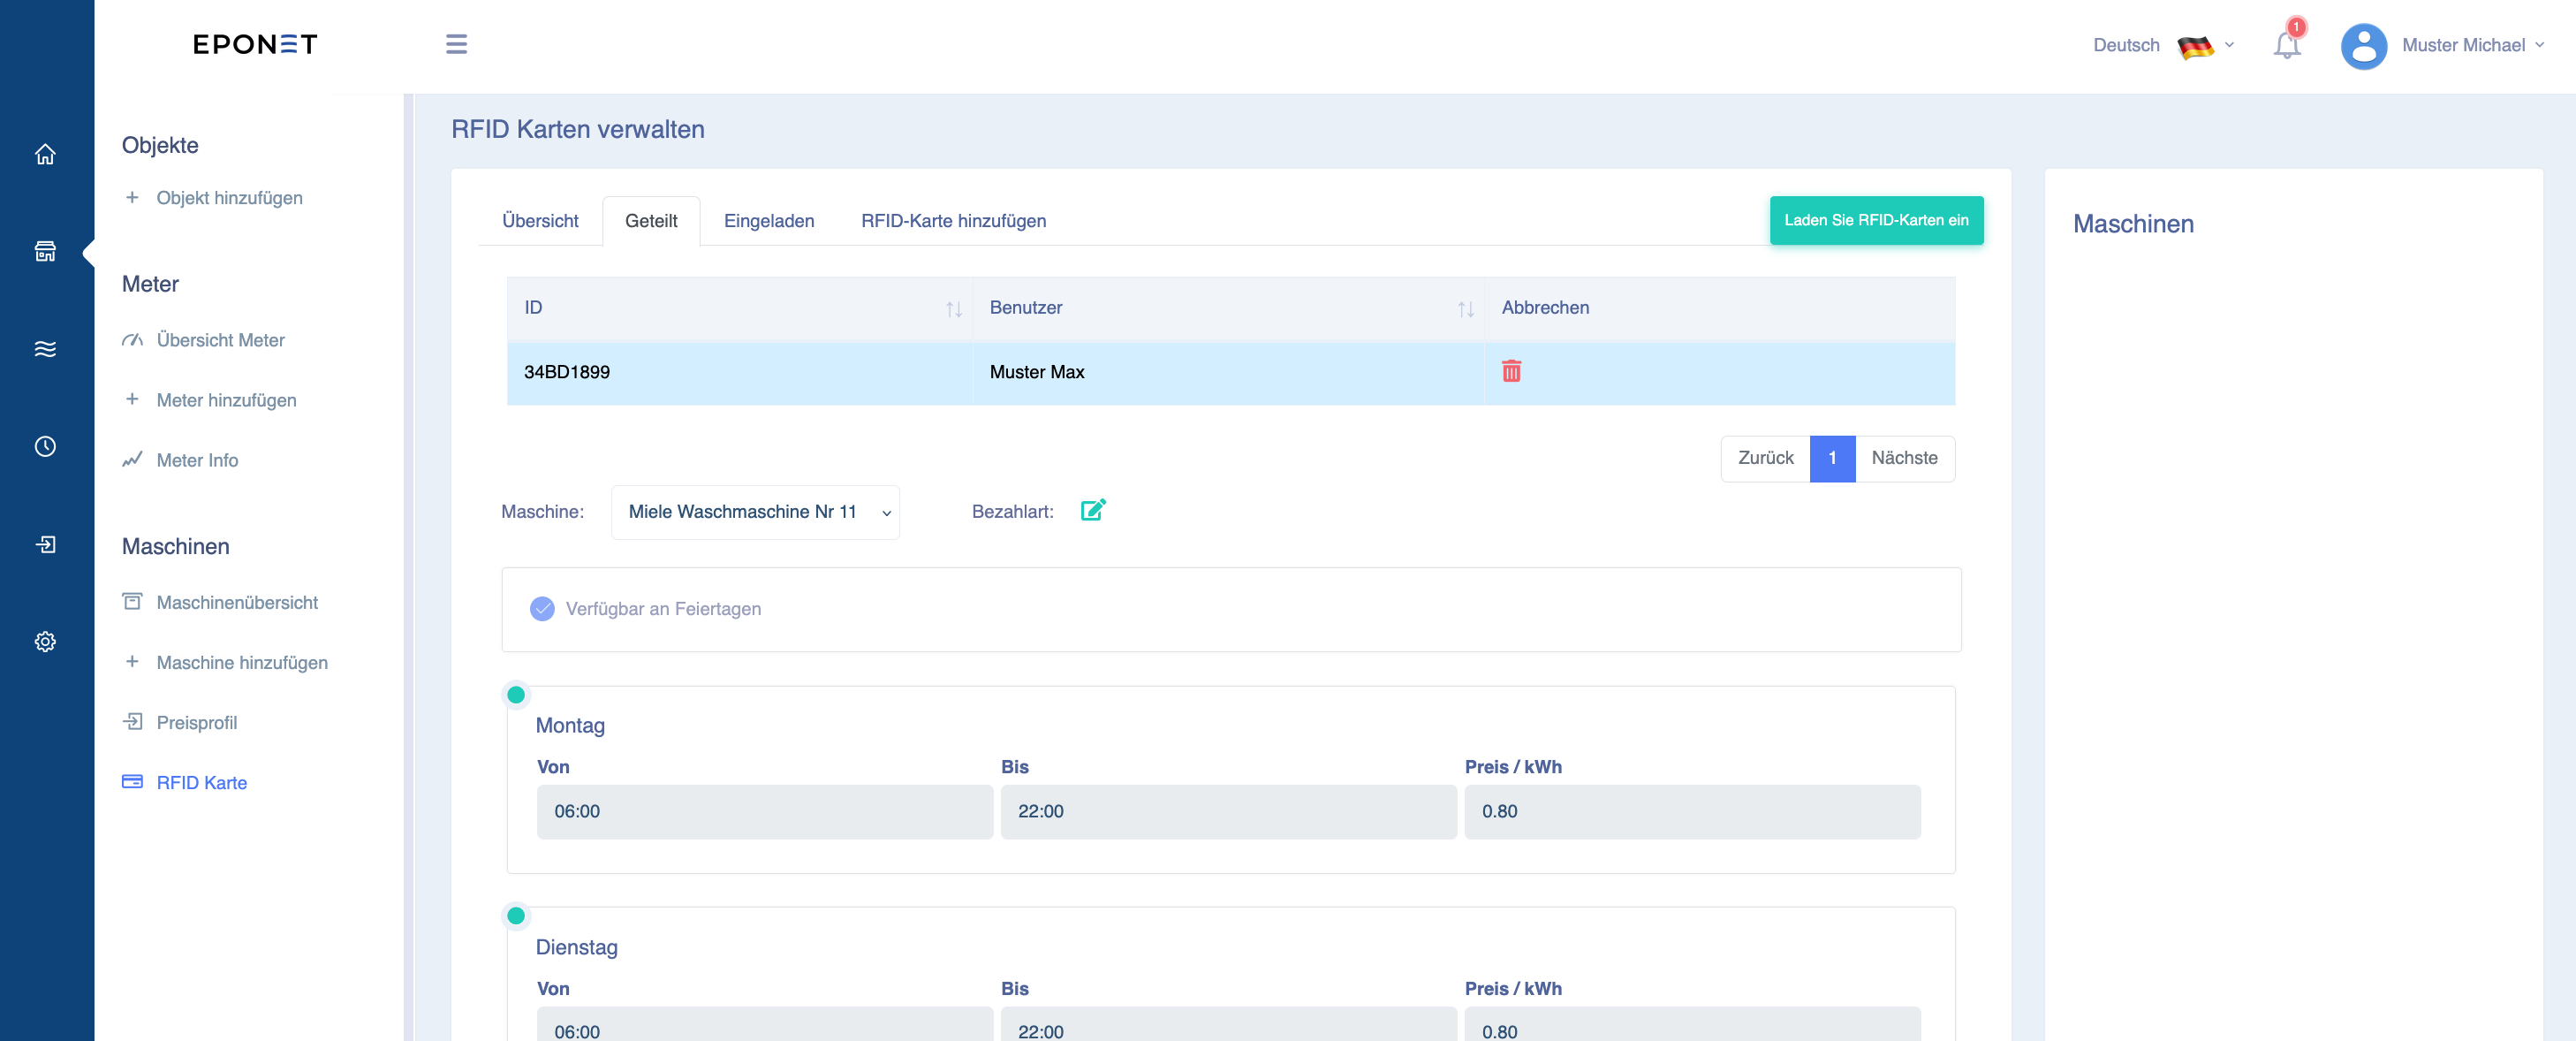
No machines or prices visible under "Shared" yet? You must first be invited by the operator. To do this, contact the operator and give them the email address of your account so that they can invite you.
"Invited" tab
Under the Invited tab, as an infrastructure operator, you can see who is invited to use which machine at what price. Click on your RFID card here and you will see in this example that this RFID card is authorised to wash on "Miele washing machine no. 11" (the price can be assigned or changed under Profile):
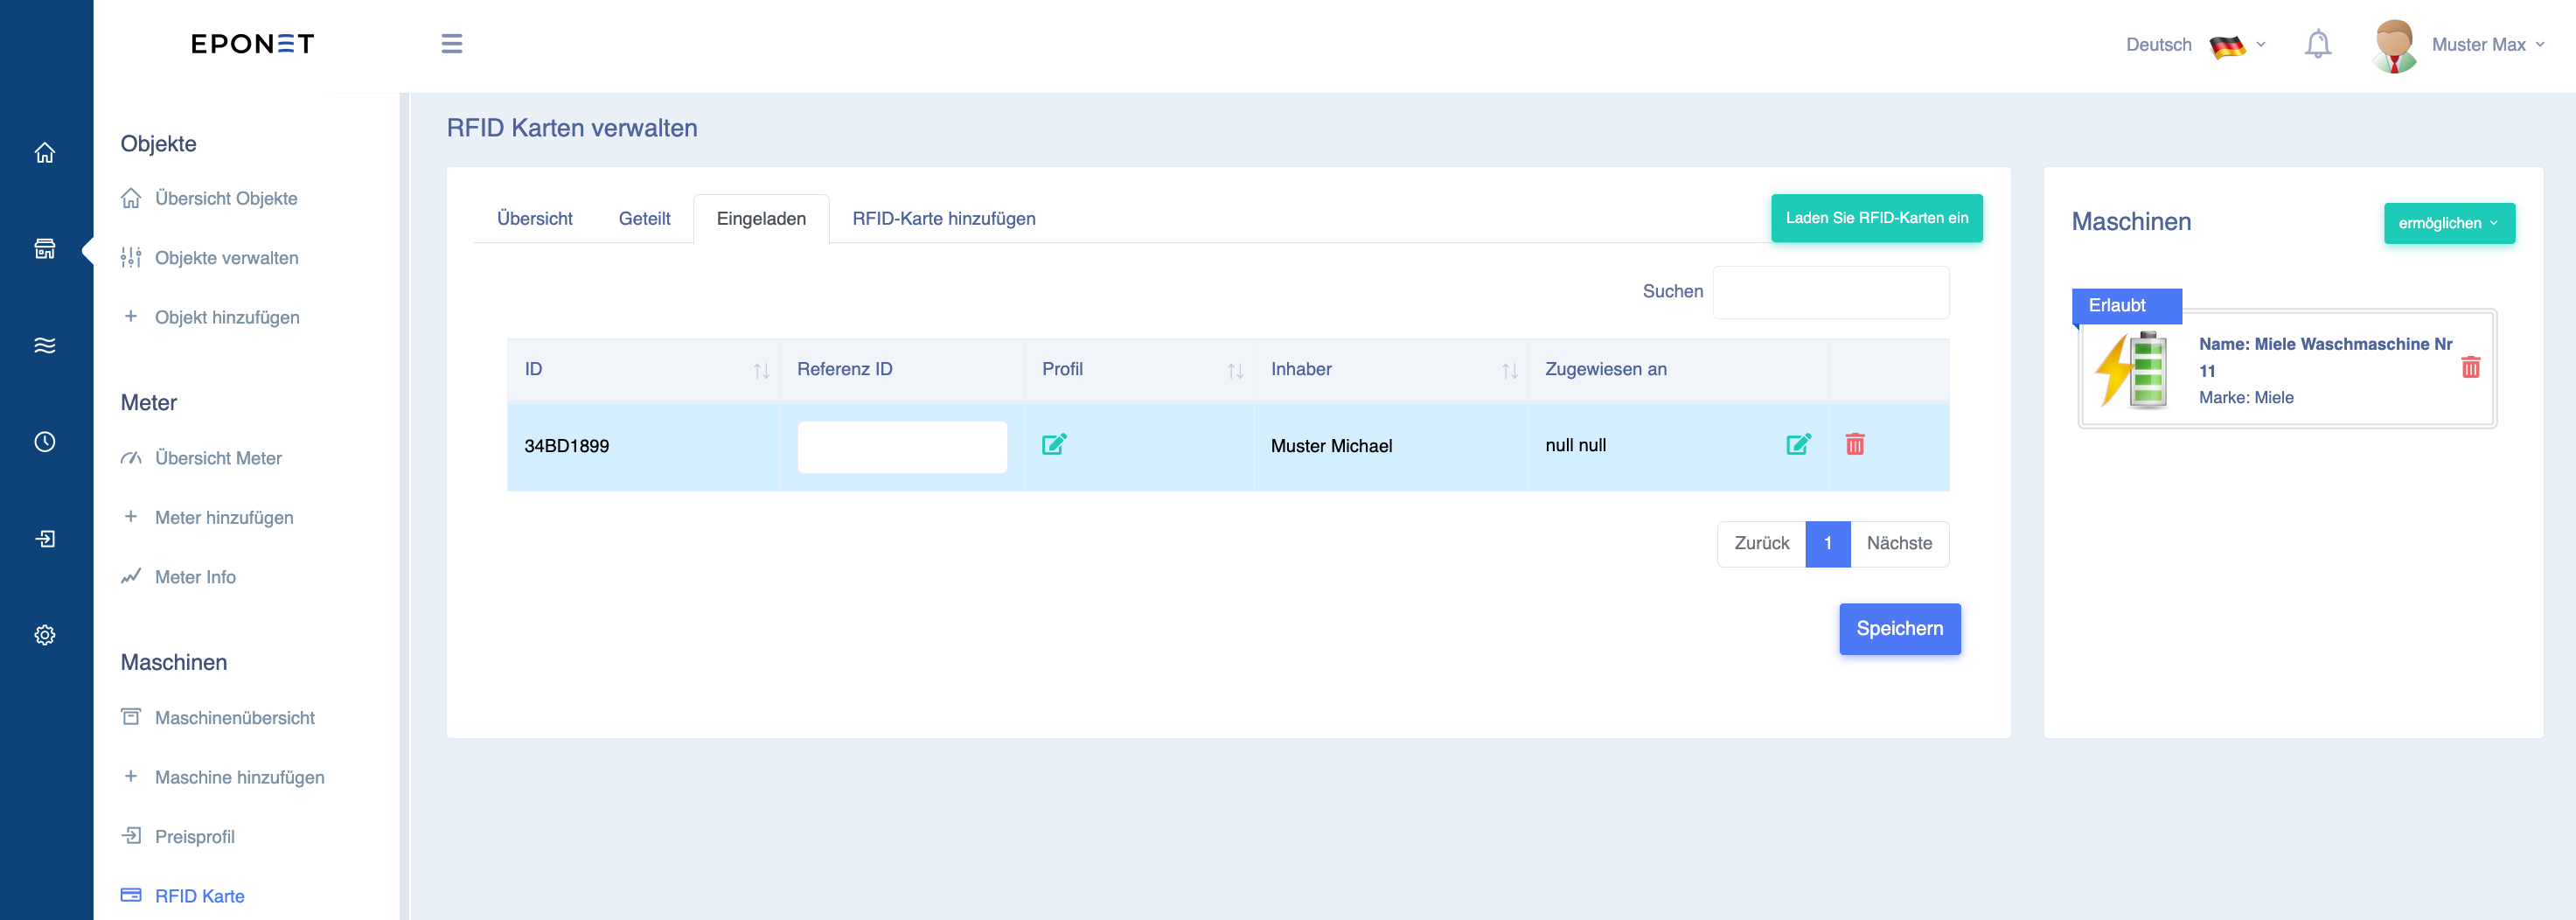
If an exclamation mark icon appears here under "Invited" for an RFID card, this means that the user has been invited without a price profile and can therefore use the machine free of charge.
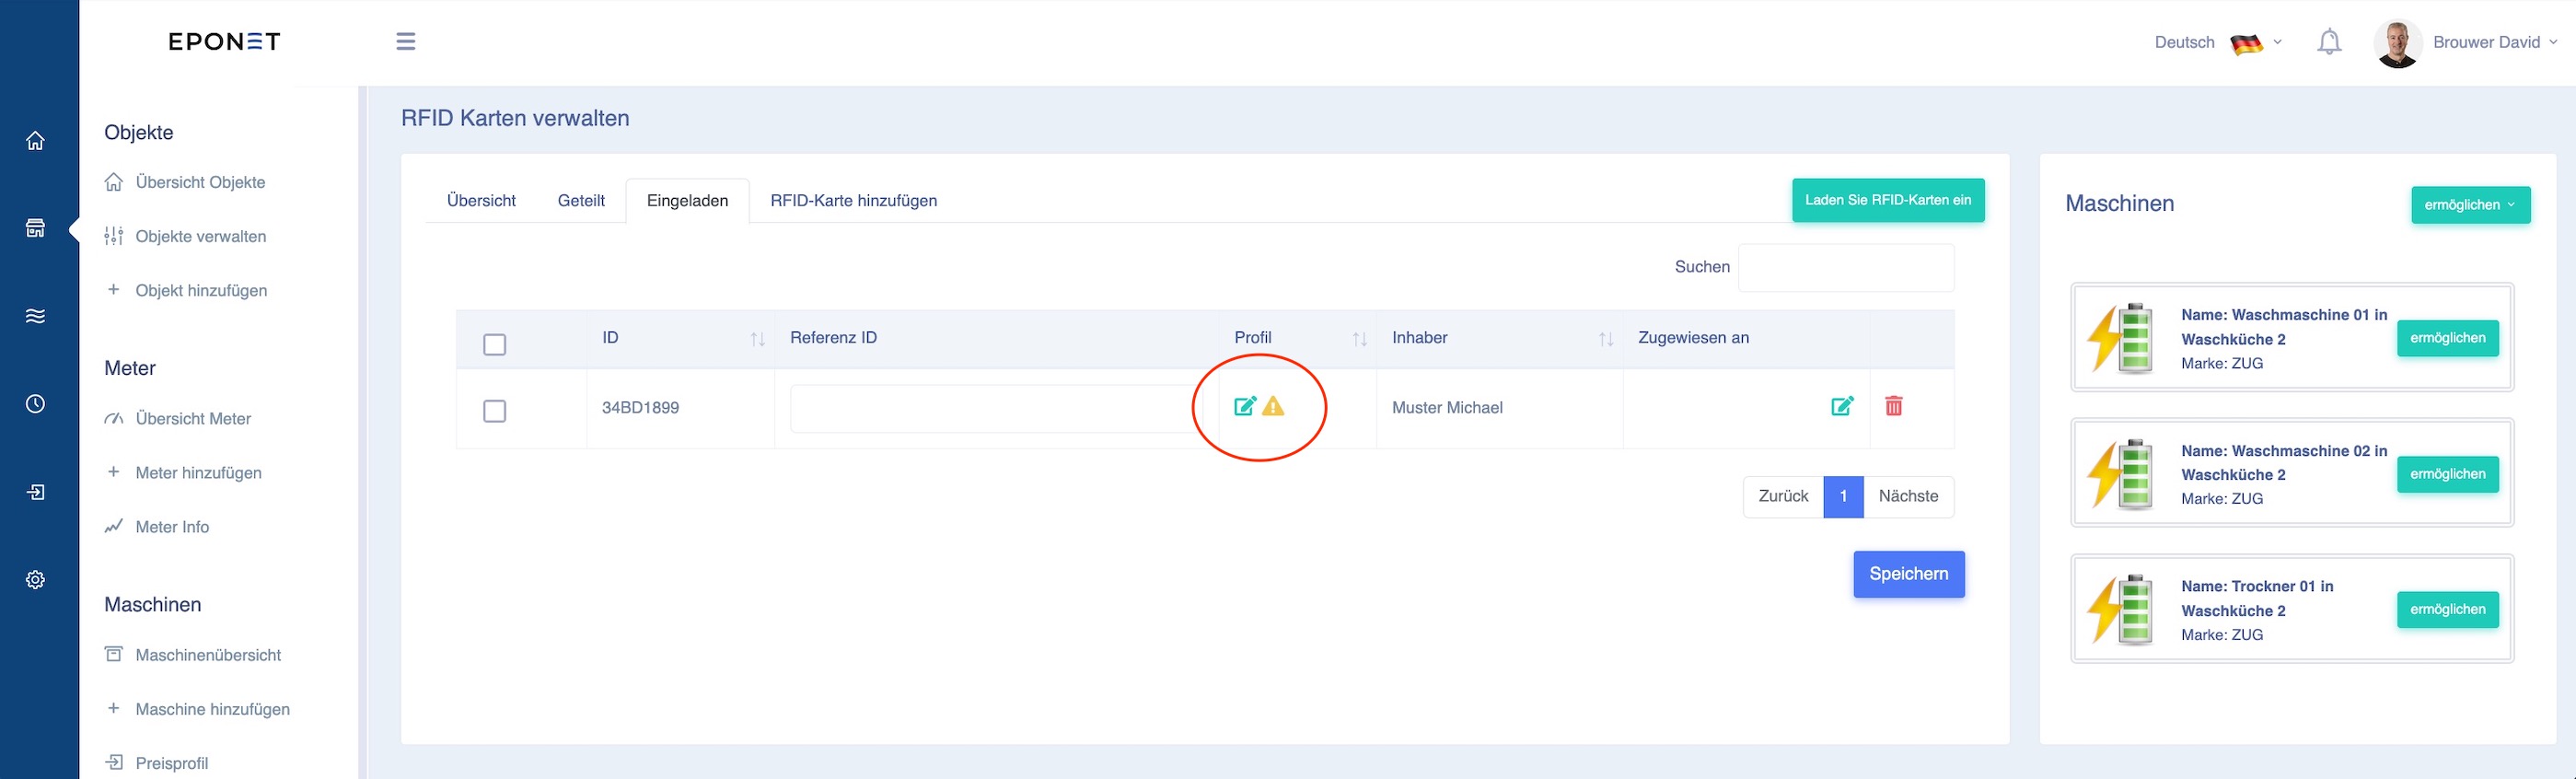
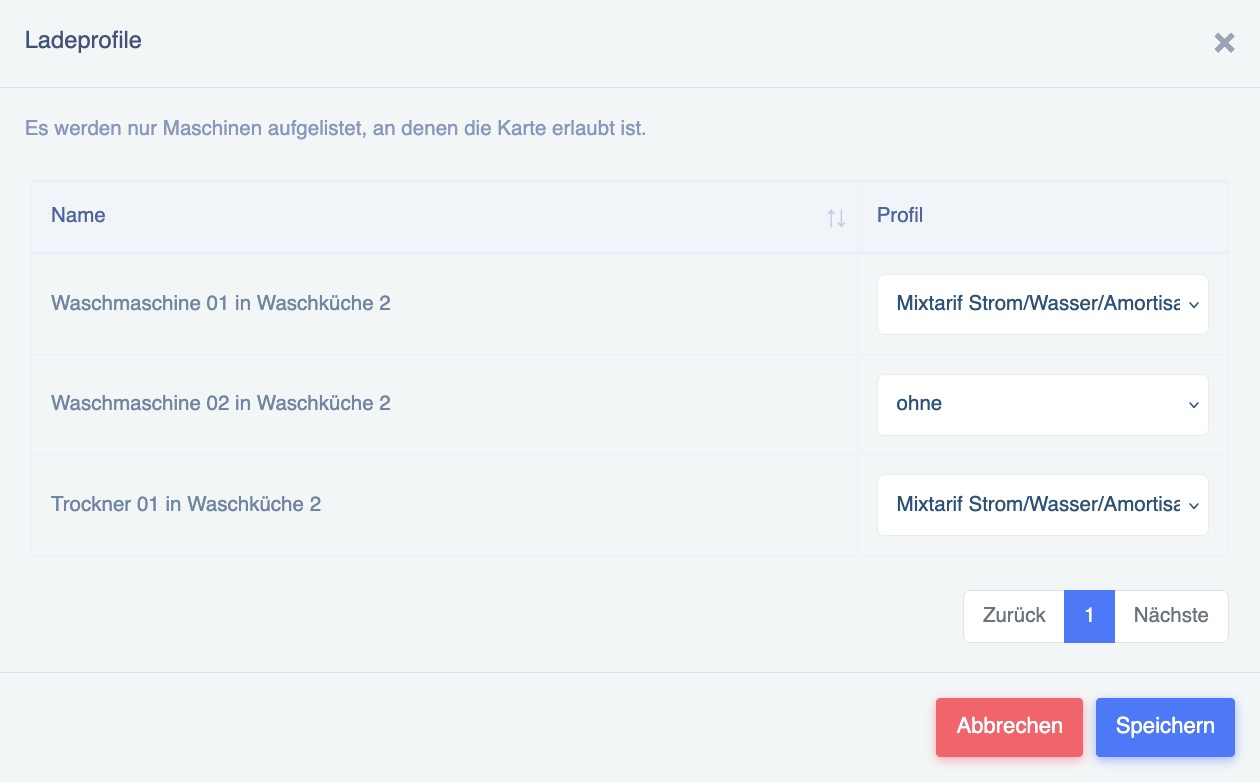
The green edit icon can be used to check or assign prices. A window opens. In this example, you can see that no price has been assigned to the second machine:
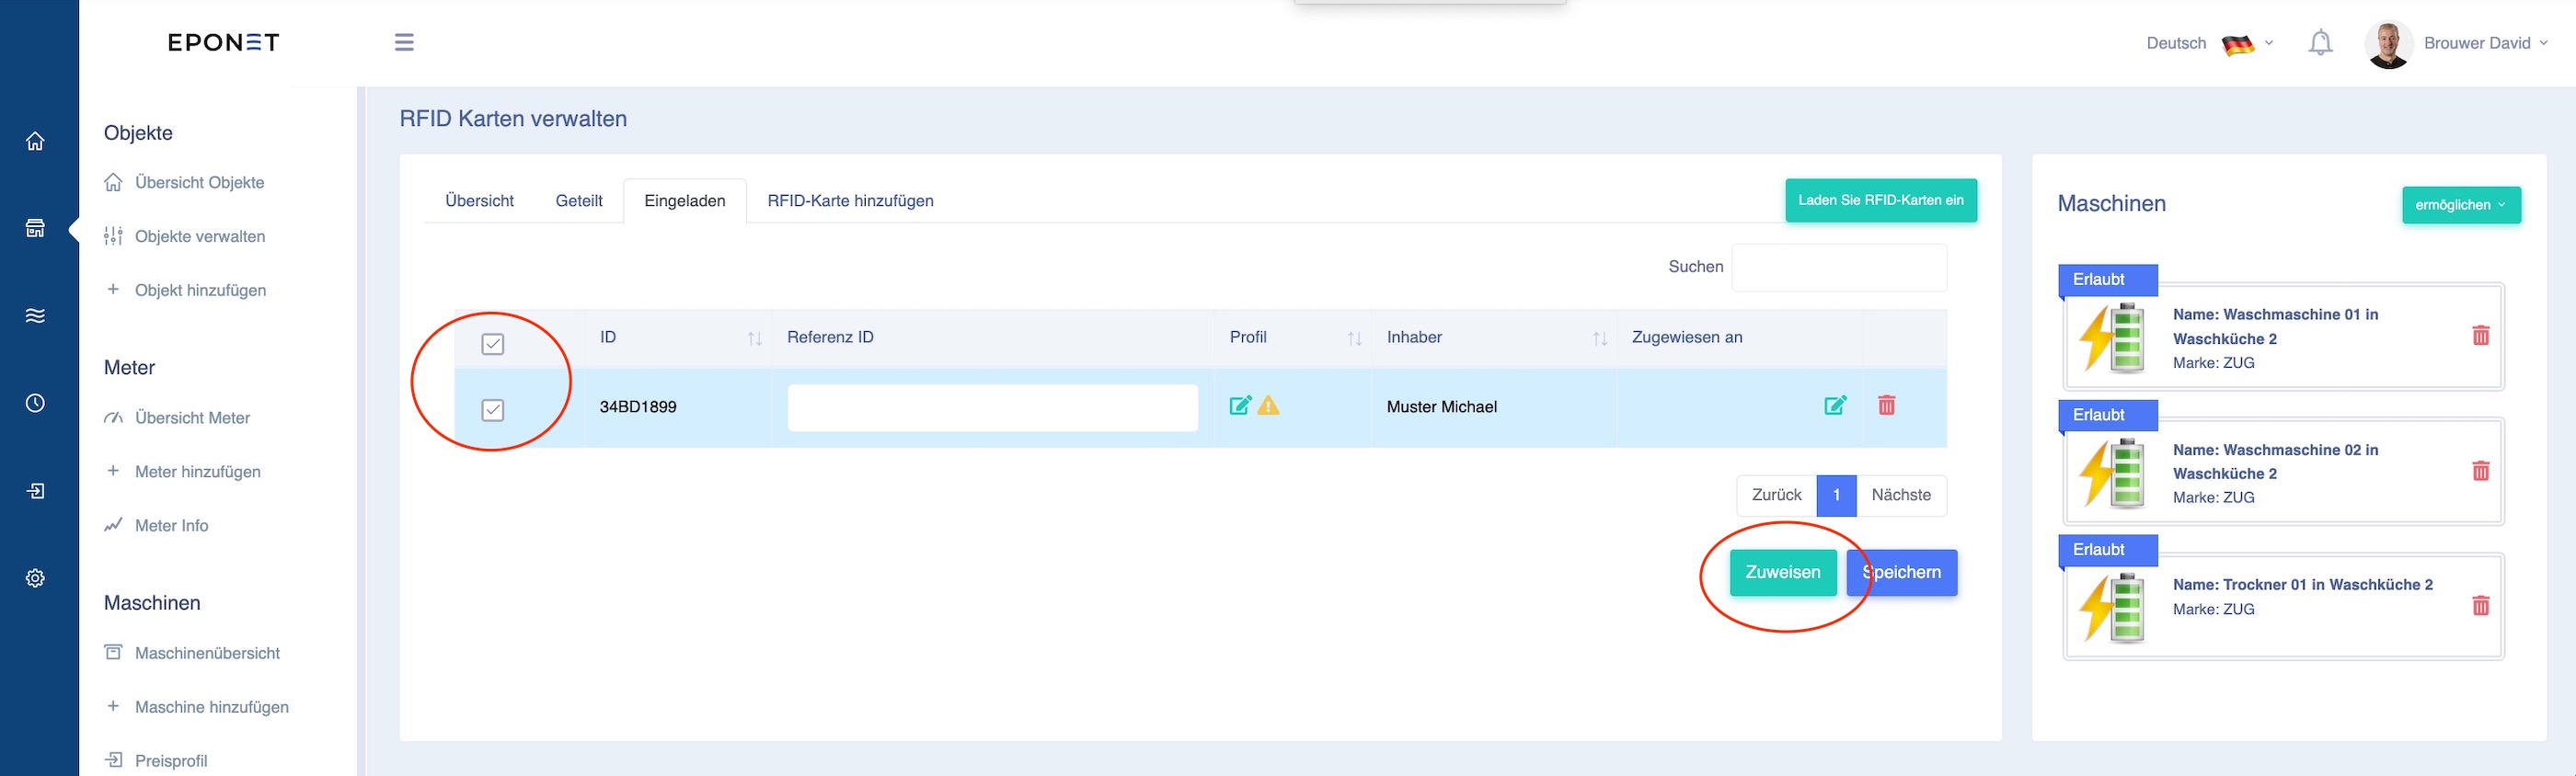
The "Invited" tab also offers the option of batch management for invited RFID cards. To do this, select one or more RFID cards and click on the green "Assign" button:
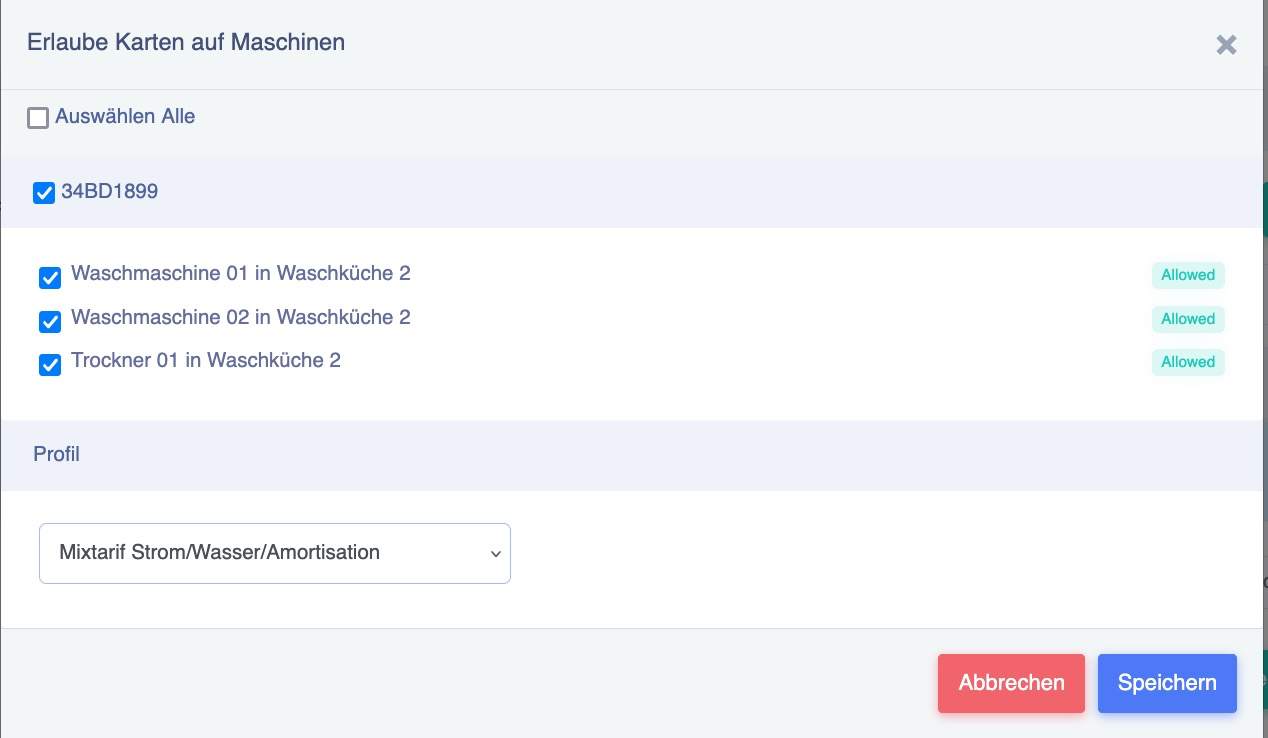
In the following window, you can now assign the authorisation and price profile to an RFID card in one step:
If you have an Eponet RFID card, the number printed on the card is also the number stored on the card that is read. This is not always the case. RFID cards from other providers can also be stored, provided they comply with the current RFID standard for charging stations.
Supported RFID technology: Passive HF RFID tags according to ISO/IEC
14443 or ISO/IEC 15693 (NFC) at 13.56 MHz are supported
. The question may arise as to whether MiFare Classic is also supported, and if so, 1k or 4k. The answer is that it does not matter. The charging station only reads the UUID of the chip. It therefore does not matter whether the chip has 1k or 4k memory.
It is not recommended to write to RFID cards, as depending on the charging station, the value stored in the memory may be read instead of the UUID. This can lead to incompatibility, e.g. with Hubject.
RFID cards - Receive receipt by e-mail
Do you have several RFID cards – for example, one for private journeys and one for business journeys – and would you like to receive a receipt by email only for the business cards? This can be set up according to your preferences.
The email address for a receipt is stored in the address book in your account.
Here is an example with Beat Muster.
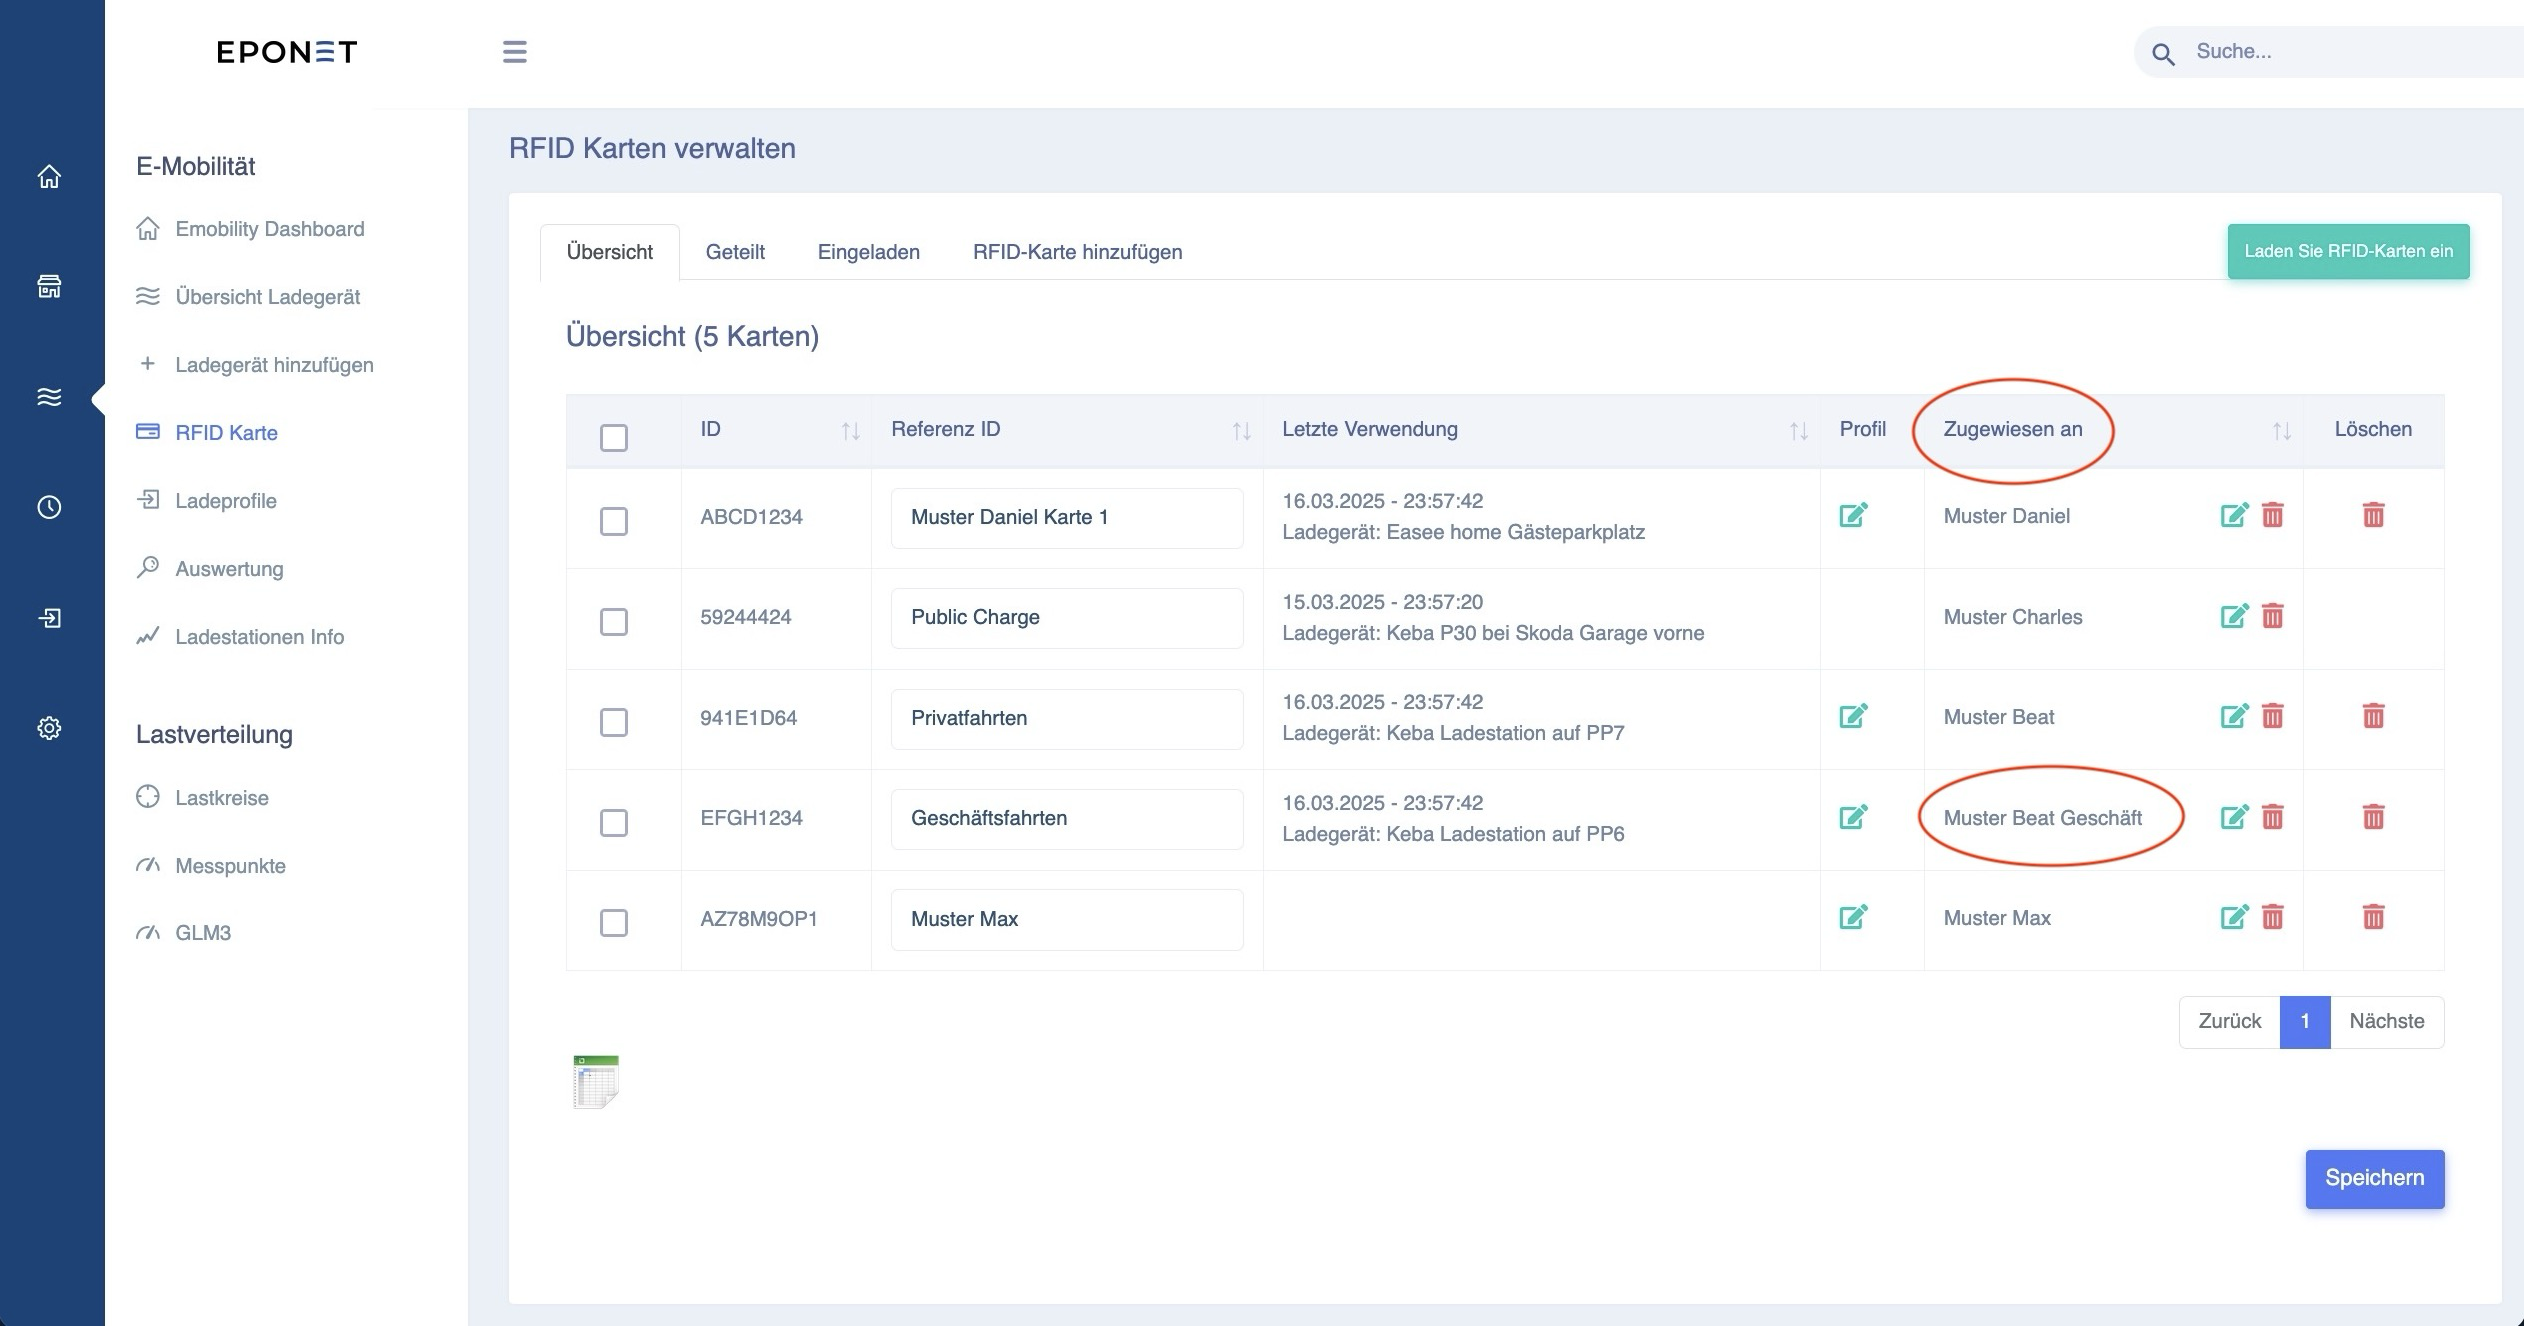
Beat Muster has two RFID cards. In the Reference ID field, he has already labelled them "Private journeys" and "Business journeys":

Now Beat Muster wants the receipt for the "Business trips" RFID card to always be sent by email to the address: firma@beatmuster.ch.
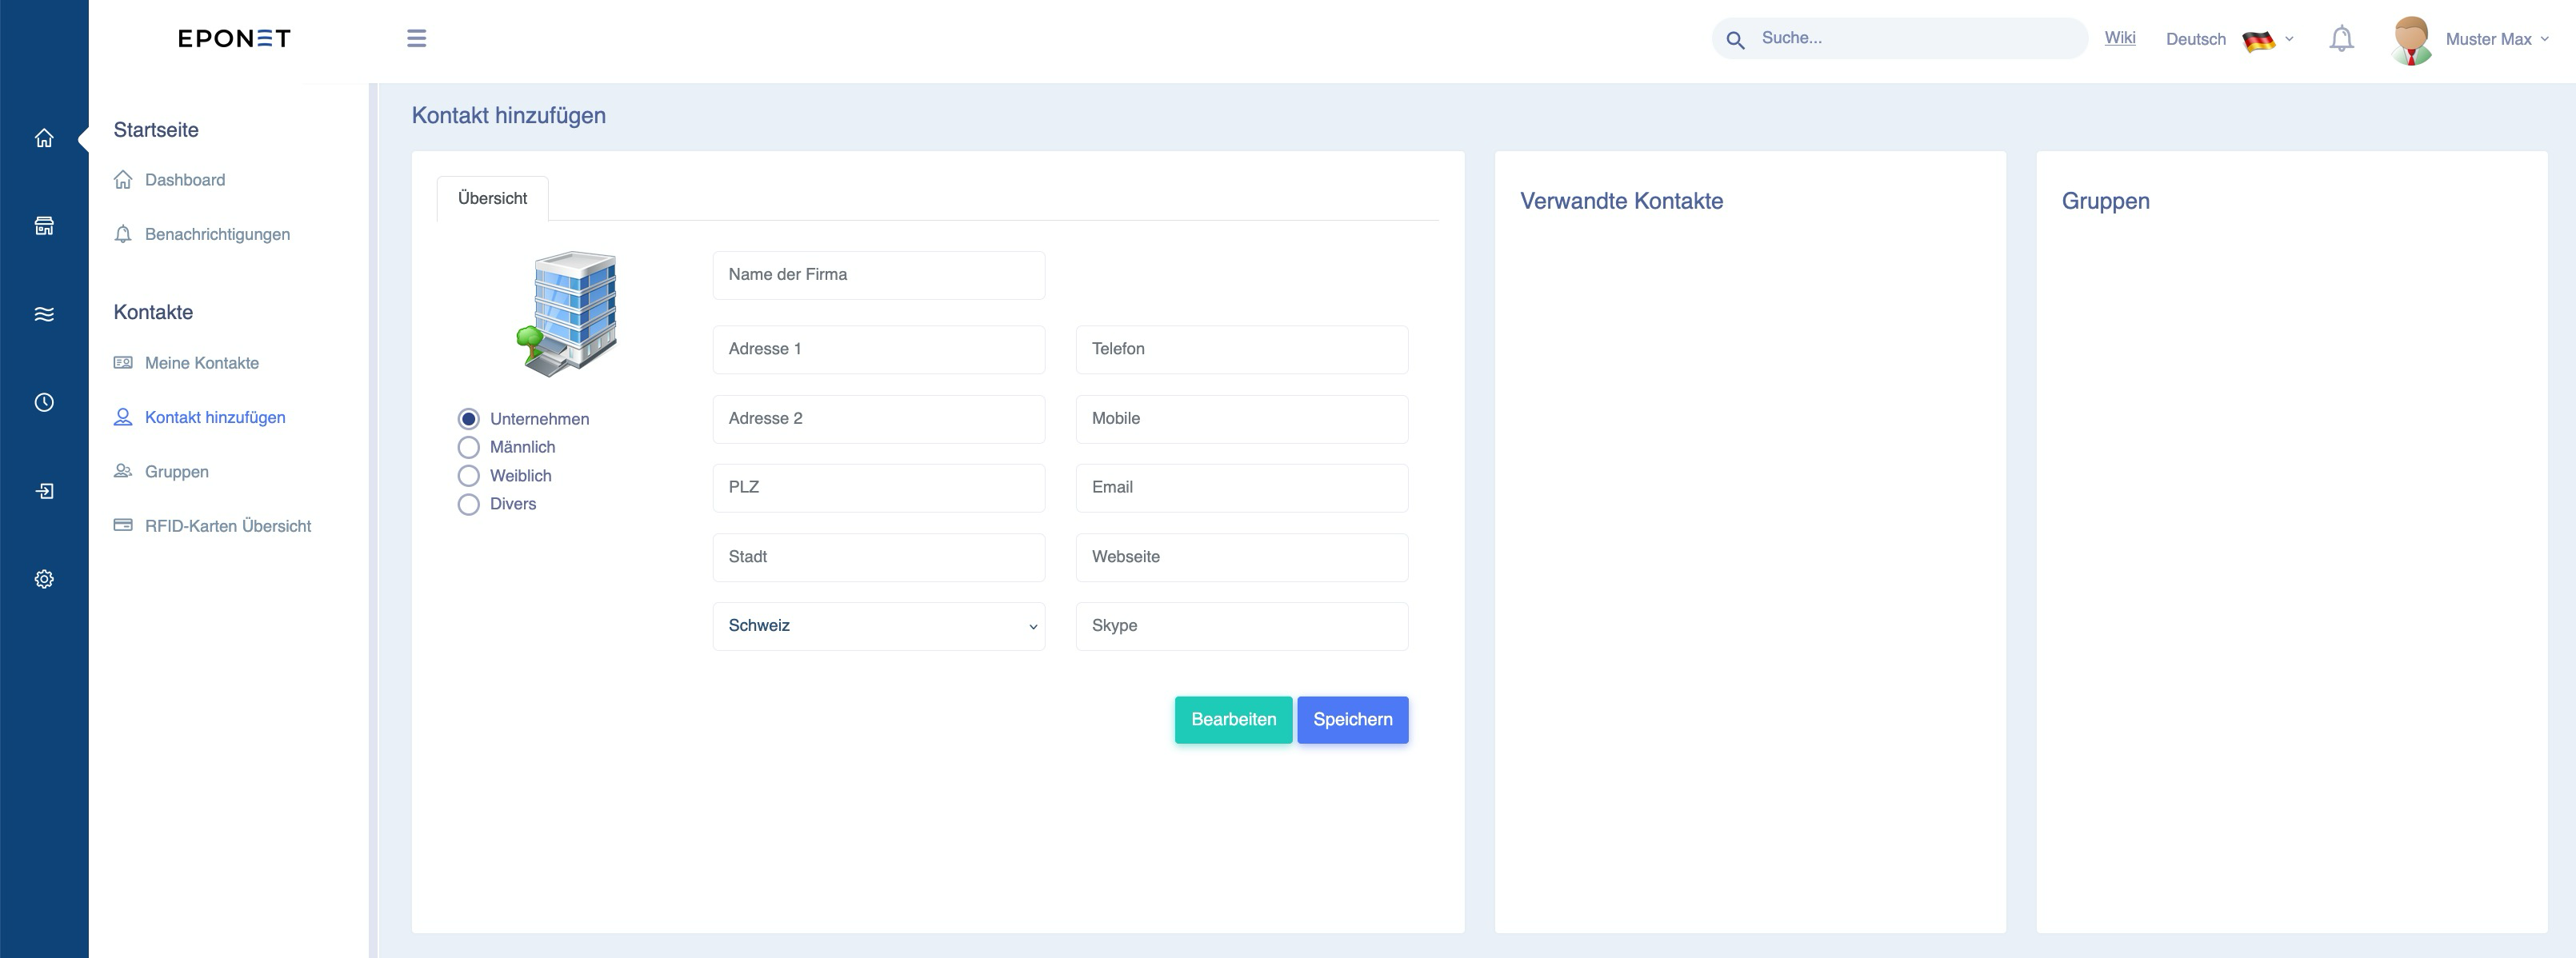
To do this, Beat Muster opens a new contact called Muster Beat Business with "Add contact" and enters this email address there:
For the RFID card (here under E-mobility), this new contact with the desired email address can now be stored in the "Assigned to" field:
Incidentally, if Beat Muster does not want to receive receipts by email for his private journeys, he can create a contact without an email address and assign this contact to the "Private journeys" RFID card.